Publish Rules
Content governance and quality assurance are critical challenges in enterprise-level social media management. Publishing errors, whether from inconsistent messaging, missed approvals, or compliance violations, can lead to reputation damage.
Publish Rules offer a structured solution to these challenges by helping create and implement automated workflows into the publishing process.
It reduces the need for constant manual oversight while ensuring every post adheres to brand guidelines and regulatory standards.
This article explains how to configure and implement Publish Rules to prevent publishing errors and ensure that every post stays compliant and on-brand.
Publish Rule Builder is available on the Premium & Enterprise Plans. See full pricing details.
What Are Publish Rules?
Publish Rules help to monitor and regulate your publishing activities to mitigate any gaps in the content. You can create rules in order to oversee or keep a check on the content going out on your socials and avoid publishing errors.
With Publish Rules, you can:
Automatically assign tags, custom fields, or watchers
Send posts for approval
Trigger notifications via Slack, Microsoft Teams, email, or in-app alerts
Reject posts based on compliance or quality checks
Setting Up Publish Rules
You can access the Publish Rule window in two ways:
Go to Publish Rules from the Statusbrew dashboard
Navigate to Publish from the Statusbrew dashboard and select Publish Rule from the sidebar.
In the Publish Rule window, select Add new rule to access the Publish Rule Builder.
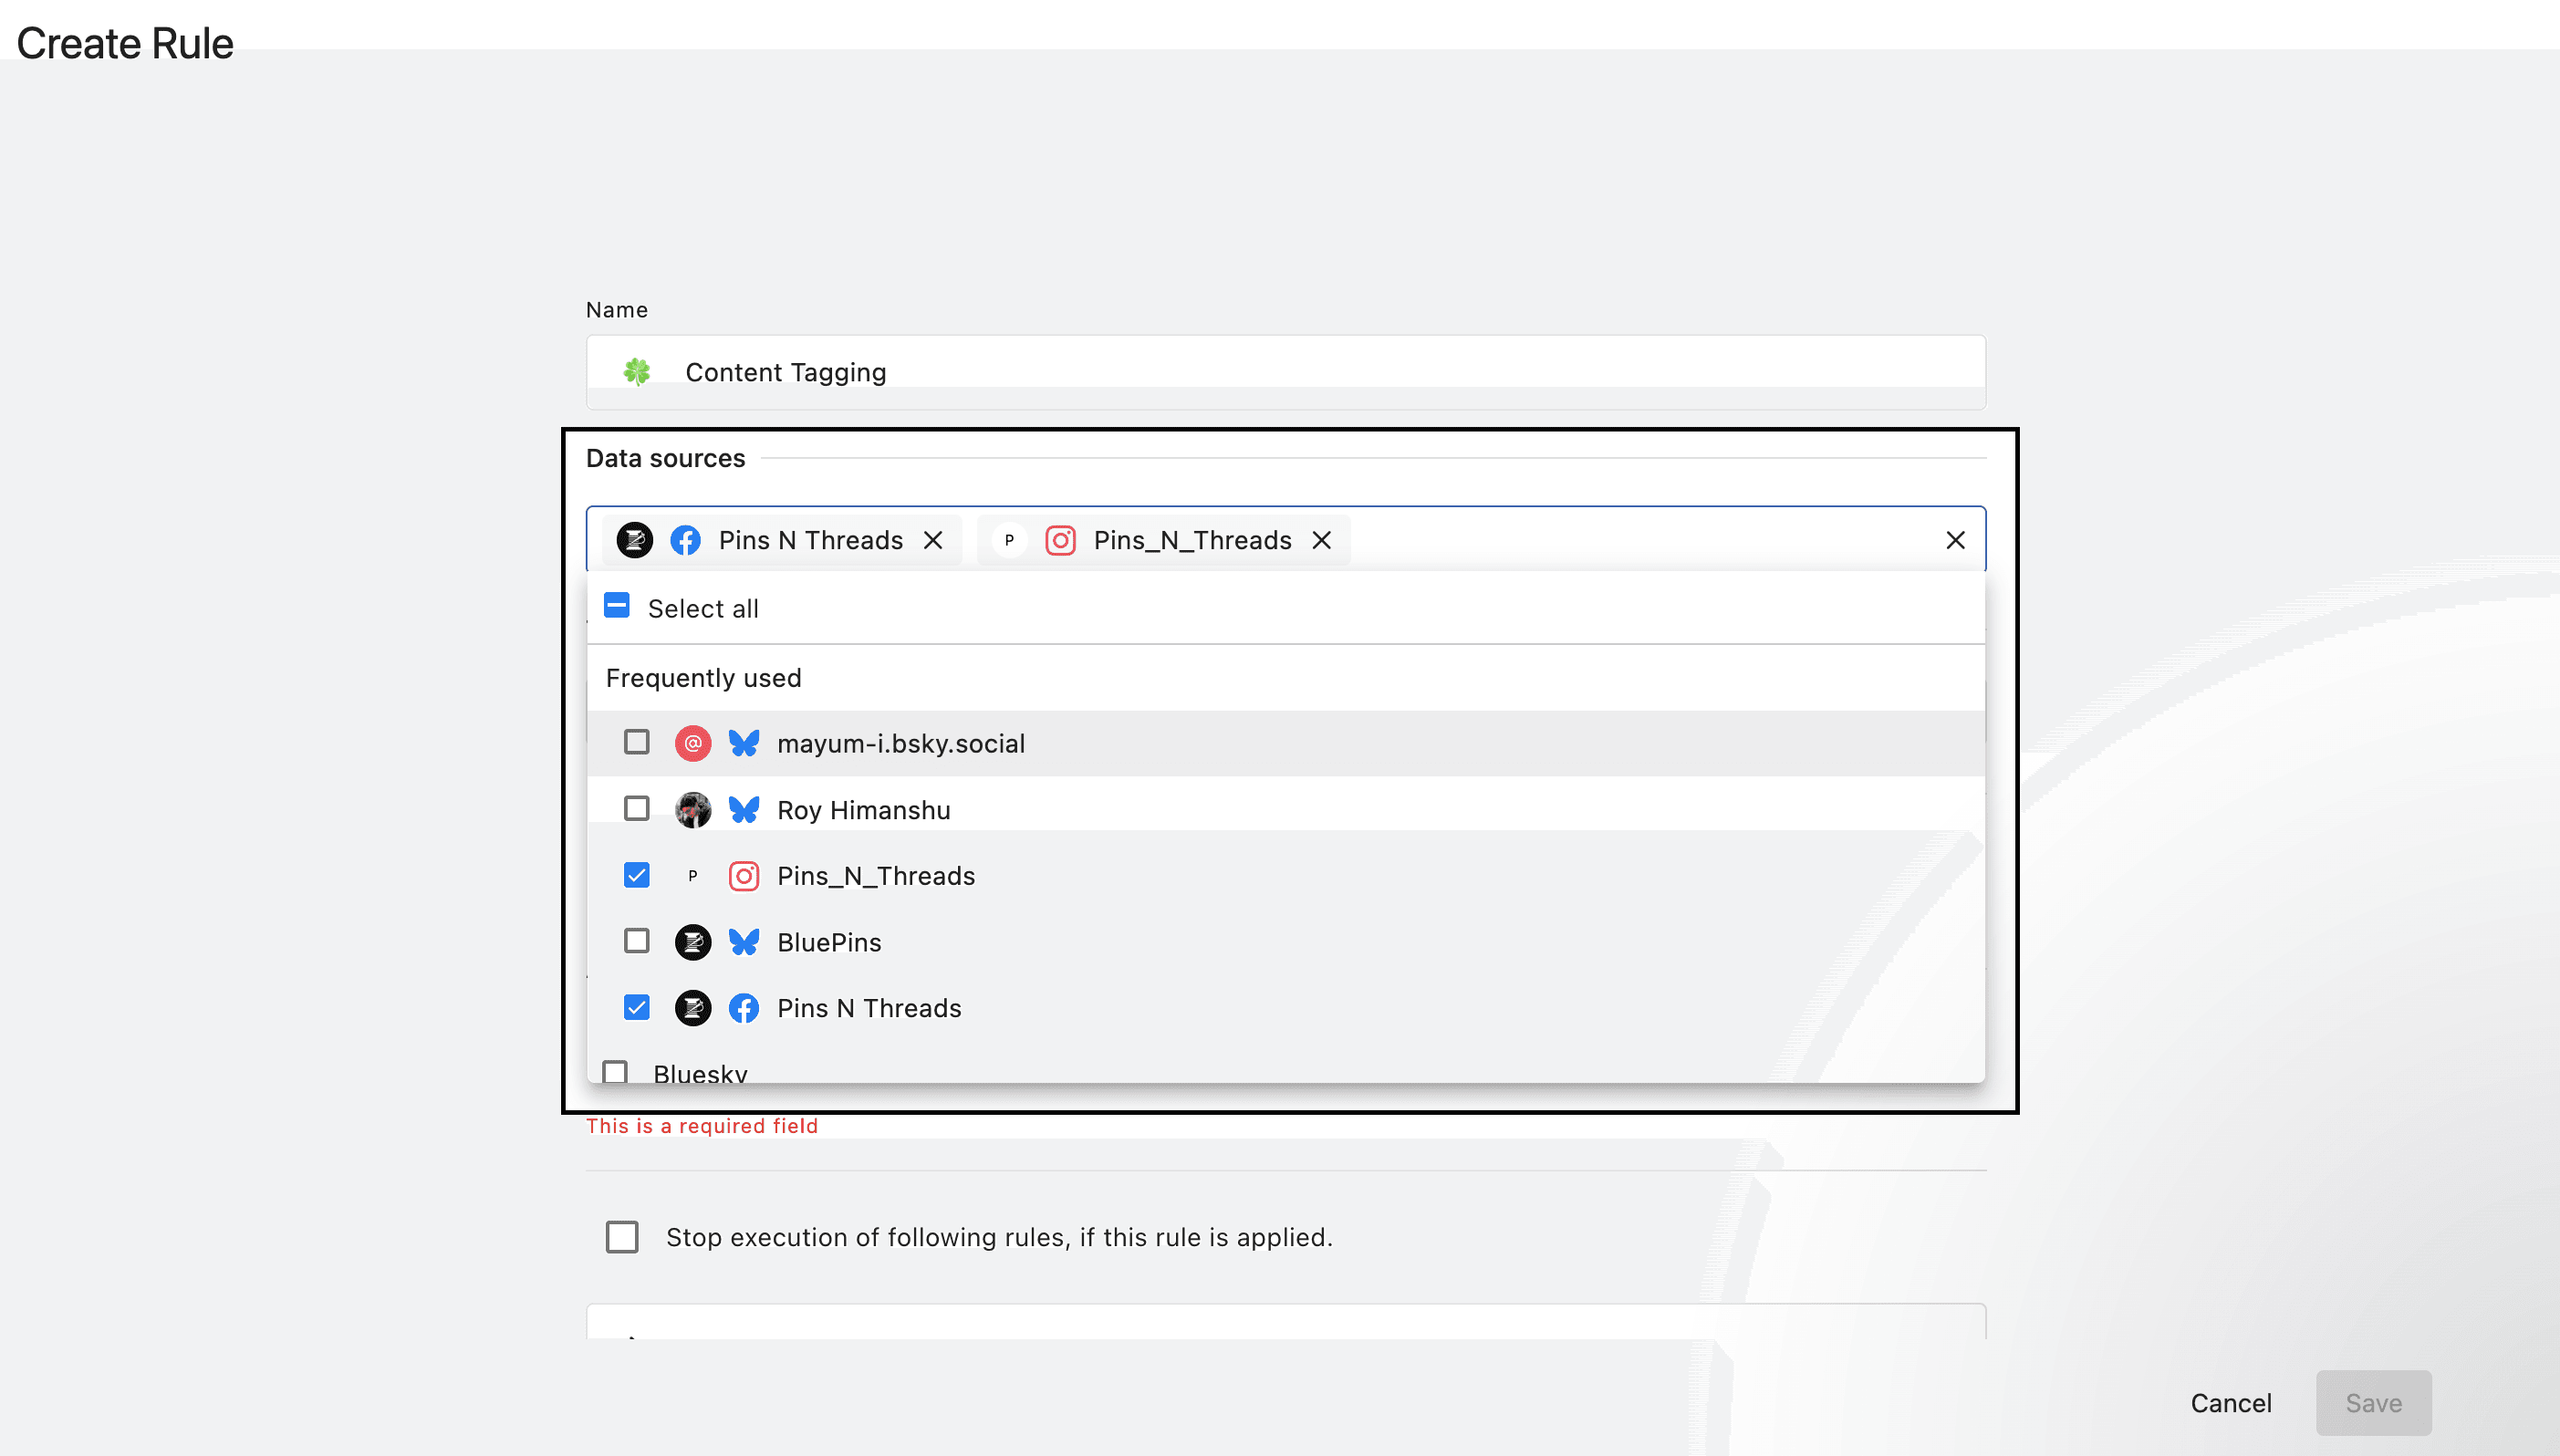
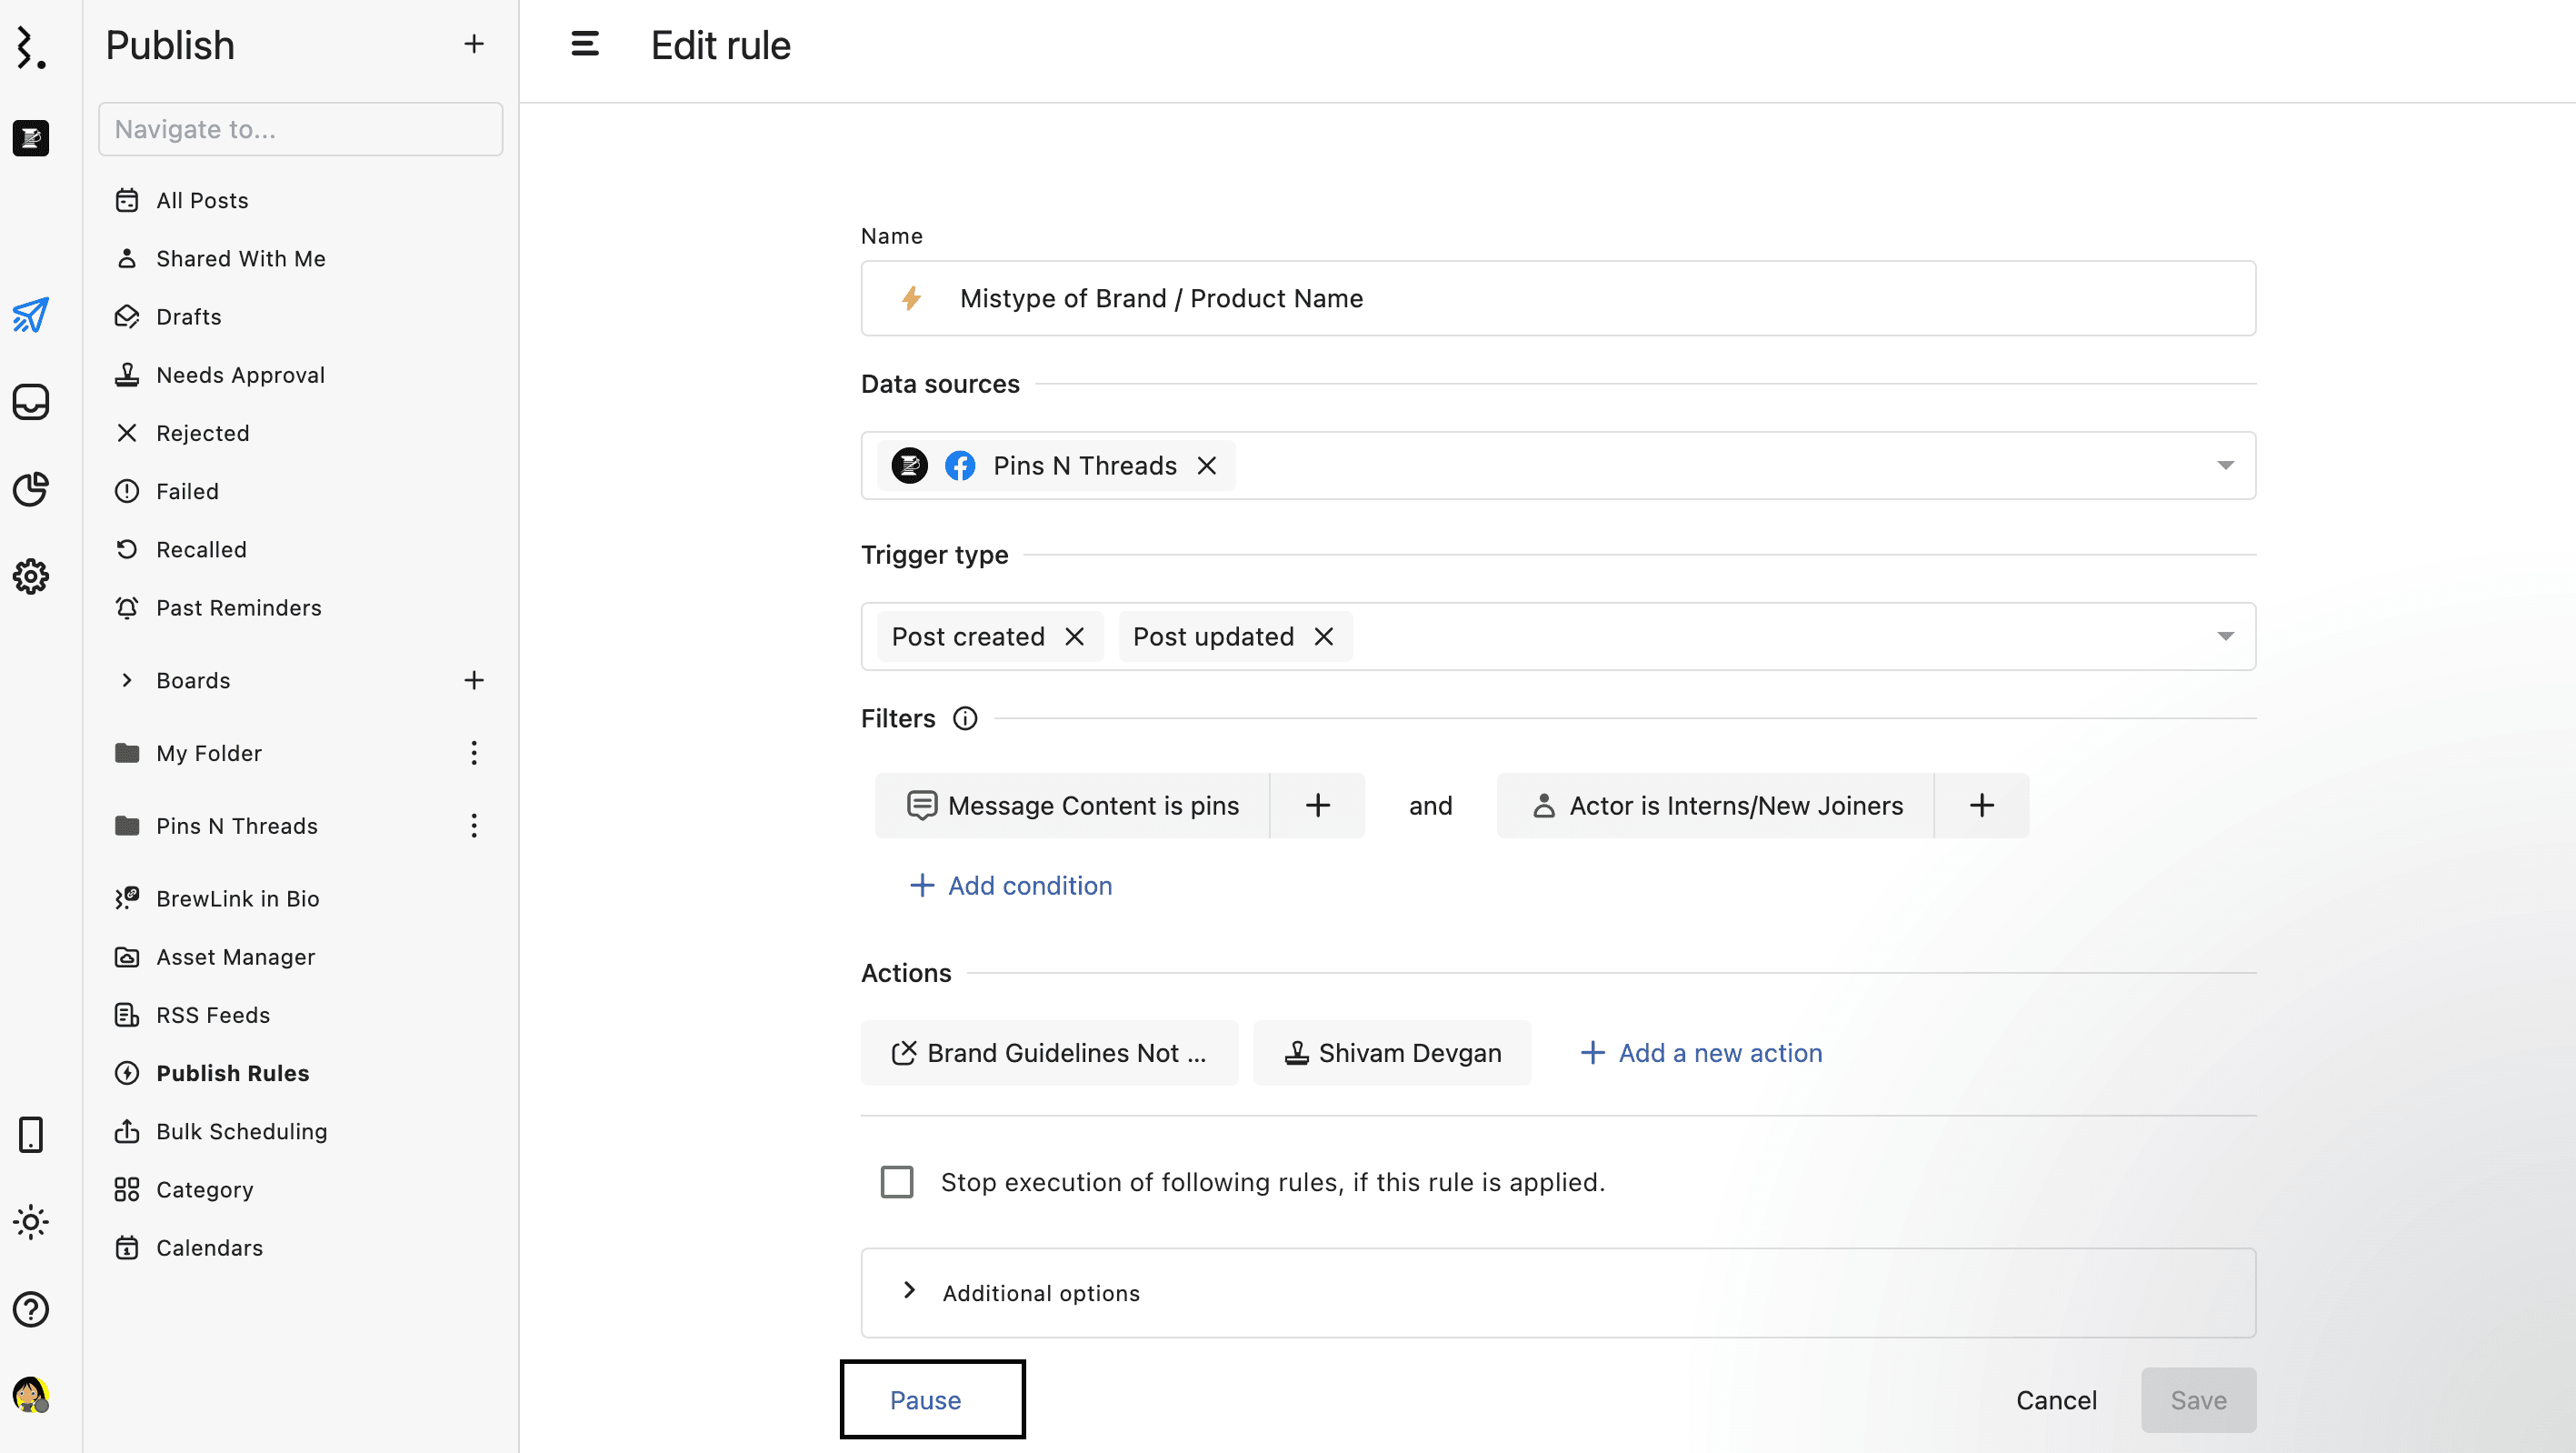
The first step is to give an appropriate Name to your rule so that the rule is easy to identify and manage later.
Here are the four key components that define how a Publish rule functions:
1. Data Sources
The data source determines the profiles on which the rule will be applied.
You can choose from:
Individual social profiles
Profile groups
Using profile groups is especially useful for teams managing multiple brands, regions, or clients, as it simplifies both rule management and profile organization.
Learn more about managing profile groups.
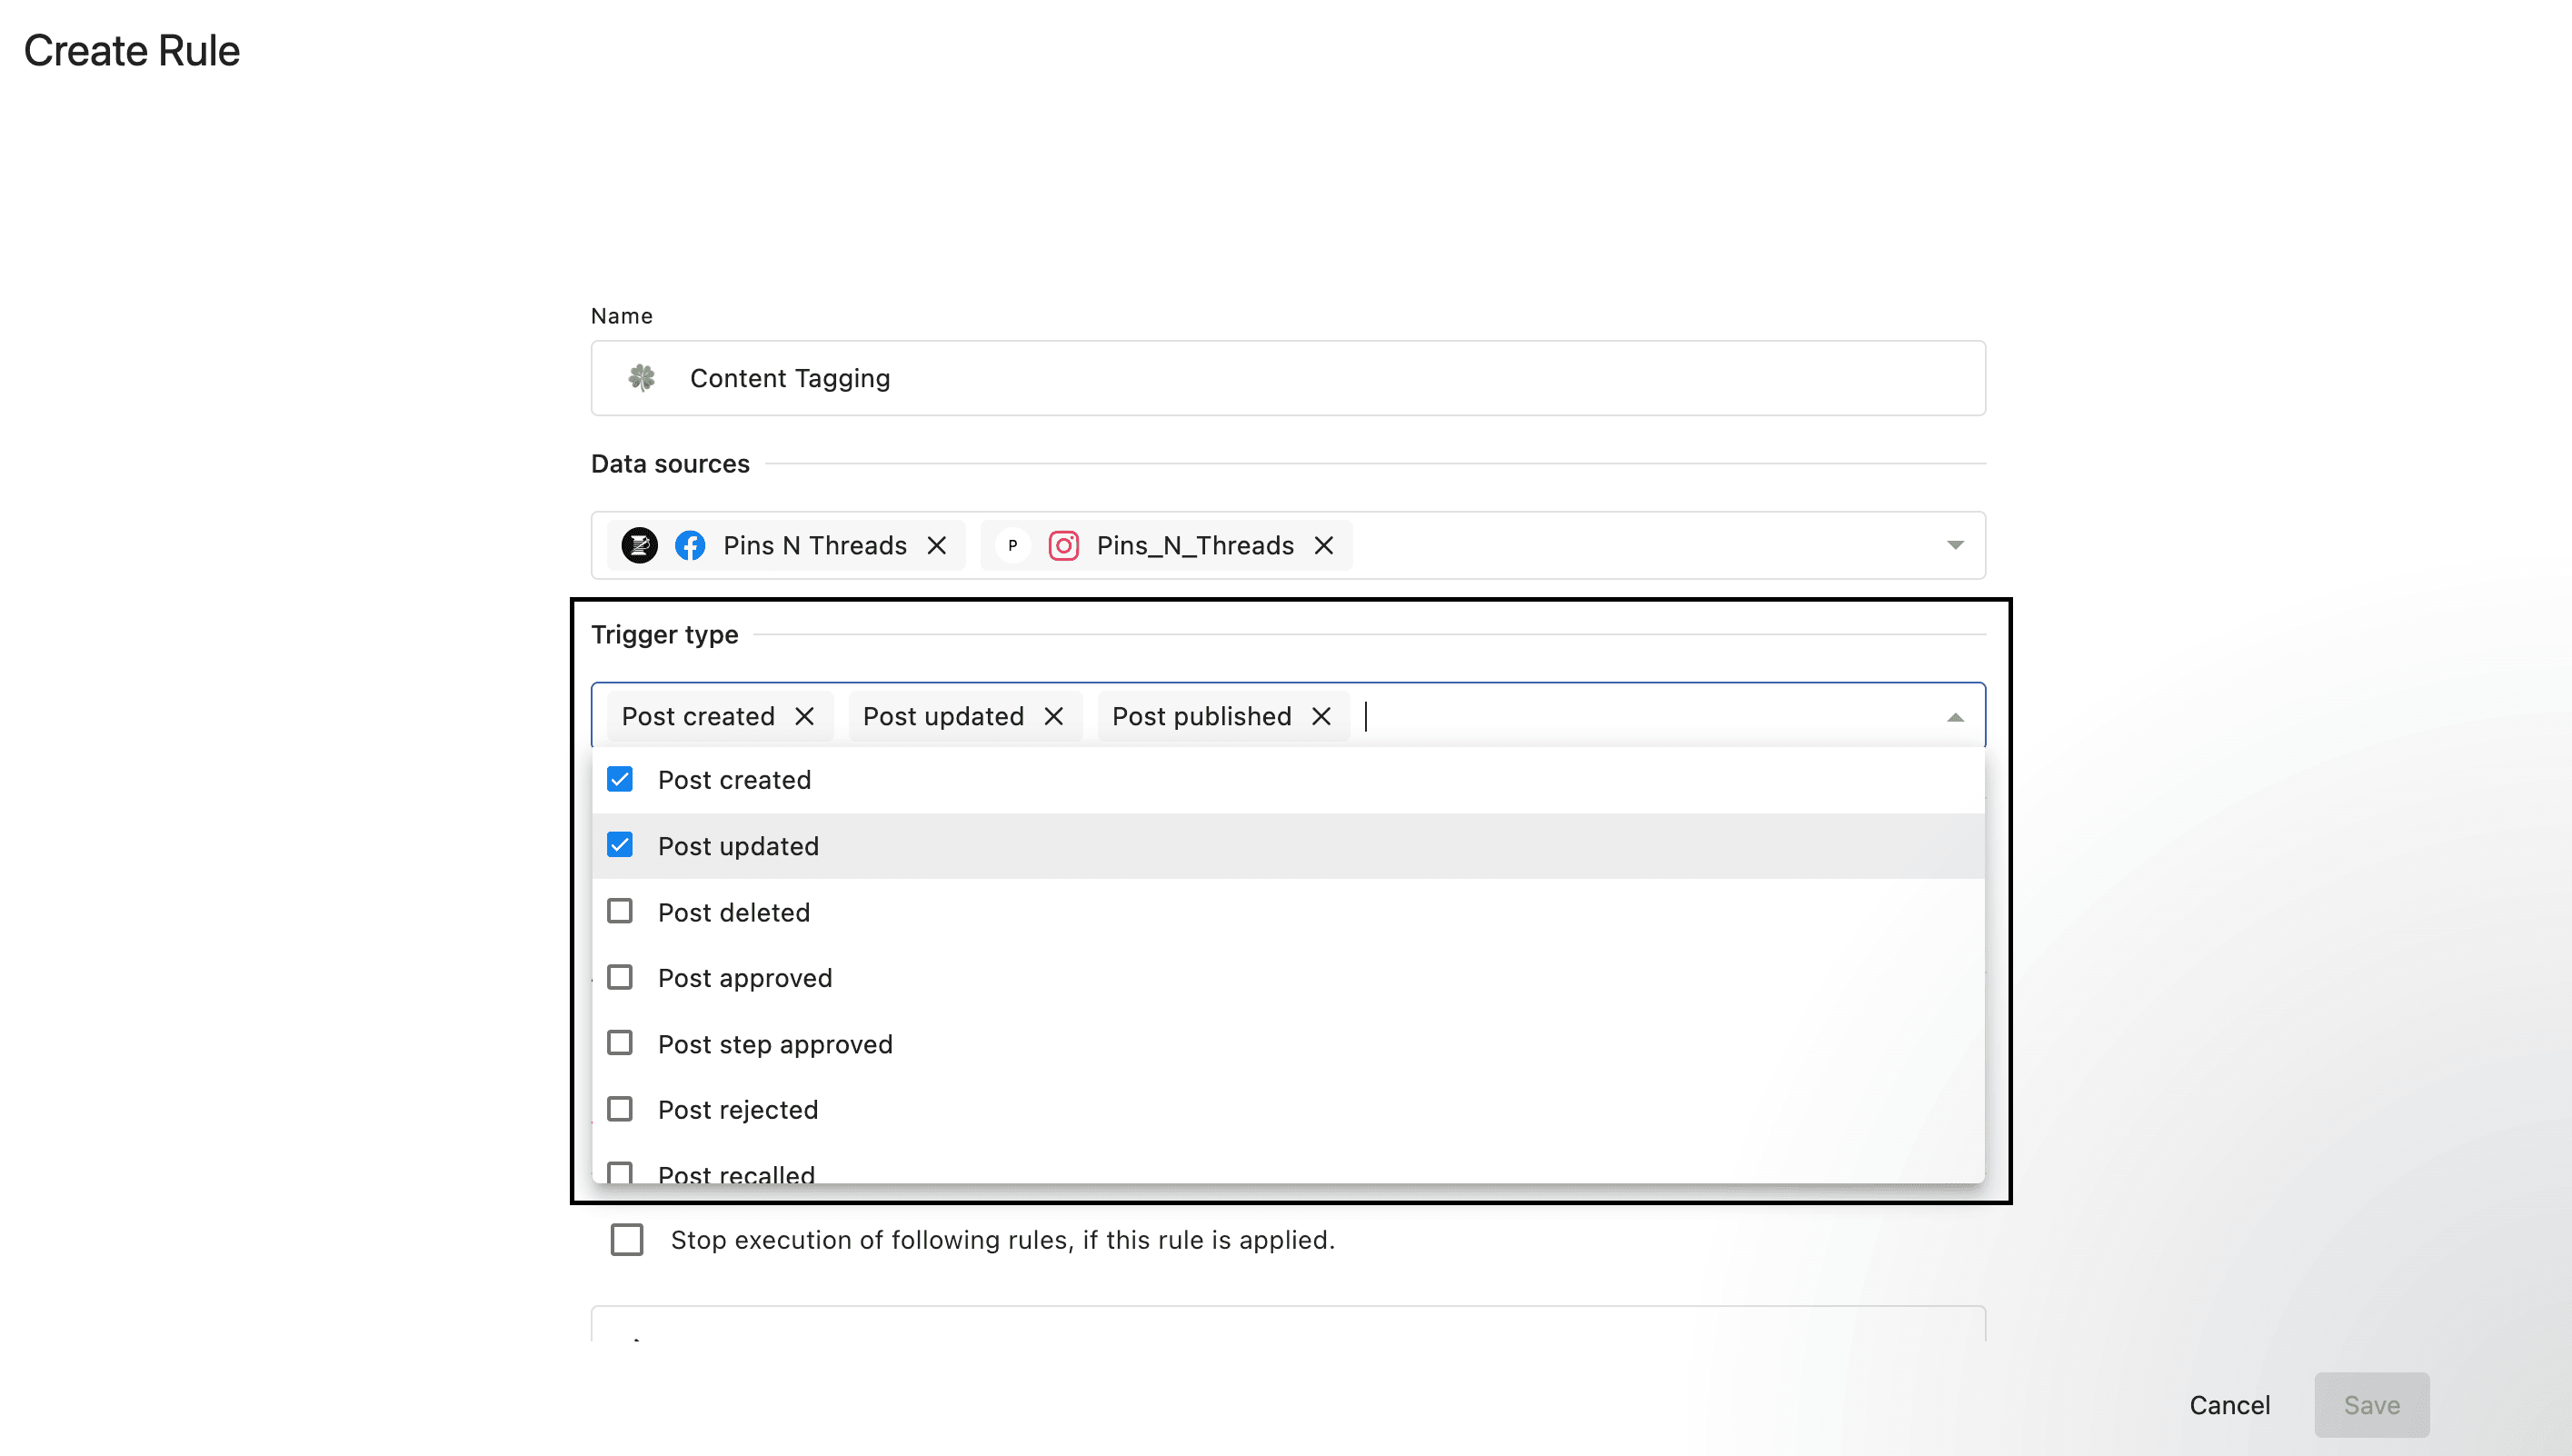
2. Trigger Types
Every rule begins with a trigger — the condition that activates it.
The available trigger types are:
Post created
Post updated
Post deleted
Post approved
Post step approved
Post rejected
Post recalled
Post published
Post failed
This means the rule will run every time any of the above-given triggers occur on the selected profile(s).
3. Filters
Filters define conditional constraints that must be met after the trigger event occurs for the selected profile(s).
They help you fine-tune how and when a rule is applied based on post content, type, state, and more.

Filter Logic: AND vs. OR
AND logic: All filter conditions must be met for the rule to execute.
OR logic: If any one condition is met, the rule will execute.
You can switch between AND and OR logic when adding multiple filters and even when applying filters within a group.
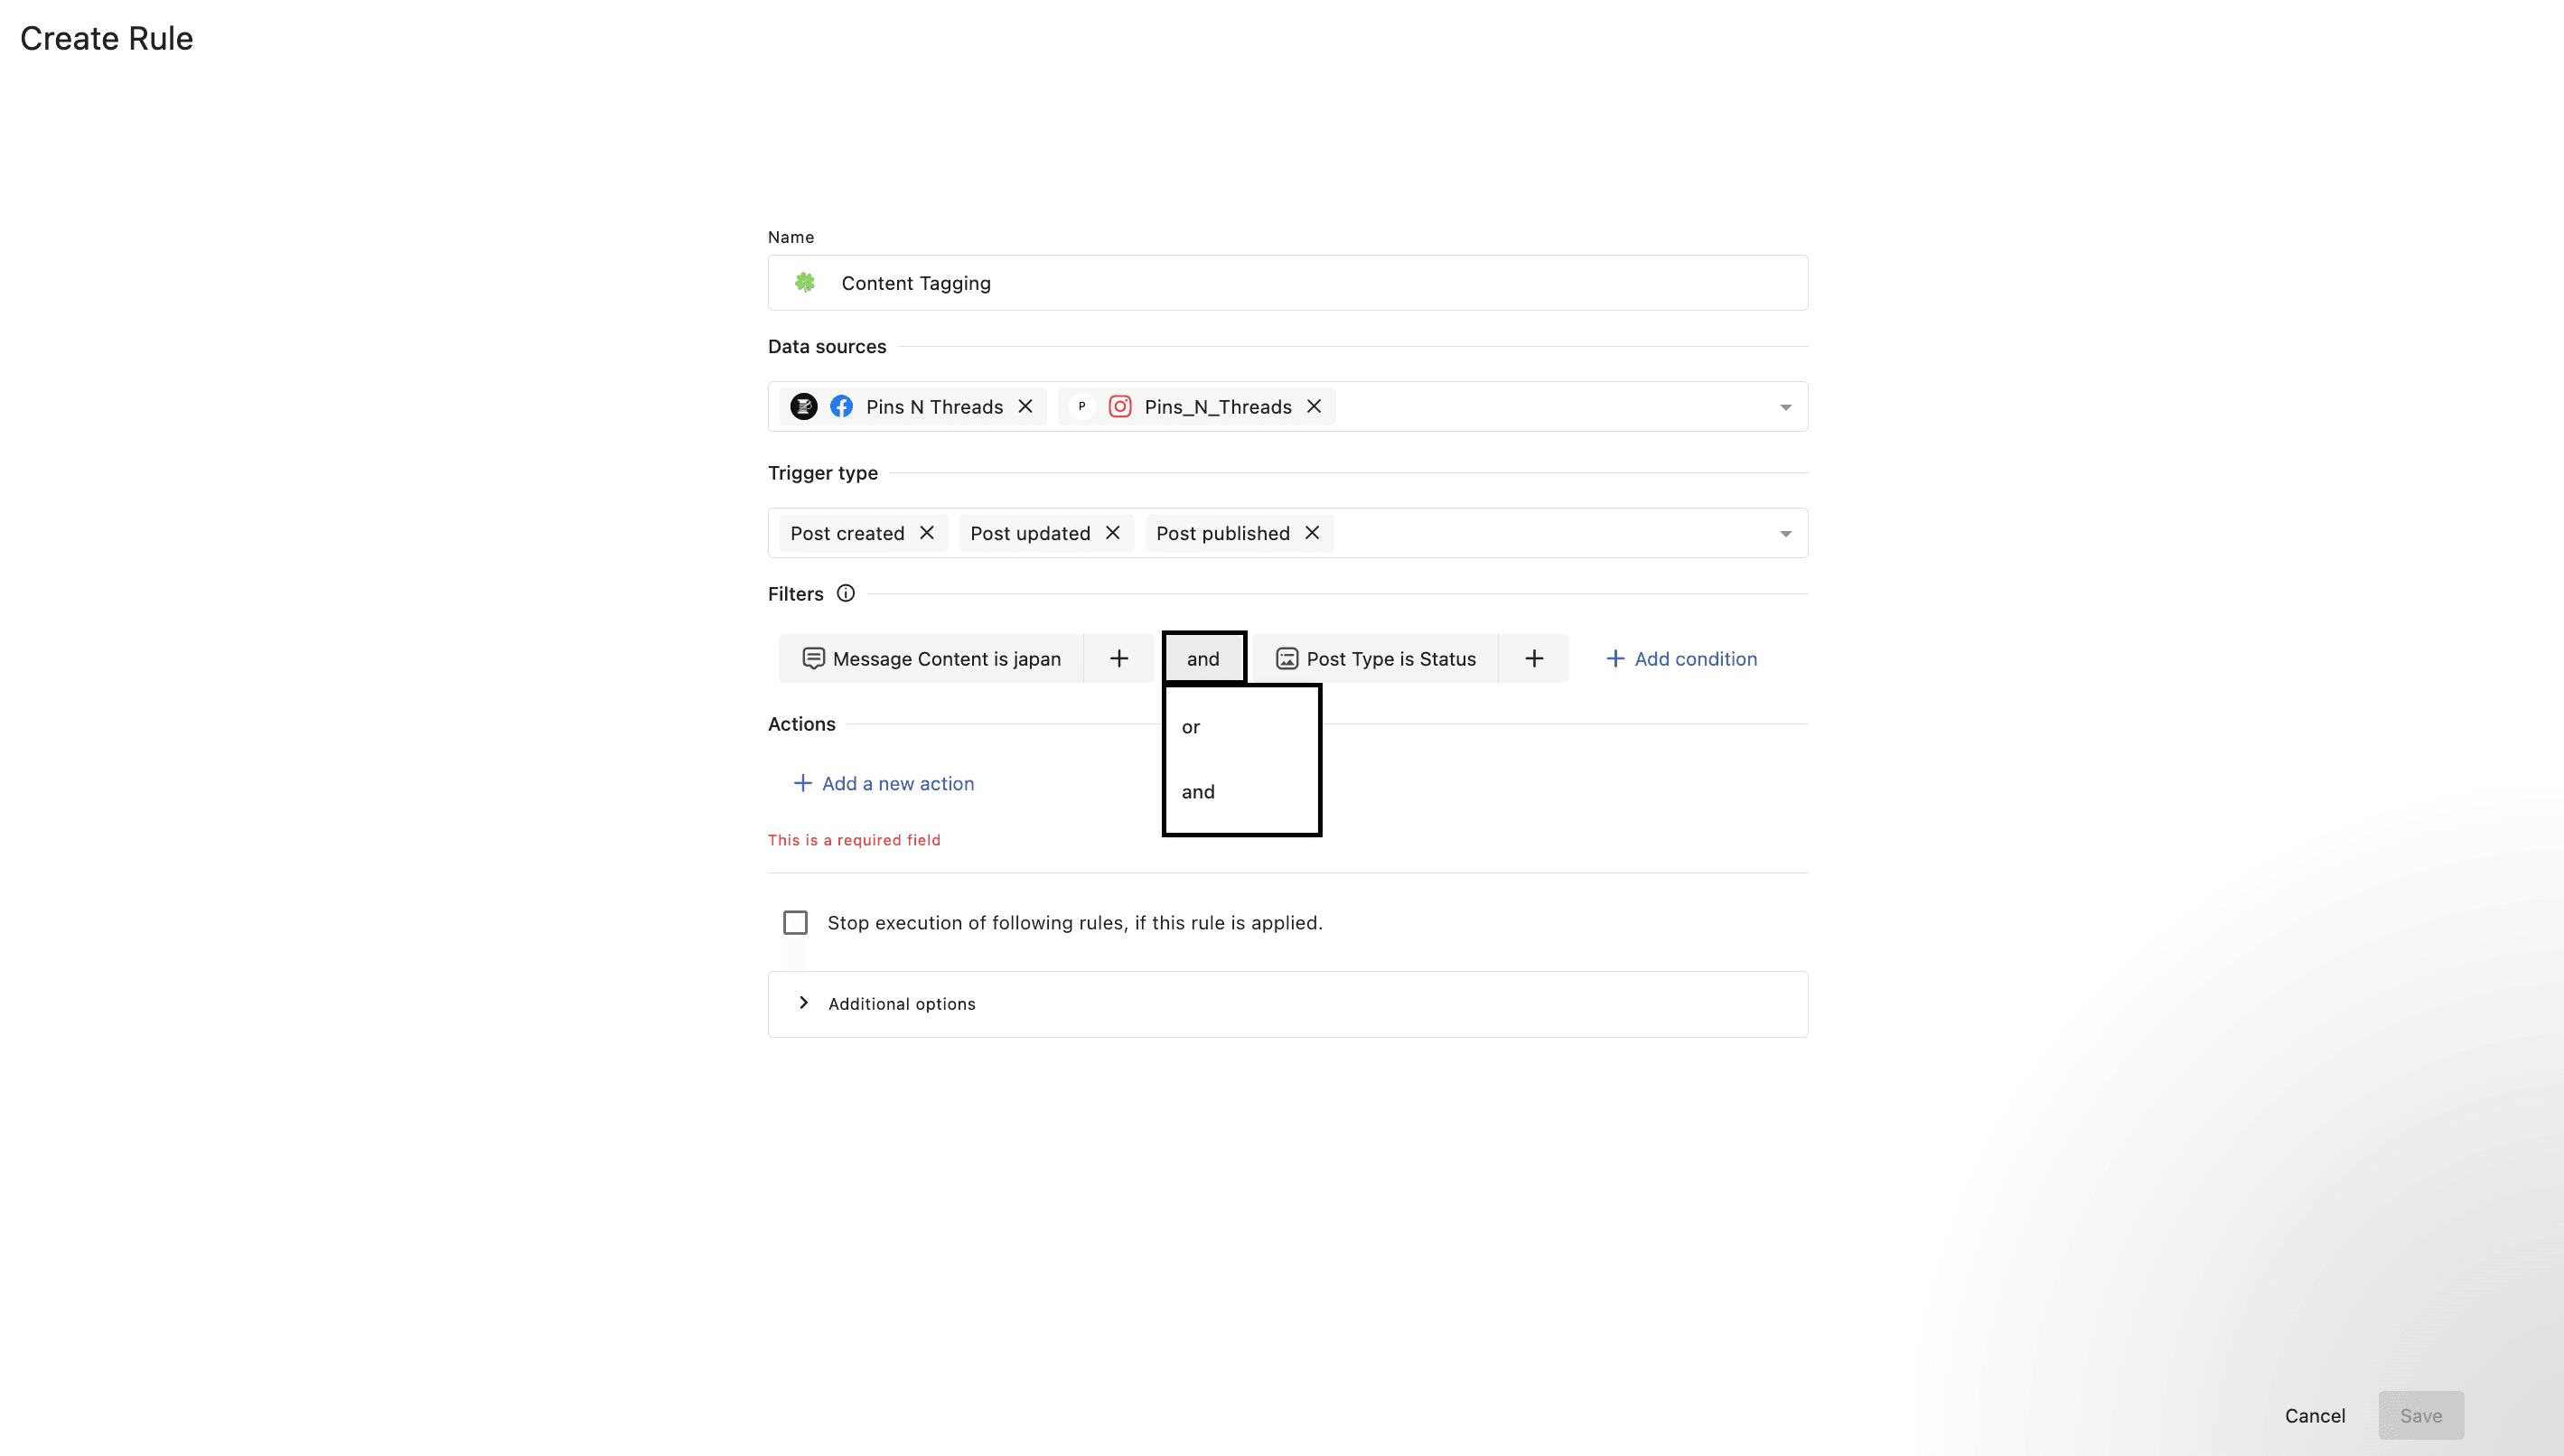
After adding your first filter group, click Add condition to include another. By default, the AND logic is applied, but you can change it as needed.
Learn about all available filters in our article on Planner Filters.
4. Actions
Actions are the automated tasks that are executed when a selected trigger type(s) occur and all configured conditions are met in a Publish Rule.
You can choose one or multiple actions to be executed simultaneously.

Here are the available actions:
Actions | Description |
Conversation Actions | |
Add watchers | Add watchers to keep them updated about various content publishing activities on selected profile(s). |
Post Actions | |
Reject the post | Reject posts with a rejection reason when it doesn’t meet your publishing or brand guidelines. |
Send post for approval | Send posts to designated approvers when the rule conditions are met to prevent accidental publishing. |
Tag Actions | |
Add tags | Assign tags to the post for better categorization and analytics. Ensure consistent tagging structure across your team and avoid the risk of forgetting to manually tag posts when it meets defined criteria. |
Remove tags | Remove specified tags from the post when conditions are triggered. |
Notification Actions | |
Slack Alerts | Select the Slack channel where you wish to receive notifications |
Send notification | Select the user(s)/user group(s) to whom you wish to receive in-app notifications |
Send email | Select the user(s)/user group(s) to whom you wish to receive notifications on their email, with which they use their Statusbrew account |
Send email to external users | Add emails of the external user (users who are not a part of your Statusbrew space) to whom you wish to receive notifications yes on their email |
Microsoft Teams Alerts | Select the Microsoft Teams Connector that you have added in Statusbrew to receive notifications |
Custom Fields | Update specific Custom Fields based on conditions |
Reject the post, Send post for approval will not work with Post deleted, Post approved, Post step approved, Post rejected, Post recalled, Post published, and Post failed triggers.
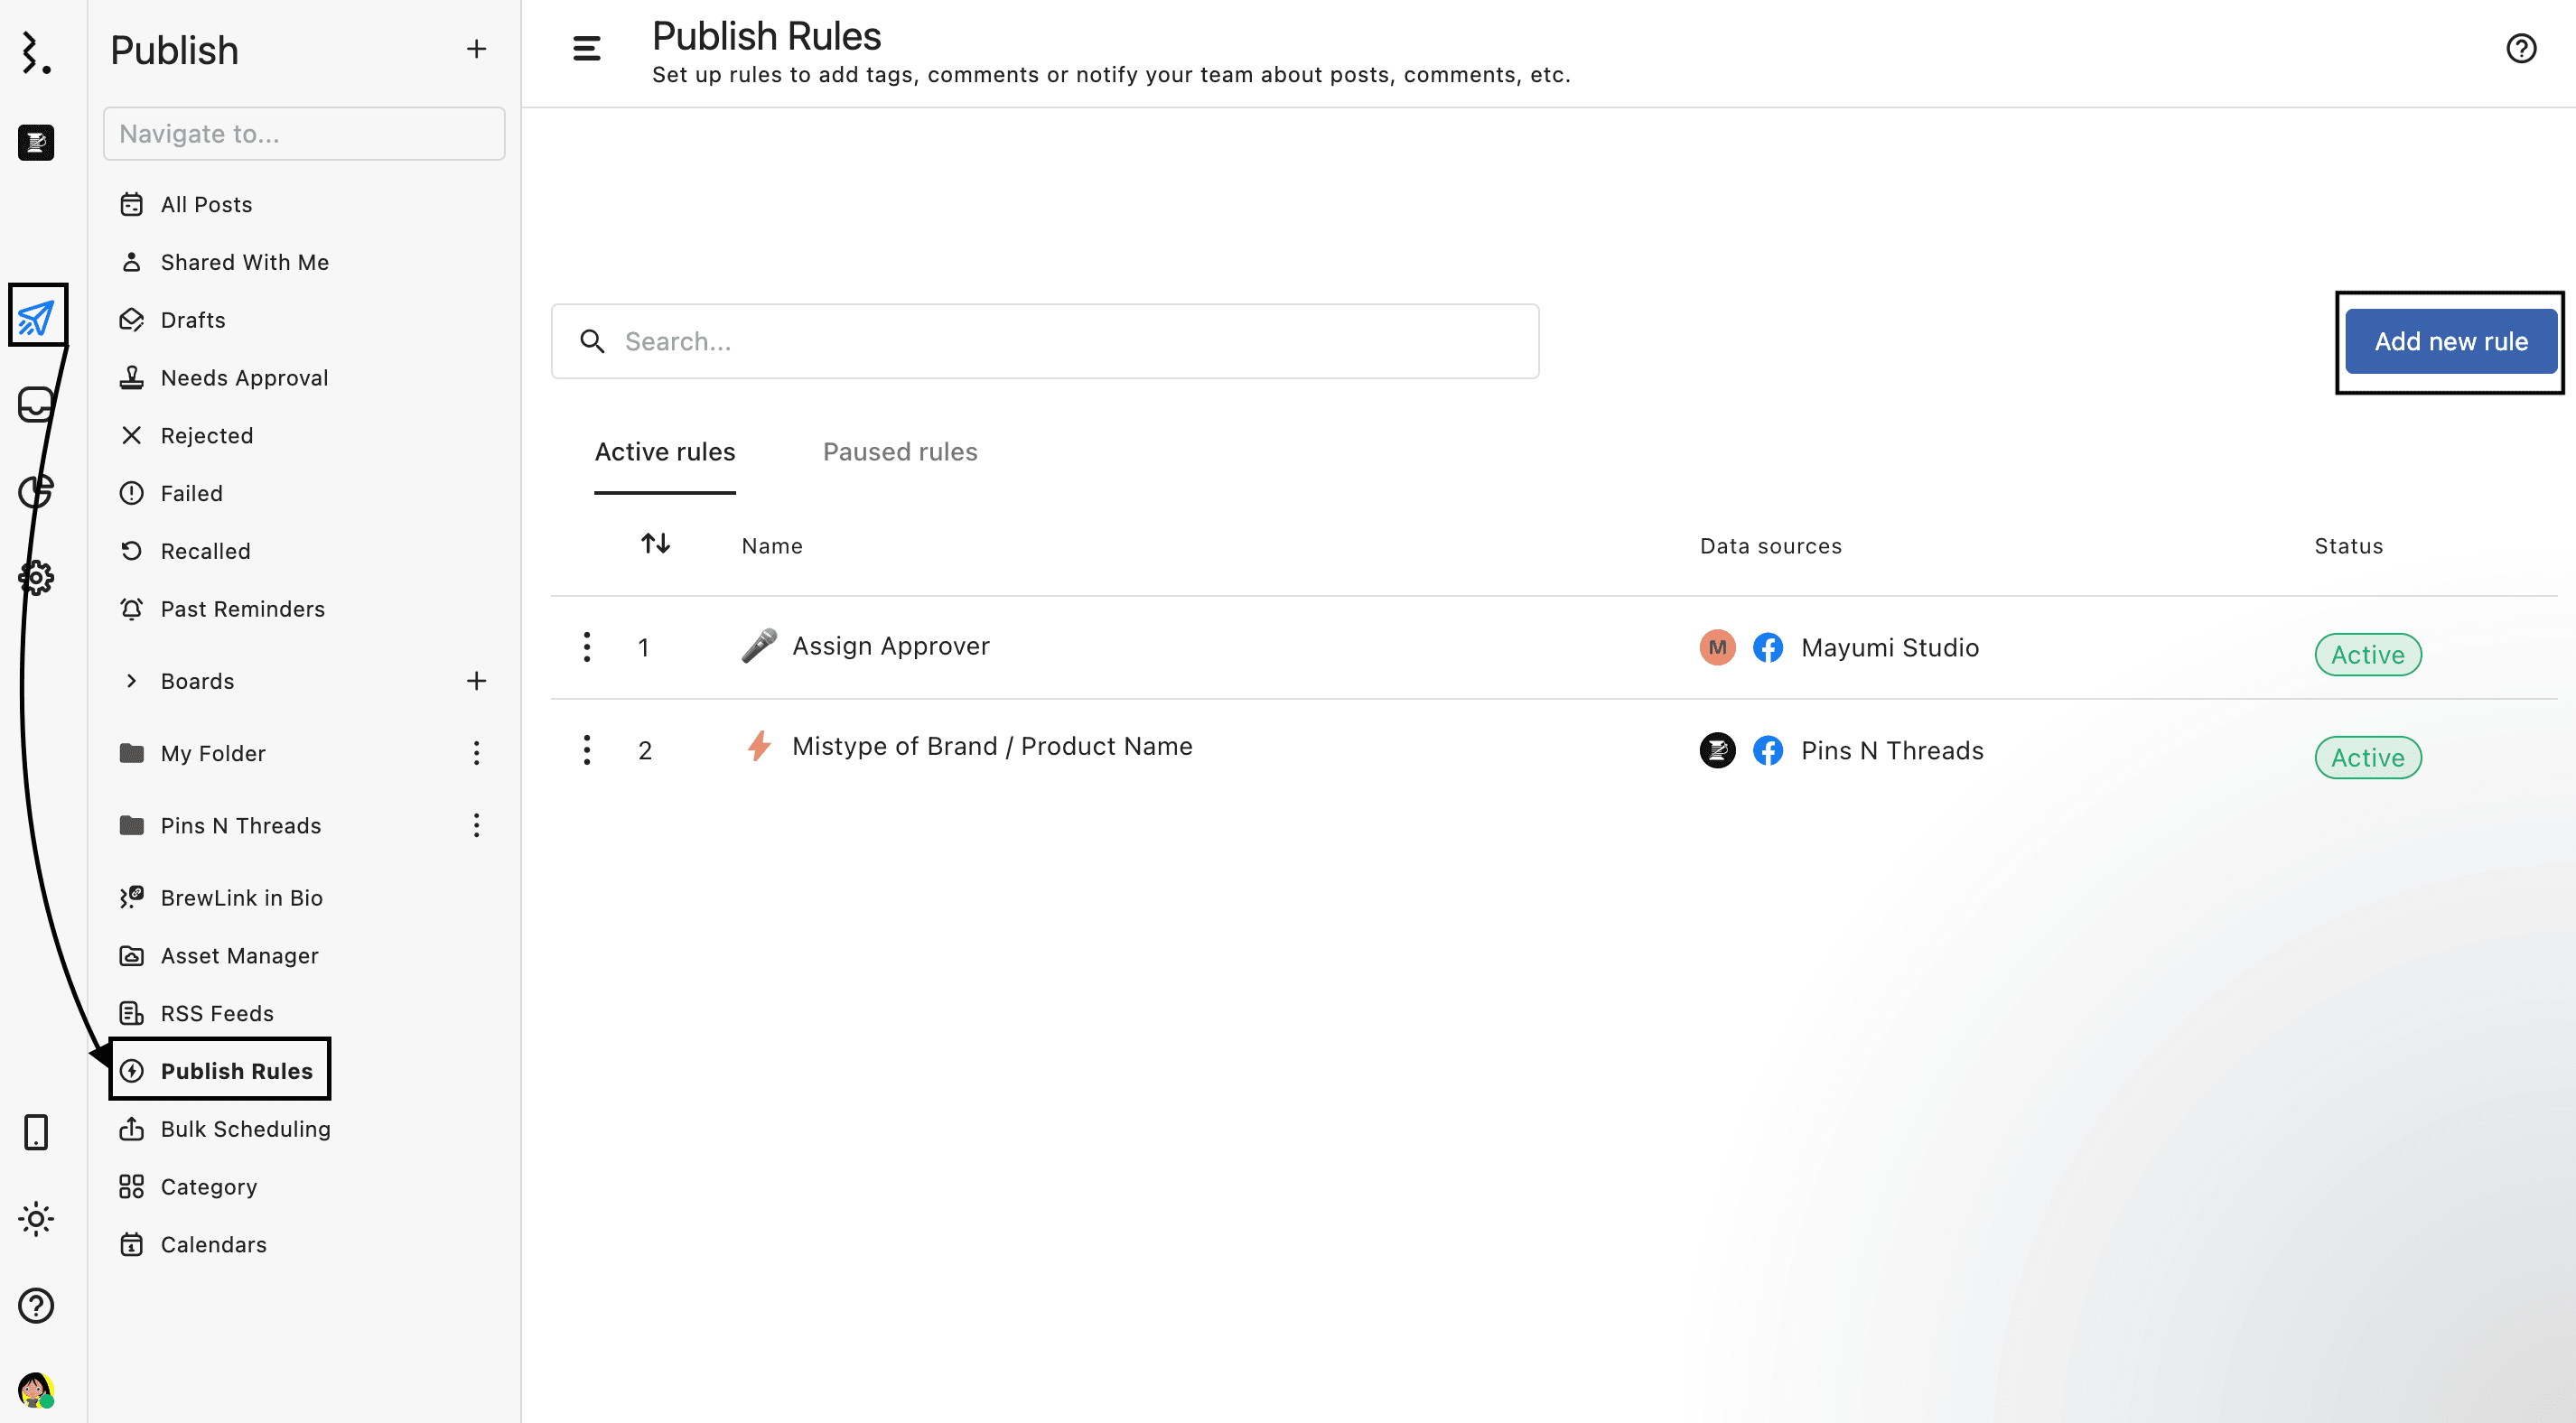
Managing Publish Rules
Going to Publish > Publish Rule will open the Publish Rules window, where you will be able to see a list of all the Publish rules set up by you and your team.
Rules are classified as:
Active rules: Rules currently running.
Paused rules: Rules that are temporarily disabled.
Click (More options) besides a rule to edit, duplicate, or delete it:
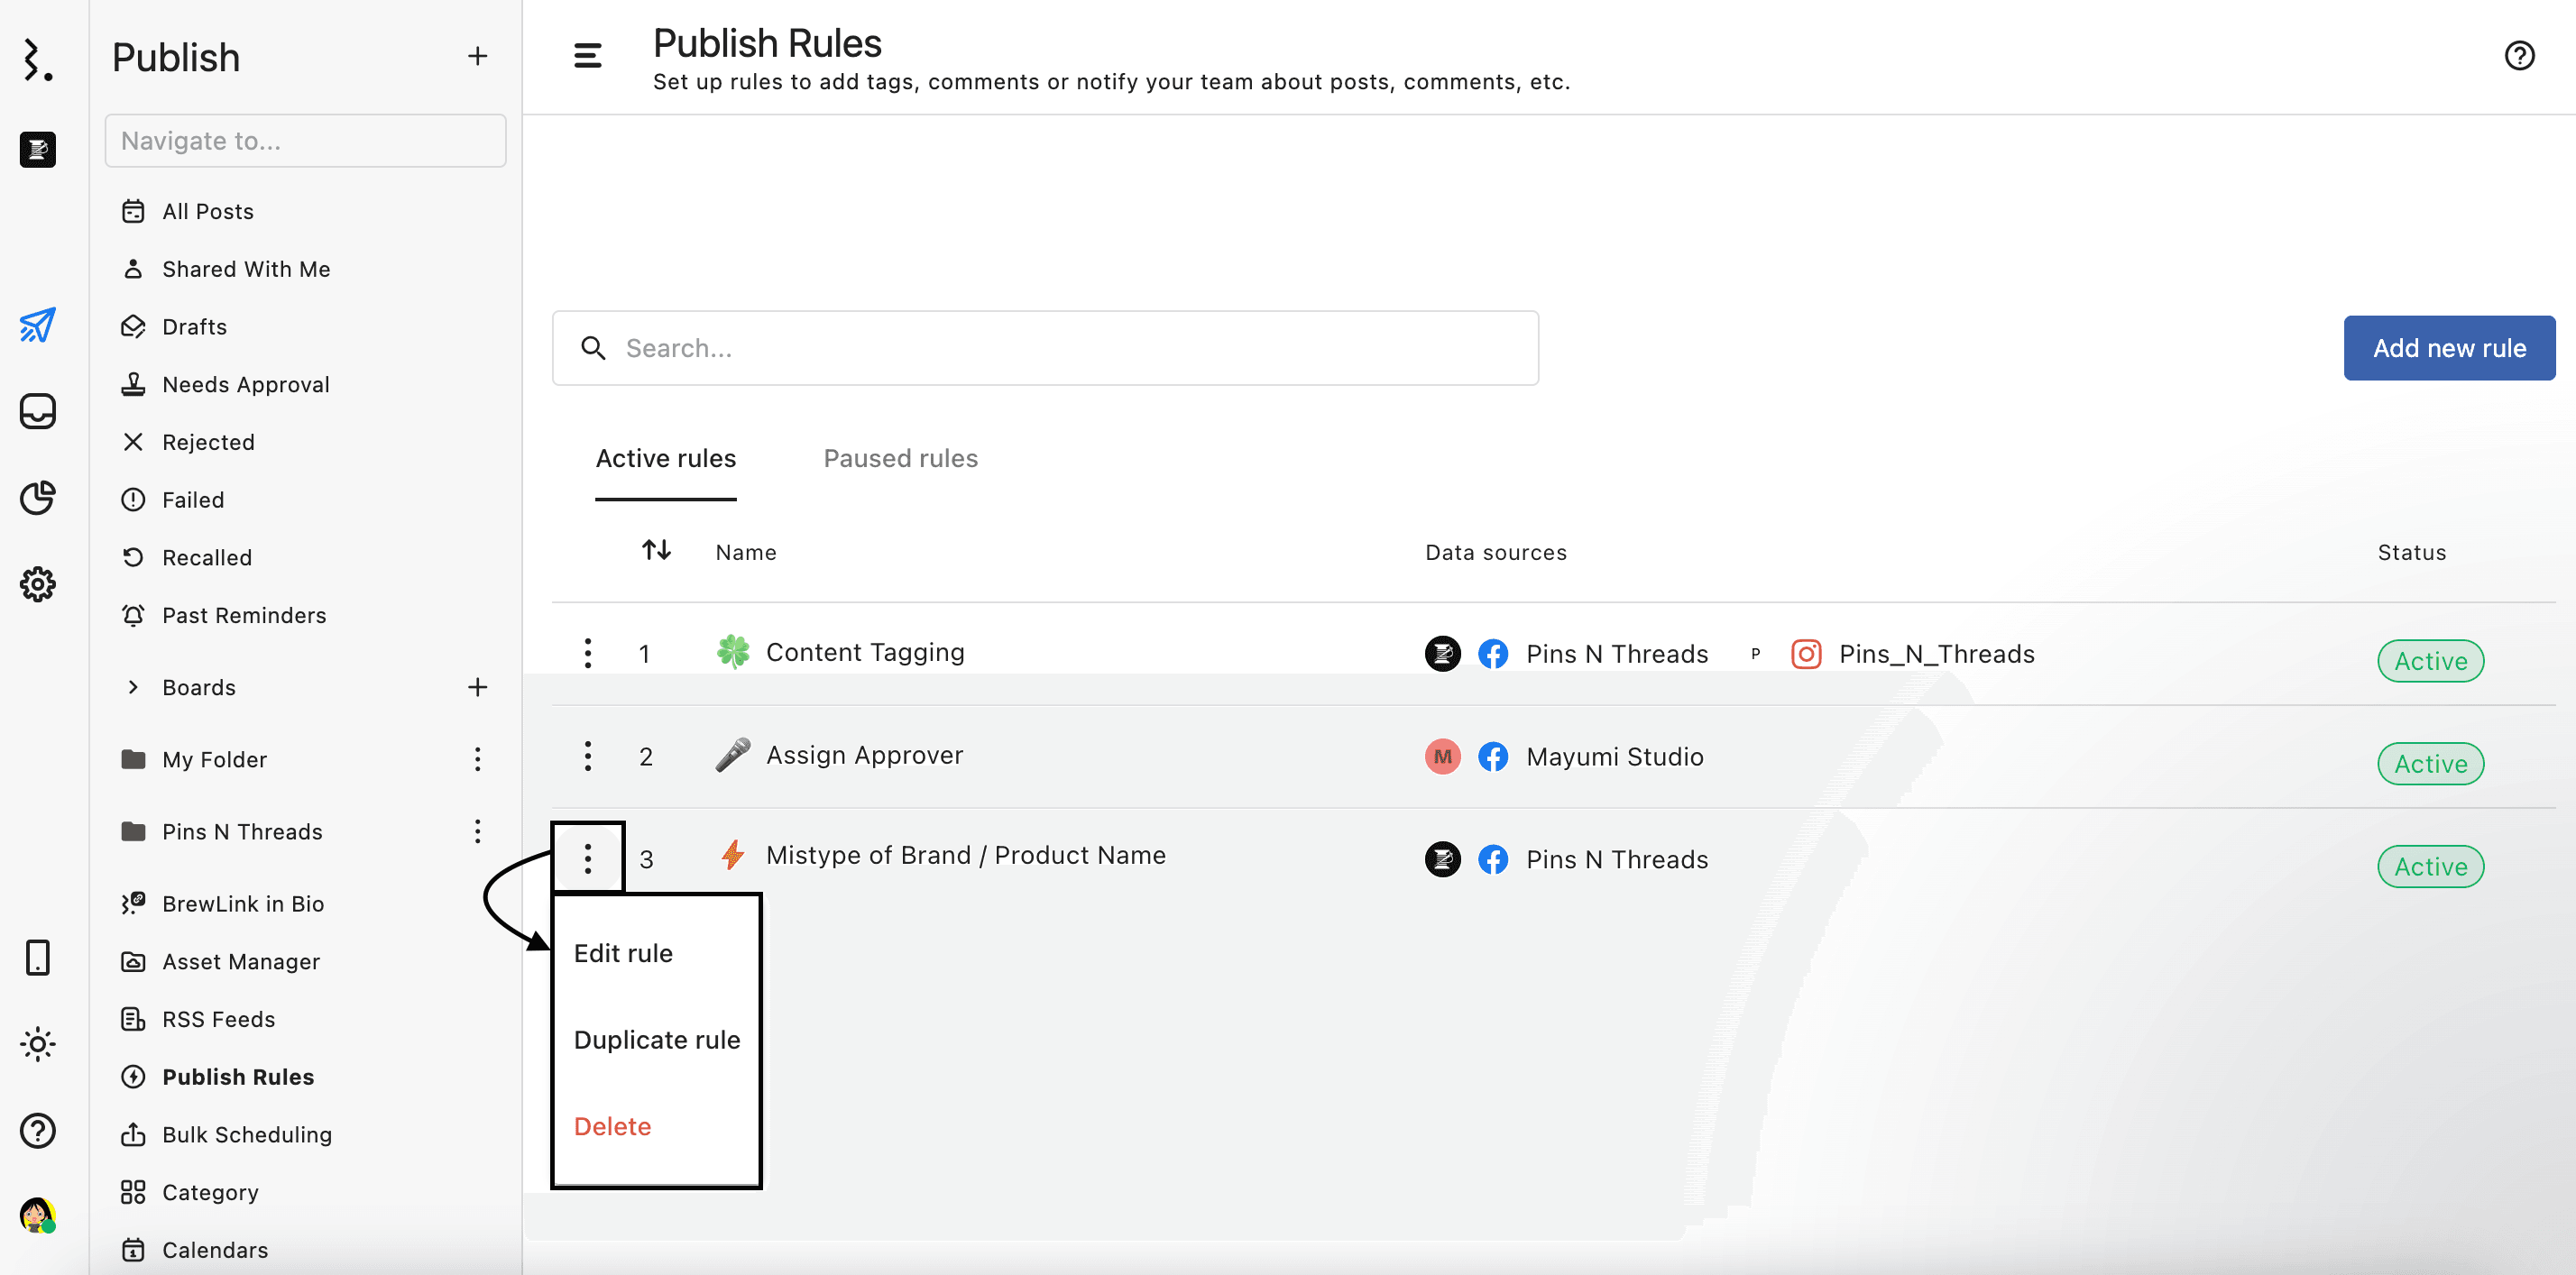
Clicking Edit rule will open the Edit rule window, where you can update the configuration. Once done, click Submit to save your changes.
Clicking the Duplicate rule will open the Duplicate rule window with the same configuration. You can modify the configuration before clicking Submit to save the rule.
Clicking Delete
will permanently remove the rule from your list. This action cannot be undone.
If you temporarily want to stop a rule but know that you may have a need to reactivate it in the future, you can select to Pause rule. If you’re sure you no longer plan to use the rule again, you can Delete rule.
Pausing A Rule
To pause a rule, go to Publish > Publish Rule. Click (More options) beside the rule you want to pause and select Edit rule. In the Edit rule window, click the Pause rule button and confirm your action. Pausing a rule will temporarily pause the actions attached to this rule unless you activate it again.
Additional Options
You can choose to Stop execution of following rules, if this rule is applied.
You can also schedule your rule to run only during specific time periods.
Under Add hours, choose the day and define the time range during which the rule should be active, for example, Monday from 09:00 to 17:00. You can specify multiple days and time blocks by clicking Add times.
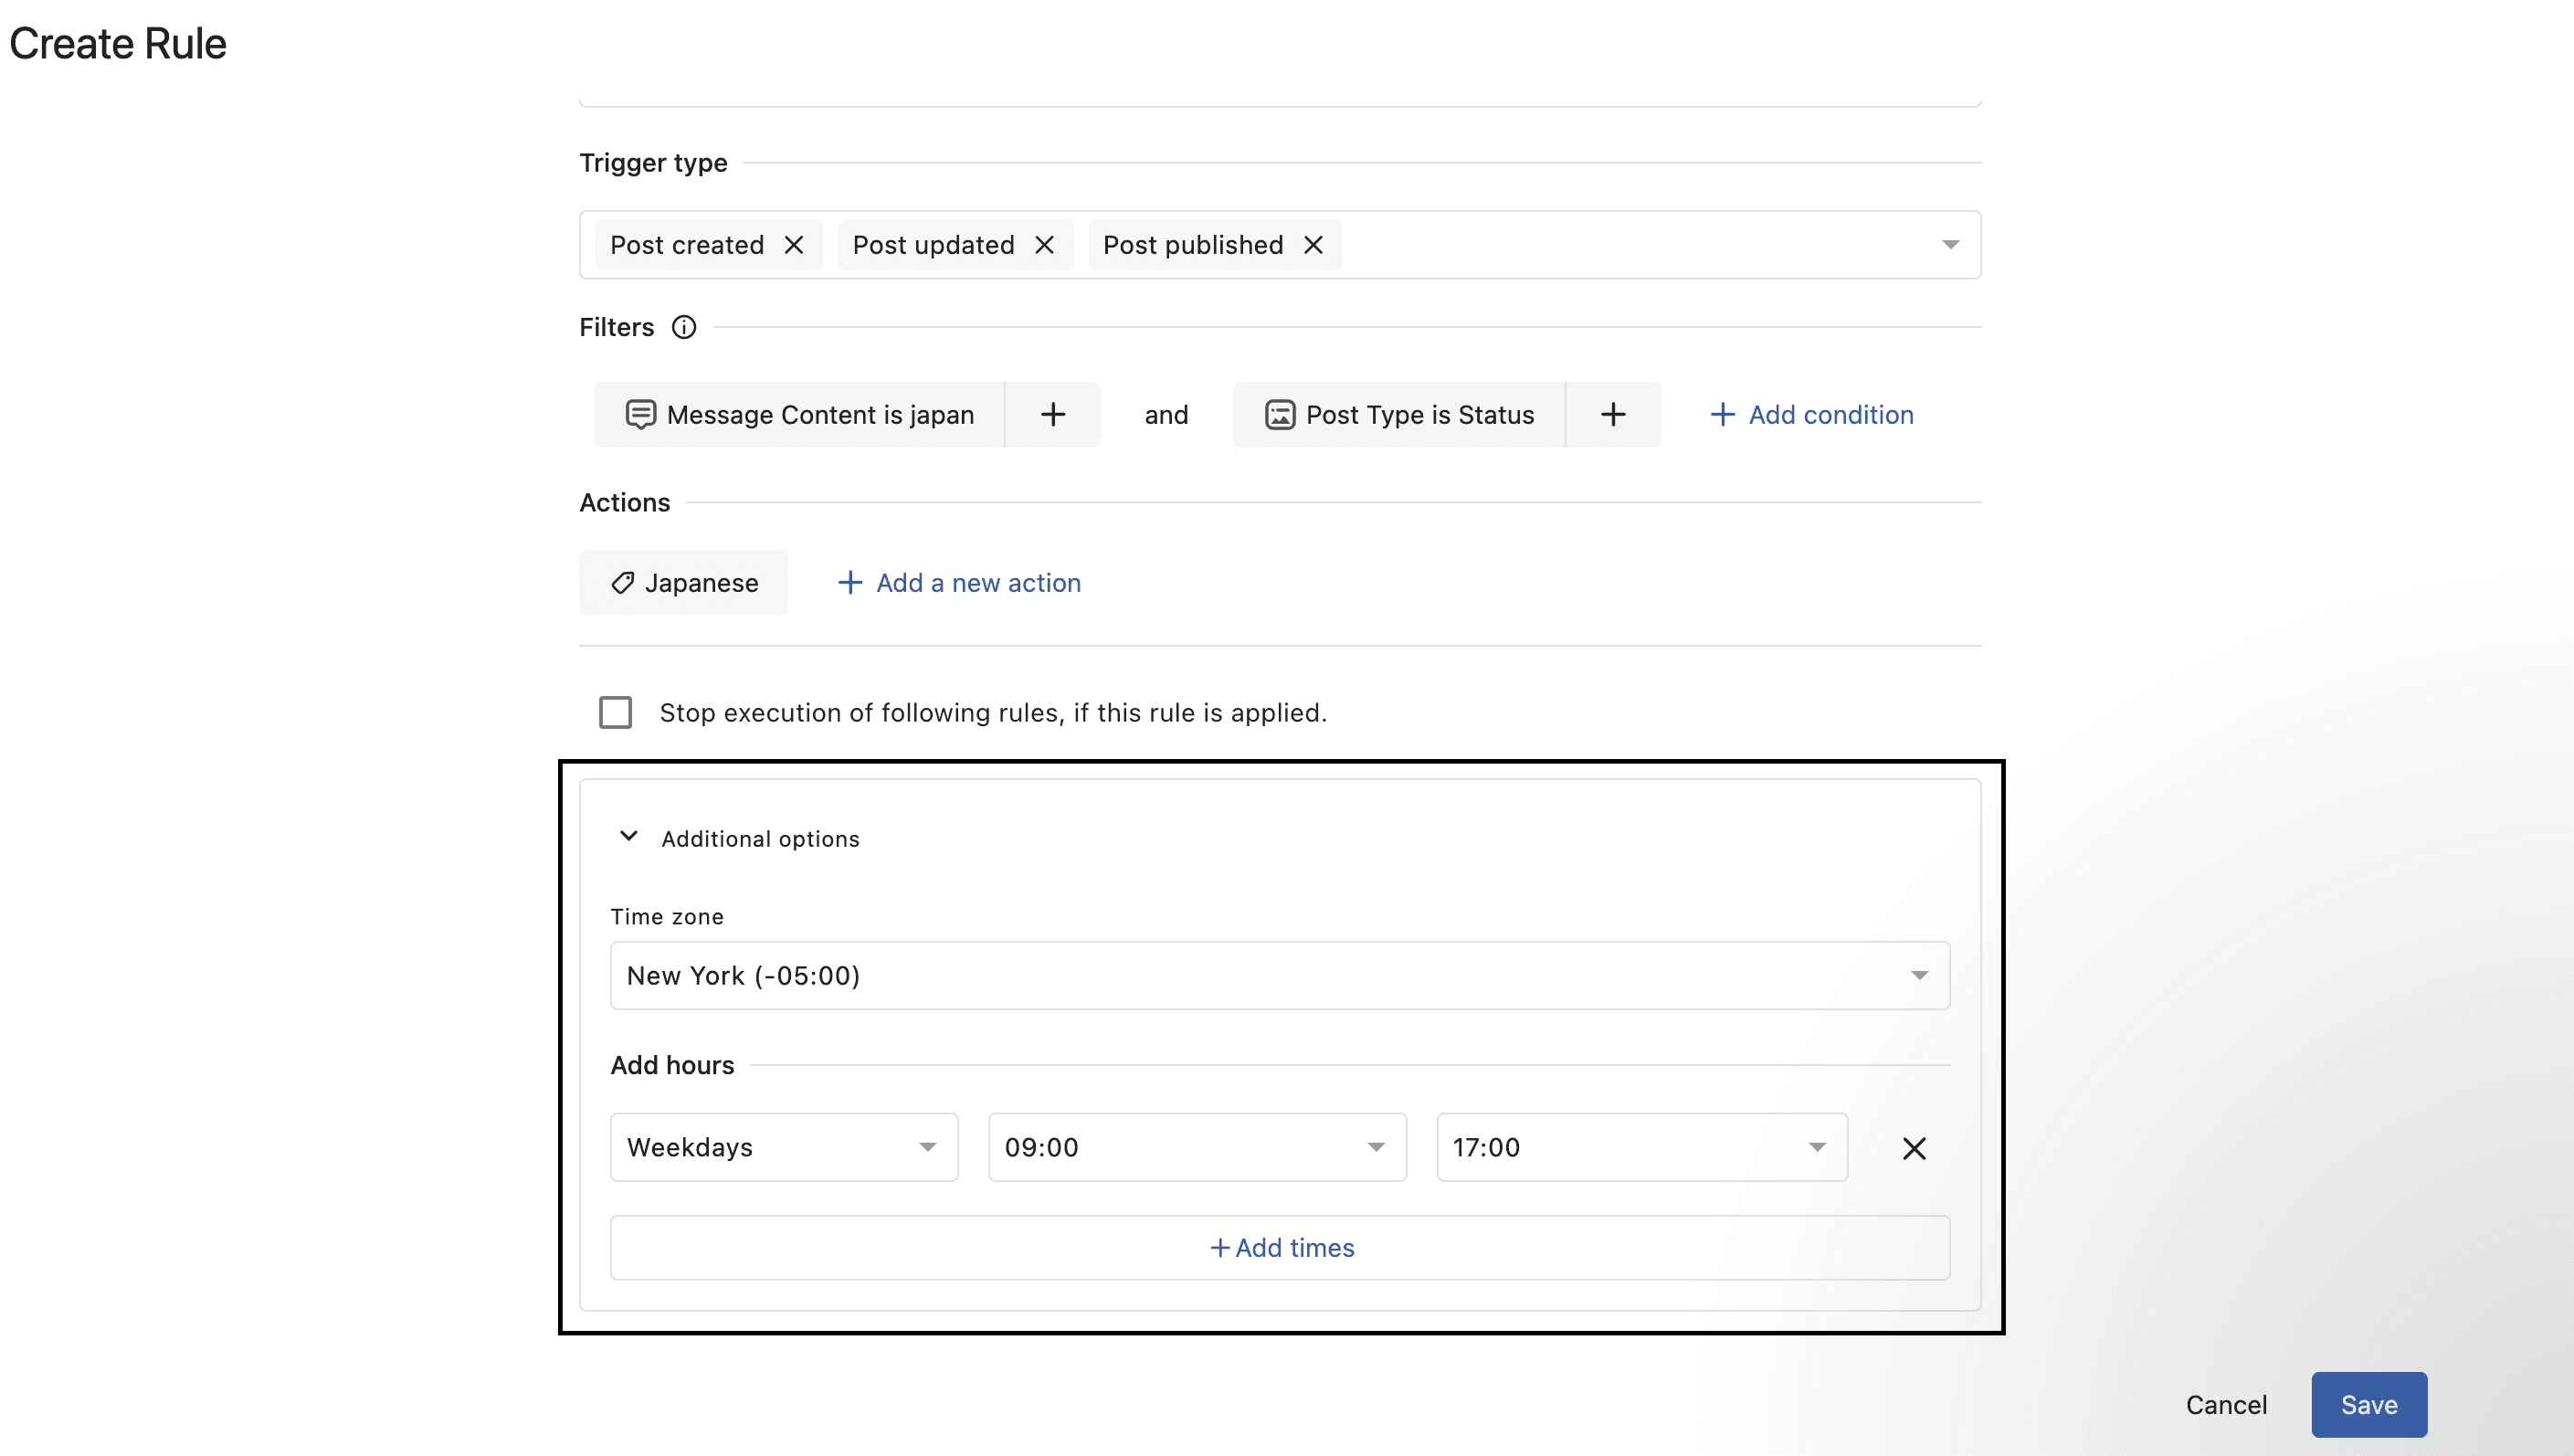
You can also specify the time zone to ensure the rule runs based on your local business hours or regional team workflows.
If no time is specified, the rule will run continuously, 24/7 by default.
Examples Of Publish Rules
Here are some commonly set up Publish Rules that can help simplify your publishing workflows and prevent publishing errors.
Auto Send All Intern Created Posts For Approval
Suppose you've assigned interns to create posts for your socials, and want to ensure their posts undergo a review process before publishing. In that case, you can create a Publish rule that sends posts created by the “Interns” user group for approval.
Go to Publish Rule and select Add new rule.
Name the rule (e.g., "Intern Content Publishing").
Select the Data sources (Profile or Profile groups).
Choose Trigger types (e.g., Post created).
Add Filters:
Add condition > Actor > In(=) > Select the Intern user group.
Add Actions
Add a new action > Send post for approval > Select the approver or the appropriate approval workflow.
Click Submit to save and activate the rule.
Auto Send Brand Awareness Content For Appropriate Approval Workflows
Suppose your team regularly publishes Brand Awareness content that goes through a Brand Awareness approval workflow. In that case, instead of manually sending each post for approval, you can create a rule to automatically send all posts tagged with "Brand Awareness" for the appropriate approval workflow.
Go to Publish Rule and select Add new rule.
Name the rule (e.g., "Brand Awareness Content Publishing").
Select the Data sources (Profile or Profile groups).
Choose TimeTrigger types (e.g., Post created).
Add Filters:
Add condition > Tag > In(=) > Brand Awareness.
Add Actions
Add a new action > Send post for approval > Select Brand Awareness approval workflow.
Click Submit to save and activate the rule.
Auto-Tag Campaign Posts For Consistent Reporting
Suppose your team forgets to associate posts with relevant tags. In that case, you can automate it by creating a rule that adds a “Halloween Campaign” tag to posts that contain the “Halloween” keyword, ensuring every post is properly categorized.
Go to Publish Rule and select Add new rule.
Name the rule (e.g., "Tagging Halloween Campaign Posts").
Select the Data sources (Profile or Profile groups).
Choose Trigger types (e.g., Post created, Post updated).
Add Filters:
Add condition > Message Content > In(=) > Halloween.
Add Actions
Add a new action > Add tags > Select Halloween Campaign.
Click Submit to save and activate the rule.
Send Automated Slack Alerts To Social Media Team For Published Posts
To keep your entire social media team updated about the published posts on your socials, you can create a rule that sends automatic notifications to your Slack channel named #social-published-posts whenever posts are published.
Go to Publish Rule and select Add new rule.
Name the rule (e.g., "Slack Notification About Published Posts").
Select the Data sources (Profile or Profile groups).
Choose Trigger types (e.g., Post published).
Add Filters:
Add condition > State > In(=) > Published, Published via Notification.
Add Actions
Add a new action > Slack Alerts > Select the appropriate Slack Team and channel (#social-published-posts).
Click Submit to save and activate the rule.
Auto-Reject & Prevent Posts Containing Sensitive Topics From Being Published
To safeguard your brand image, you can set up a rule to automatically reject posts that contain sensitive keywords like religion, politics, election, government.
Go to Publish Rule and select Add new rule.
Name the rule (e.g., "Reject Sensitive Topics Posts").
Select the Data sources (Profile or Profile groups).
Choose Trigger types (e.g., Post created, Post updated, Post approved, Post step approved).
Add Filters:
Add condition > Message Content > In(=) > religion, politics, election, government
Add Actions
Add a new action > Reject the post > Select Senstive topic in Rejection reason dialog.
Click Submit to save and activate the rule.
What Does “Add Post Color” Action Mean In Publish Rules?
Add post color is a Publish Rule action that automatically applies a selected color to a post when the rule conditions are met.
This helps teams visually organize posts in the calendar.
For example:
Condition: Caption contains “Summer Campaign" Action: Add post color → Yellow
When a post matches the condition, Statusbrew automatically applies the selected color to that post in the calendar.
This is useful for identifying campaign-related posts, content themes, regional posts, or any other group of posts at a glance without manually adding colors to each post.