How To Use Custom Fields On Posts, Conversations And Contacts
Custom fields are structured fields, such as dropdowns, text boxes, checkboxes and dates, that you add to posts, Engage conversations and contacts to track details like post status, campaign type or lead stage.
What Are Custom Fields?
Tags are great for grouping posts by campaign or theme. When you also use them for status, like draft or approved, they need constant updates and are hard to keep consistent. Custom fields give each detail its own field with values you control, so your team records it the same way every time.
You can create custom fields in three places:
Posts: track details like Post Status, Campaign Type or Priority.
Conversations (Engage): label threads by Conversation Type or Urgency, such as "Urgent" or "Billing Issue".
Contacts: store details like Account Type, Lead Stage or Support Tier.
A field only shows in the section you created it for.
Custom Field Types
Field type | What it is | Good for |
|---|---|---|
Select | One choice from a dropdown list you define | Post status, campaign type |
Multi select | Several choices from a list you define | Content themes |
Text | A single line of text | Notes, quick references |
Textarea | Several lines of text | Notes, context, feedback |
Number | Numbers only | Priority scores, budget, estimated reach |
Checkbox | Checked or unchecked | Approved?, flag for review |
Date | A date picker | Deadlines, due dates, follow-up dates |
Who Can Do This?
Creating and managing fields: Owners and Admins can create, edit, reorder and delete custom fields, in Settings → Custom fields or with Add Field on a post.
Filling in fields: regular users can't create fields, but they can set a field's value on any post they can access.
Seeing fields: custom fields are shared across your space. Everyone who can access a post, conversation or contact sees its fields.
Plans: custom fields are available on the Premium and Enterprise plans.
Custom field limits: You can create up to 30 custom fields per space and 200 per organization.
Create A Custom Field
From Settings
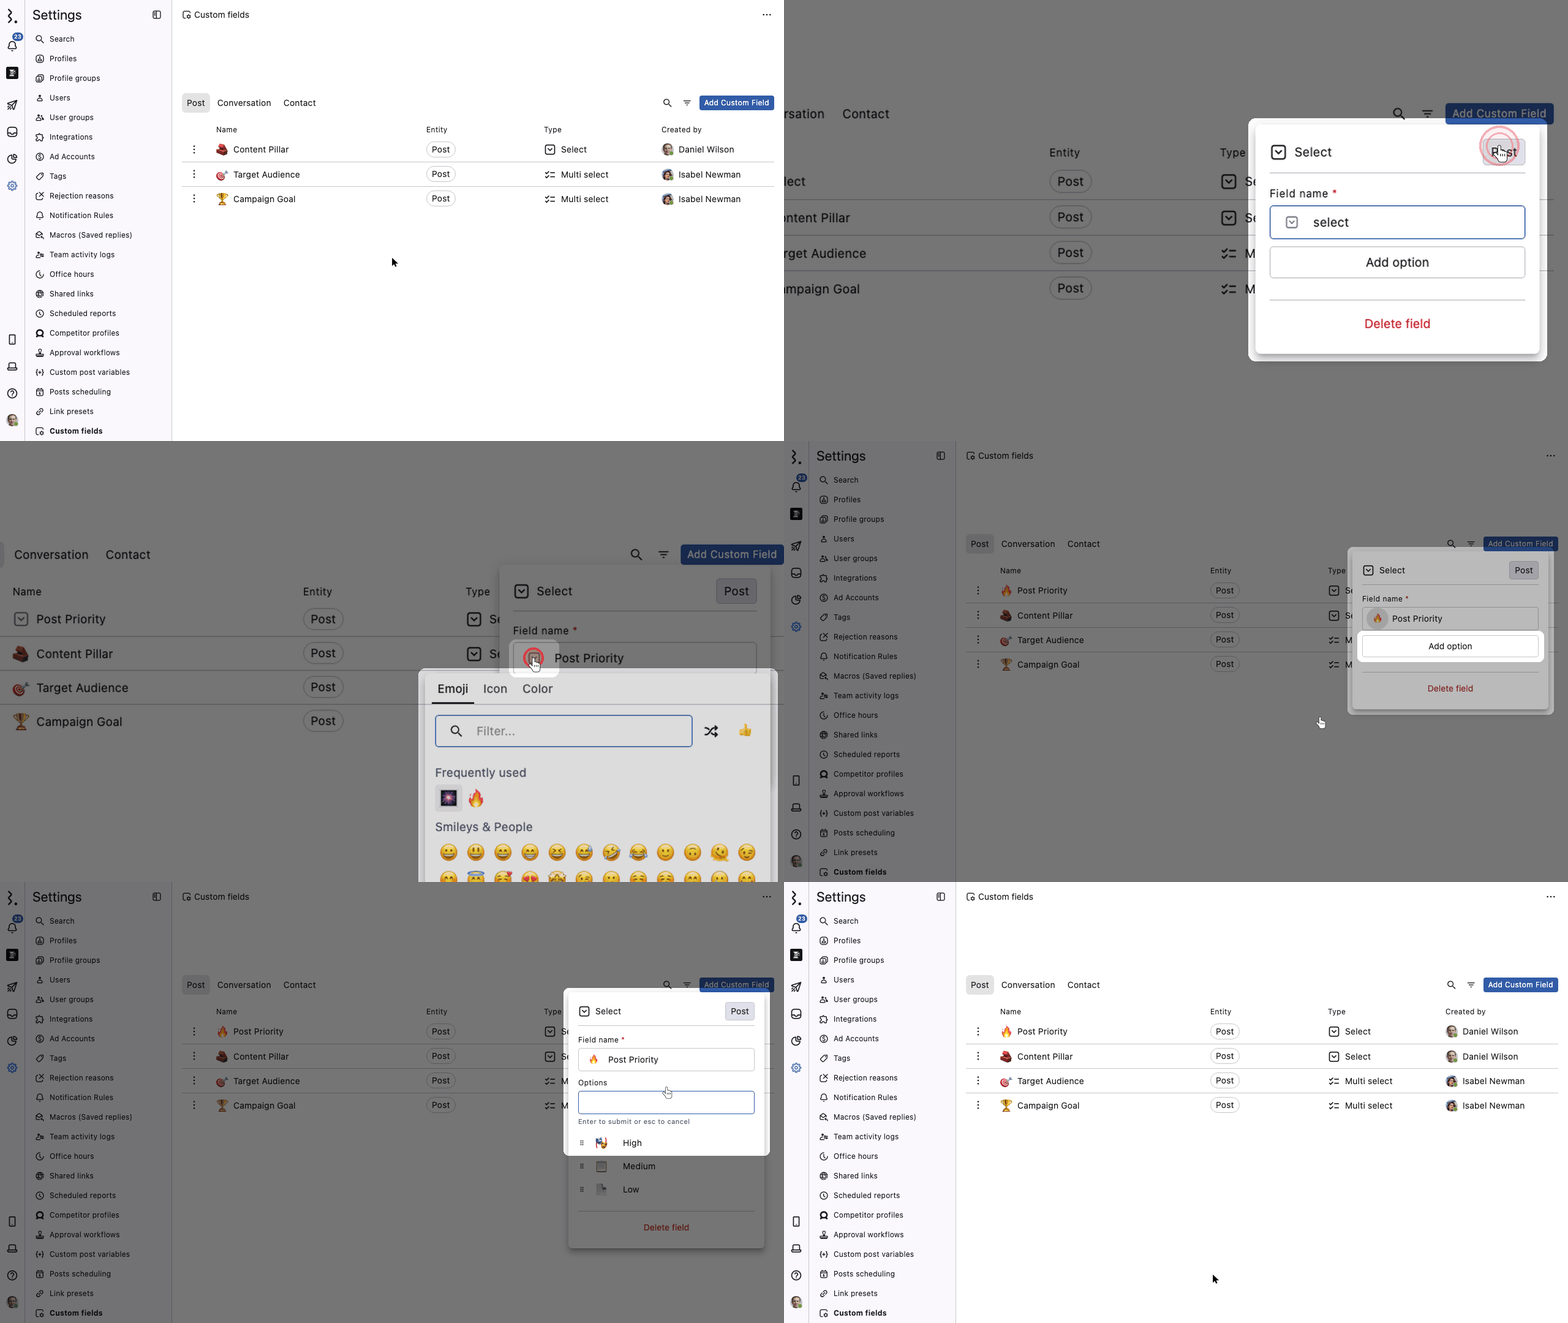
Go to Settings → Custom fields.
Pick the section the field is for: Post, Conversation or Contact.
Click Add Custom Field.
Select the field type: Select, Multi select, Text, Textarea, Number, Checkbox or Date. The field is created as soon as you pick its type.
In the panel that opens, enter the Field name and choose an icon for it. Changes save as you type.
For Select or Multi select, click Add option to add each choice.
Picking a type creates the field straight away, even before you name it (it shows as the type, for example "select"). If you picked the wrong type, click Delete field in the same panel.
Your new field now shows on every item in that section. For posts, open any post in Publish. For conversations and contacts, open a conversation or contact in Engage.
From A Post, Conversation Or Contact
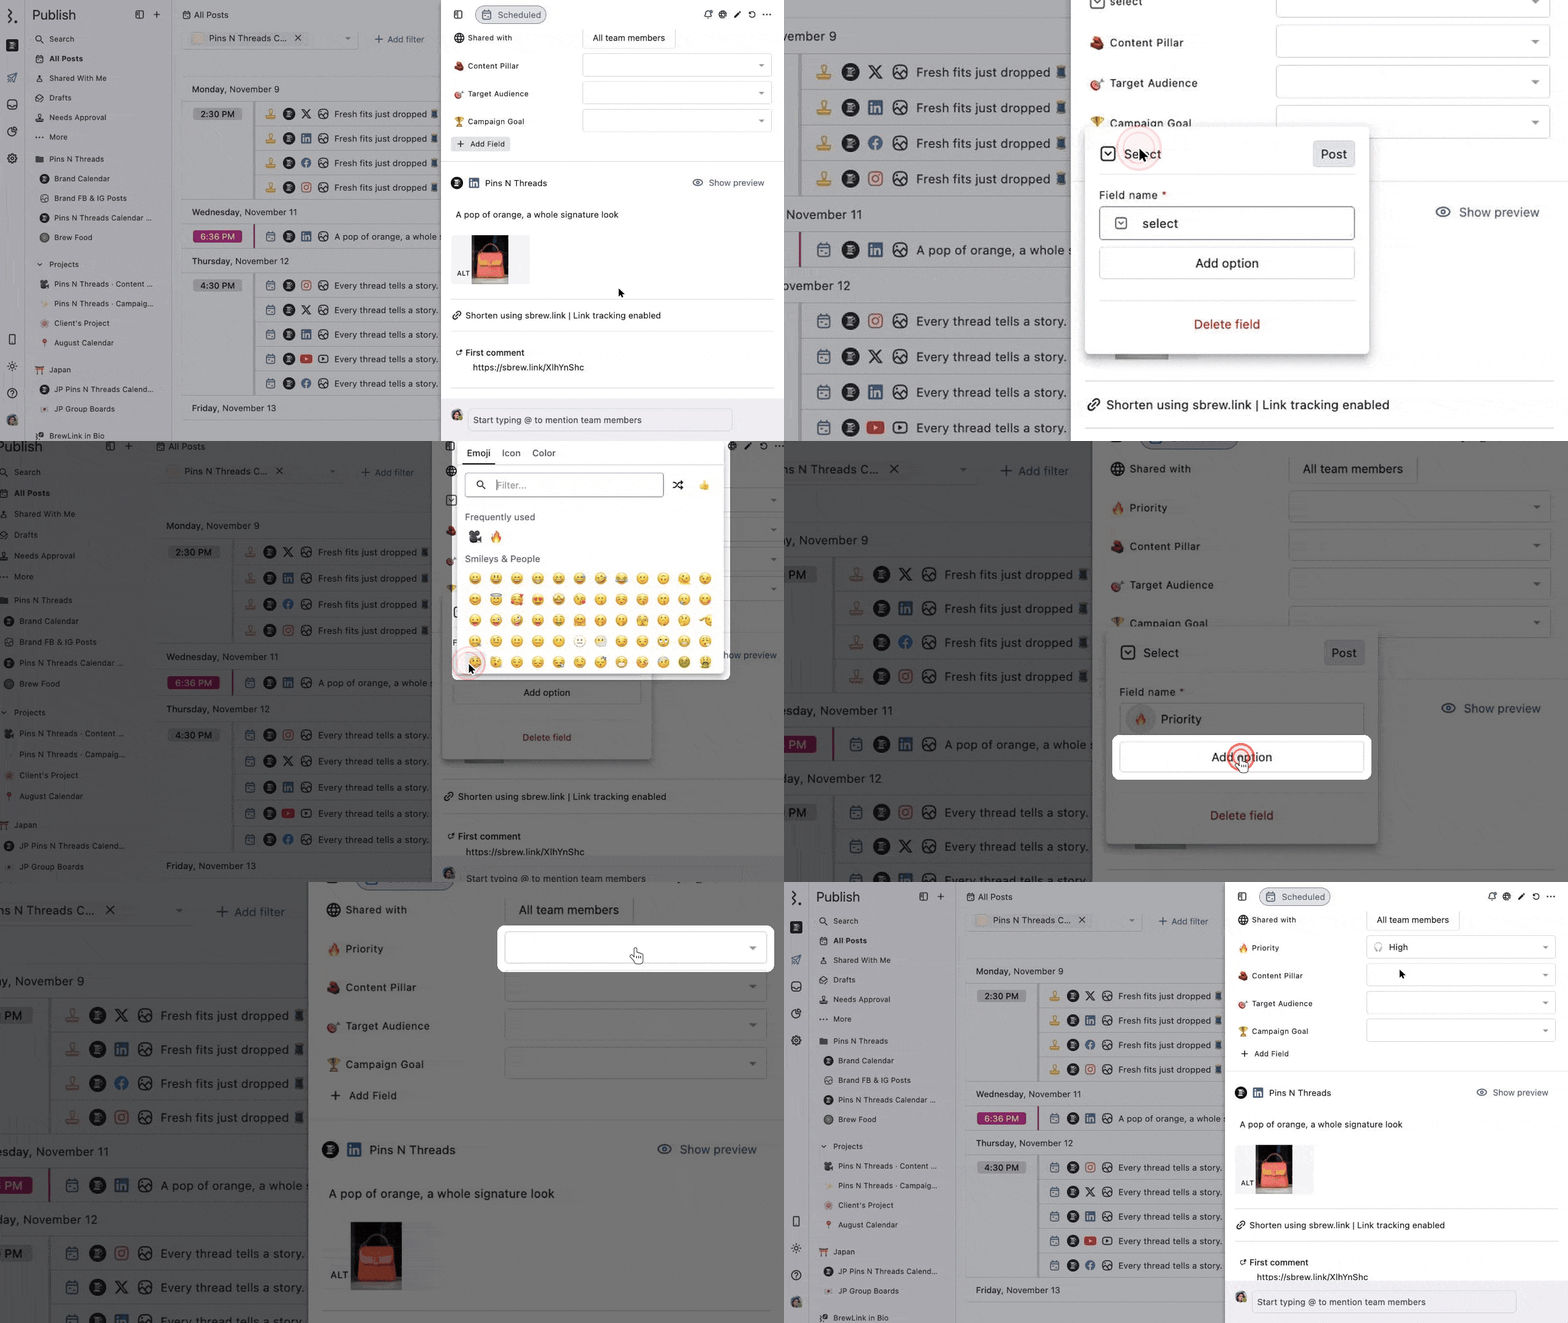
Open any post in Publish, or a conversation or contact in Engage.
In the Custom Fields section, click Add Field.
Select the field type, name it, add options if it has them and choose an icon.
Custom Fields In A Post Group
A post you create in Compose for two or more profiles is saved as a Post Group. Custom fields belong to the whole Group, the same as tags and visibility.
One value for the Group: when you set or change a custom field on any post in a Group, every post in the Group gets the same value.
Where to change it: on any post's Post Detail view, or in the Group sidebar.
Stays in the Group: changing a custom field never takes a post out of its Group.
The Post Detail view of a Group post reminds you with this note: "Tags, visibility and custom fields are shared with the group. Changes here update all posts in "Group name"." Learn more in Post Groups in Statusbrew.
Edit A Custom Field
From Settings
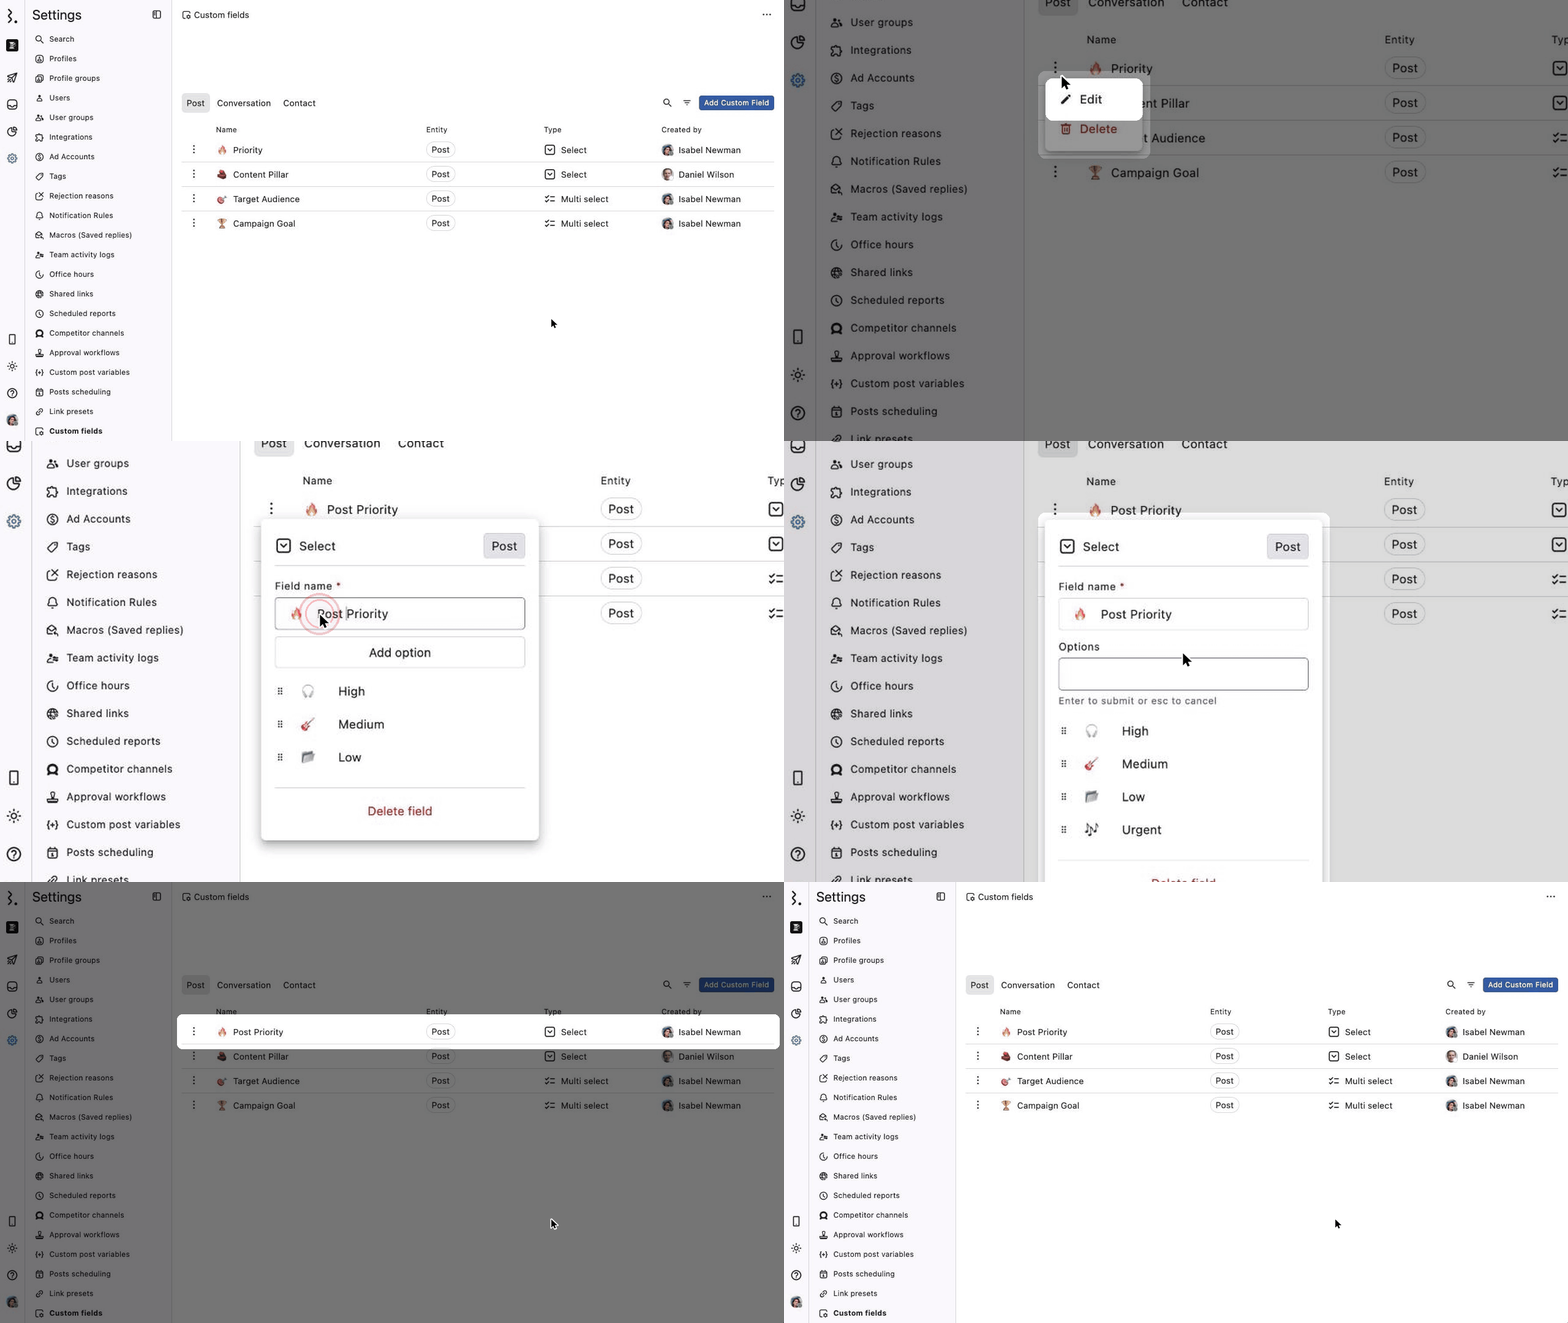
Go to Settings → Custom fields and open the Post, Conversation or Contact tab.
Click More (three dots) next to the field and select Edit.
Change the field name or options. For Select and Multi select fields, you can add, remove or reorder options.
From A Post, Conversation Or Contact
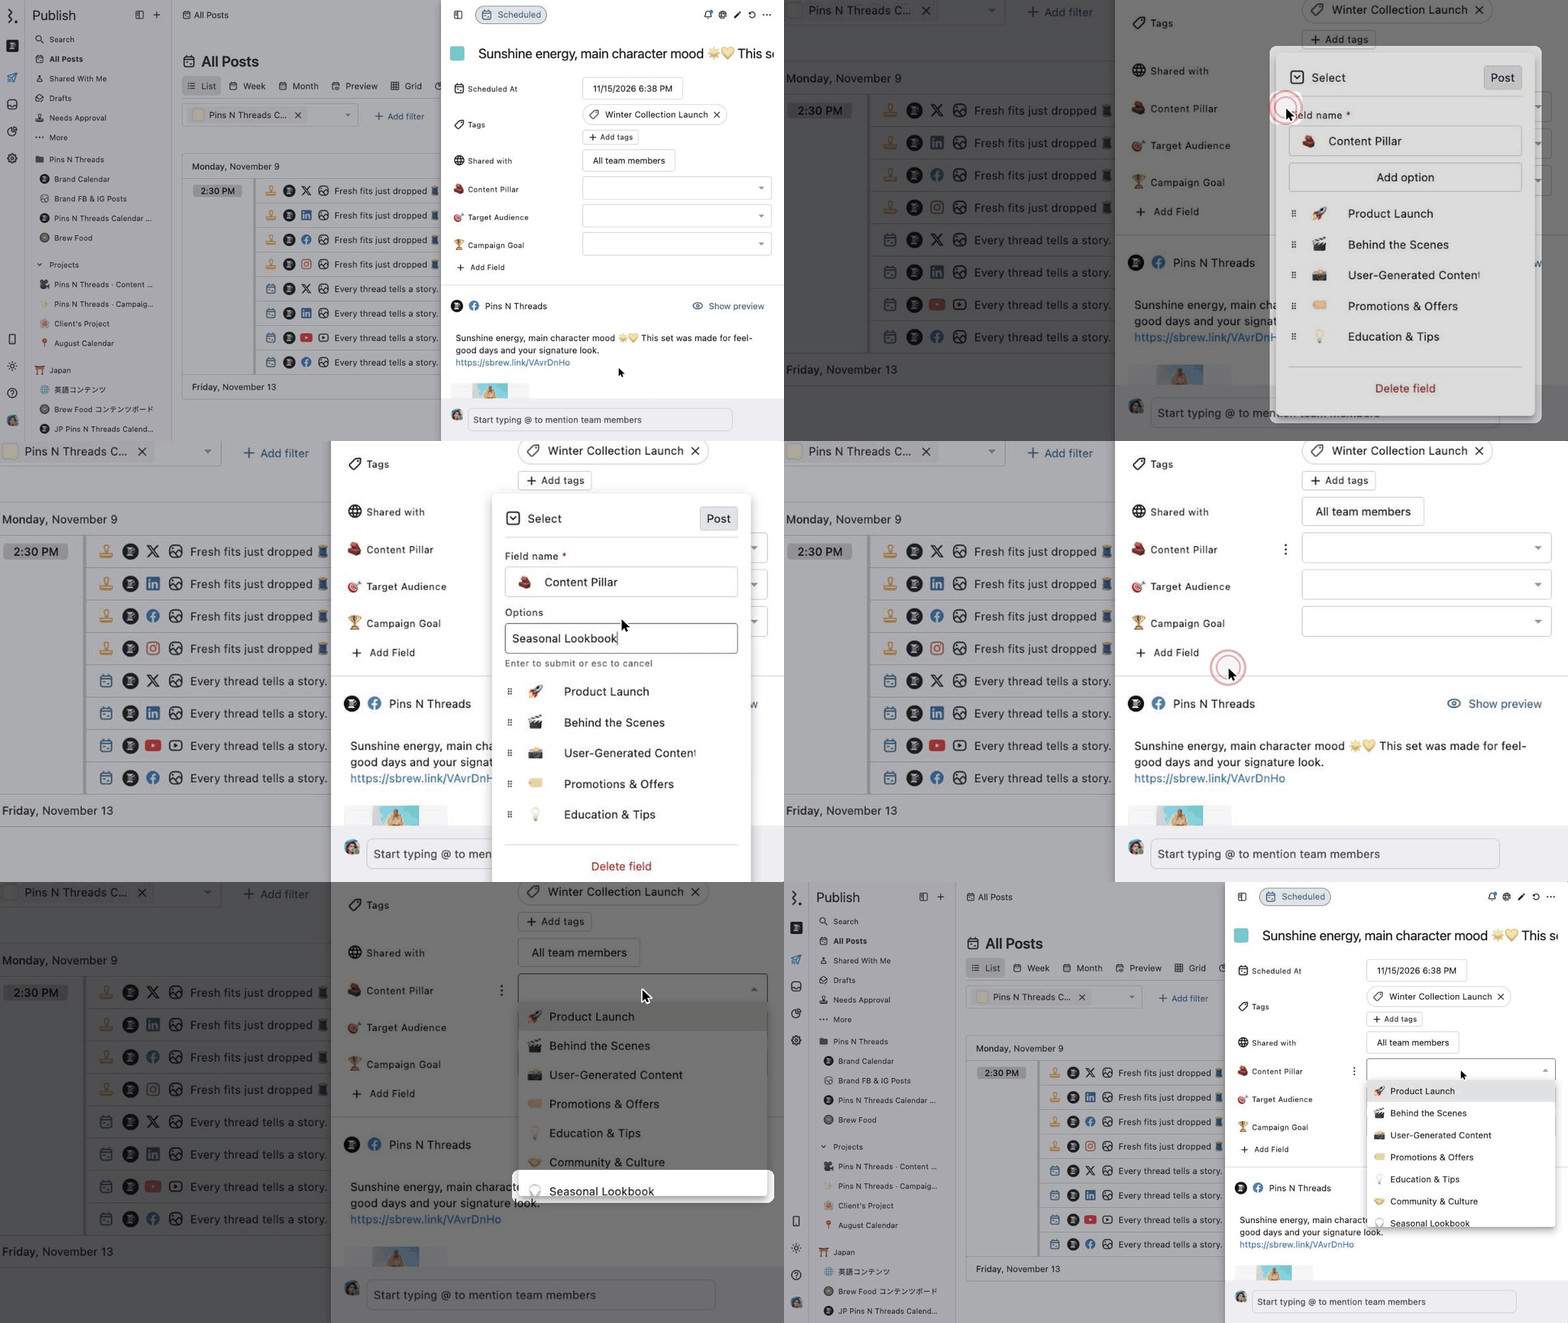
Open any post in Publish, or a conversation or contact in Engage.
Hover over the field and click More (three dots) next to its name.
Change the field name or options. Your changes save automatically.
Show Custom Fields From Other Spaces
The list in Settings → Custom fields shows each field's Name, Entity, Type and Created by. It opens on Current space, which shows the fields assigned to the space you're in. To see more, click the filter icon next to the search icon above the list and pick an option:
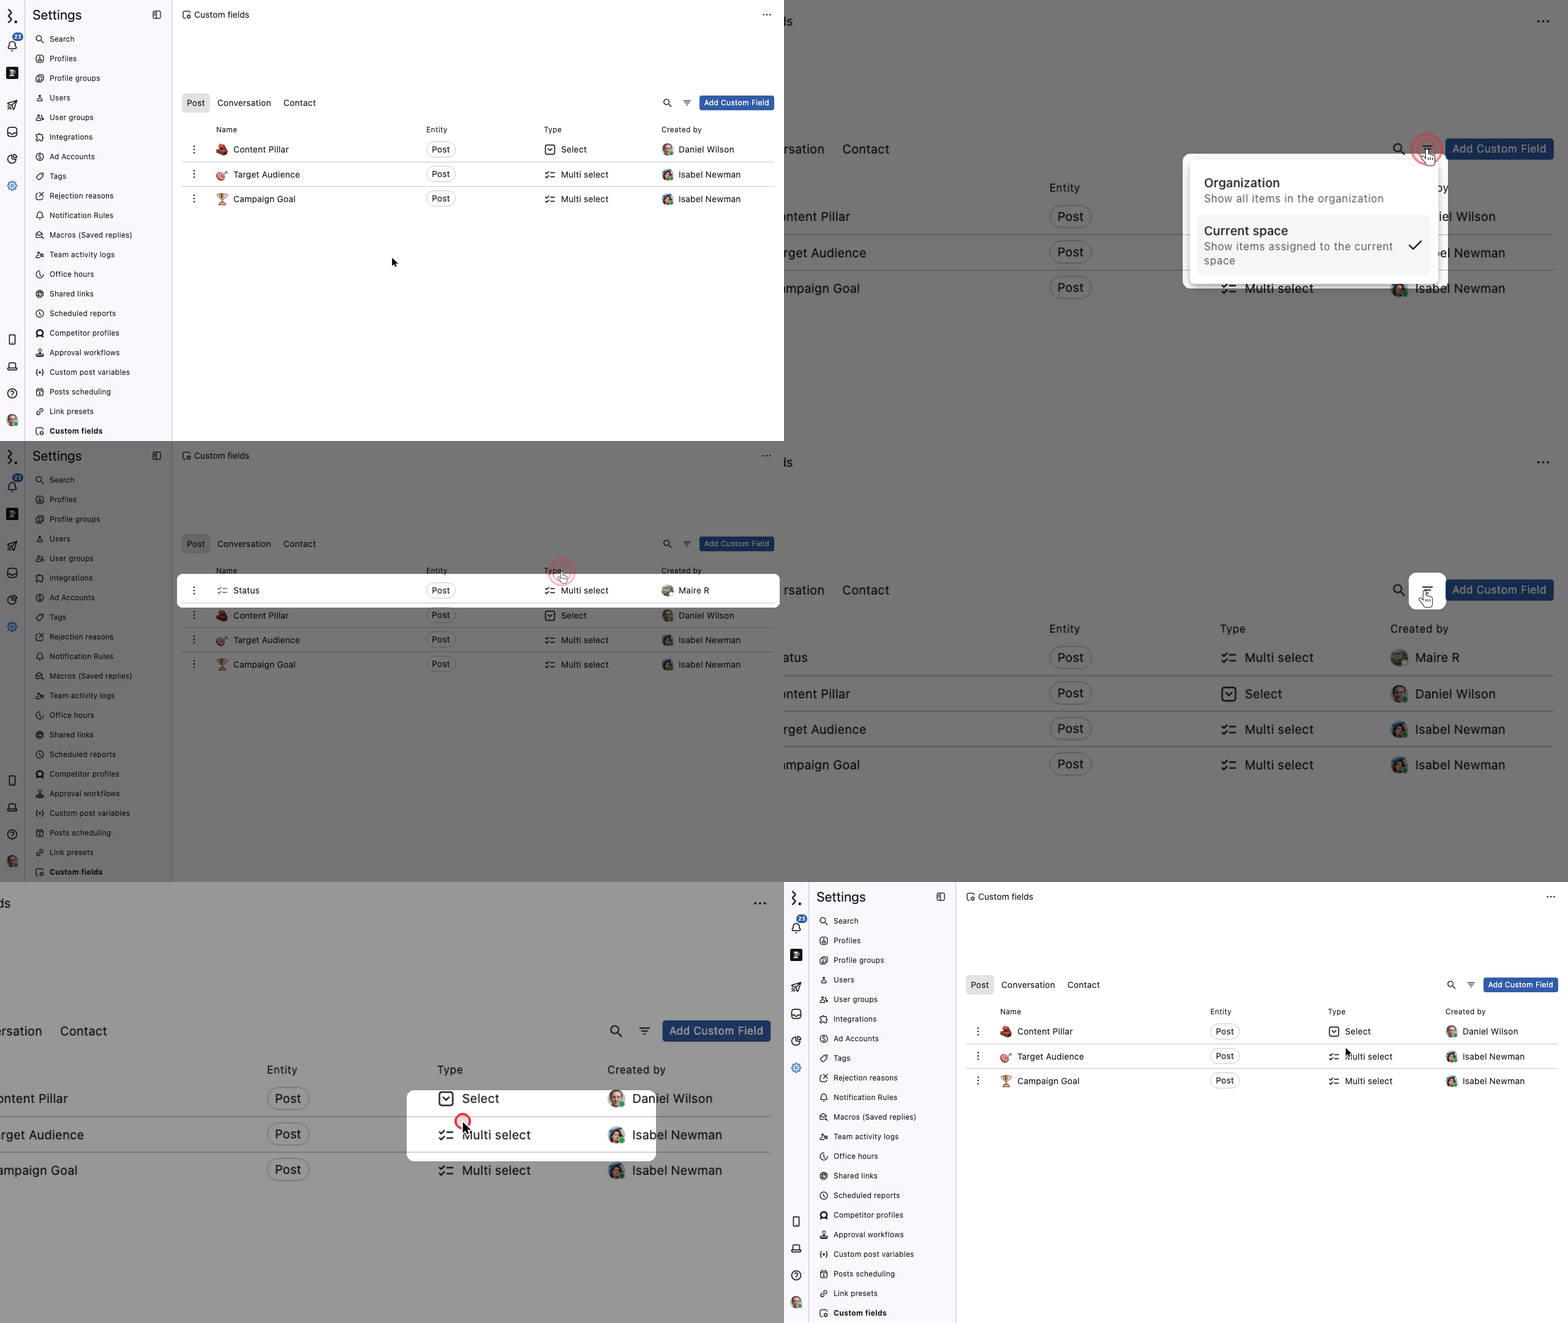
Organization: Show all items in the organization.
Current space: Show items assigned to the current space.
Reorder Custom Fields
The order you set is the order fields appear on posts, conversations and contacts, so keep the most important ones at the top.
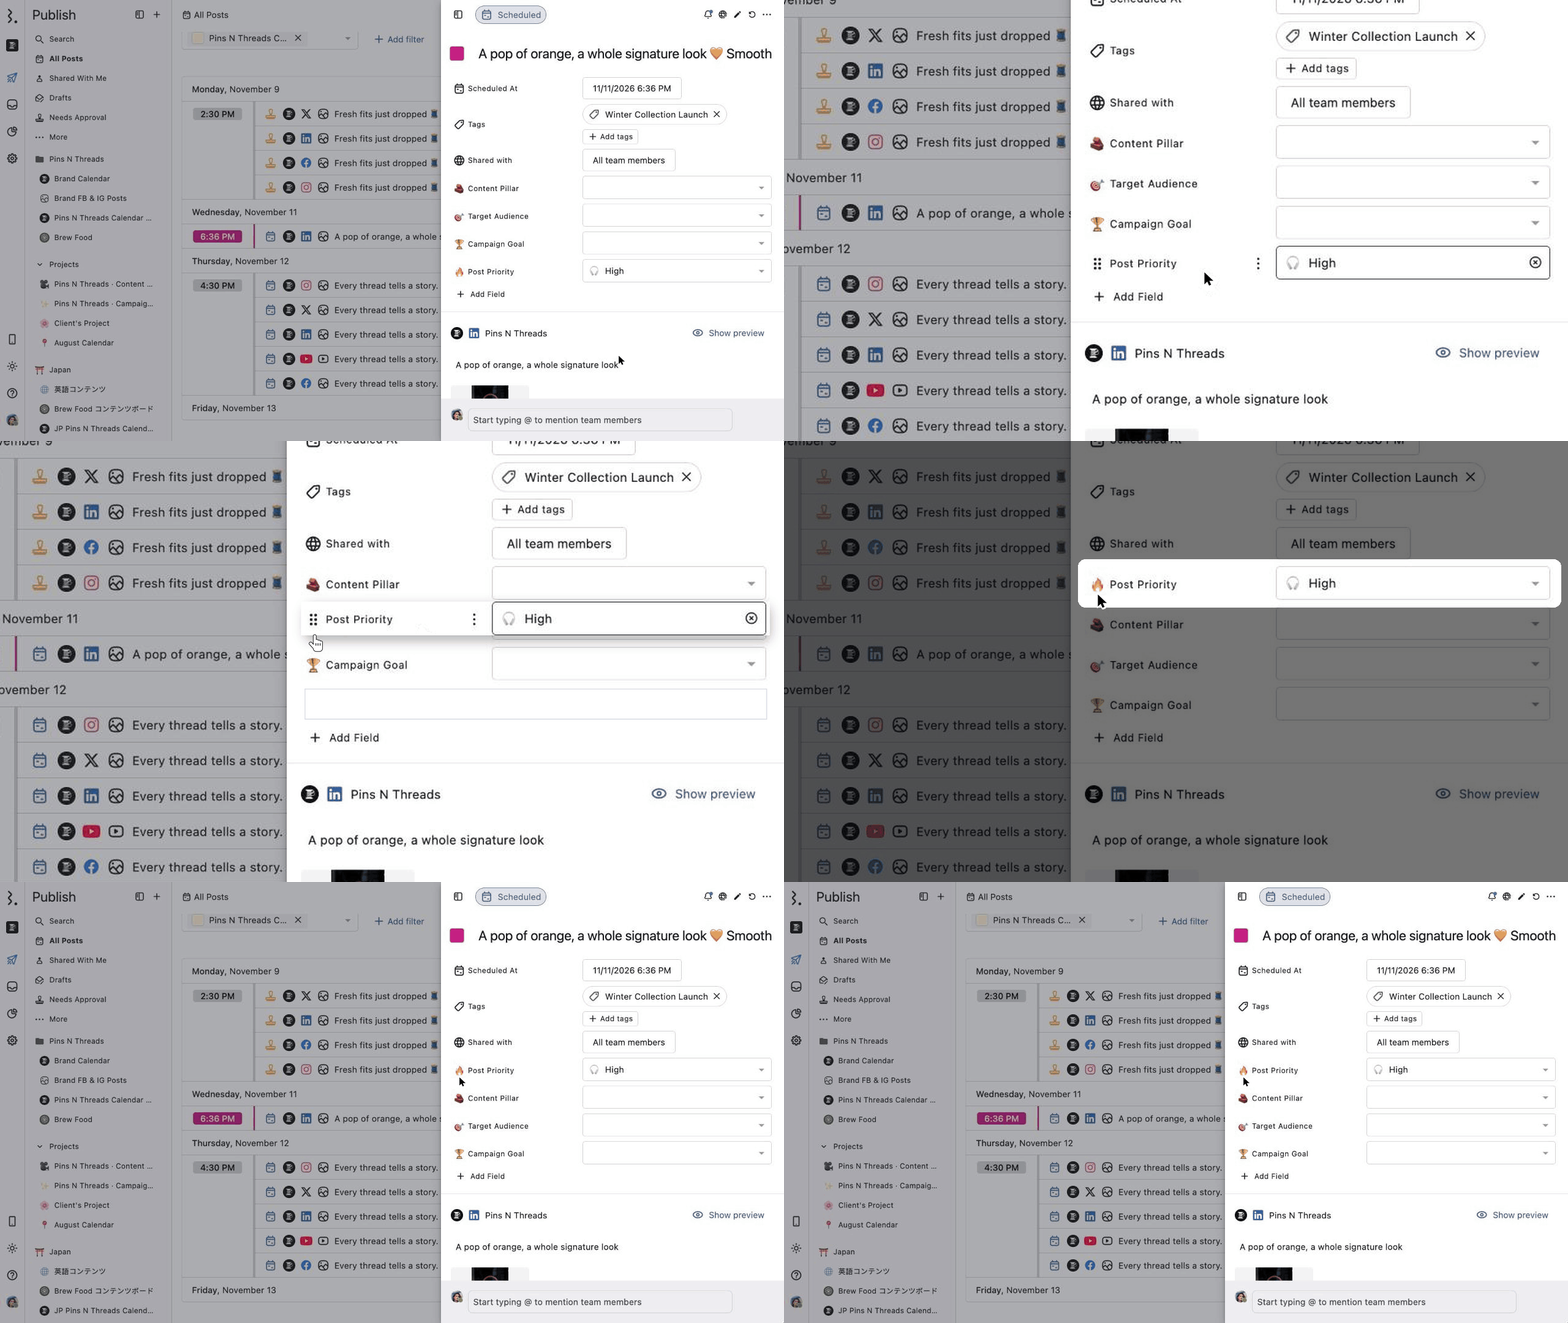
Go to Settings → Custom fields, or open any post in Publish or a conversation or contact in Engage.
Hover over a field and drag it by the handle icon next to its name.
Drop it in its new spot. The new order saves automatically.
Bulk Update Custom Fields
Set the same value on many posts or conversations at once.
In Publish
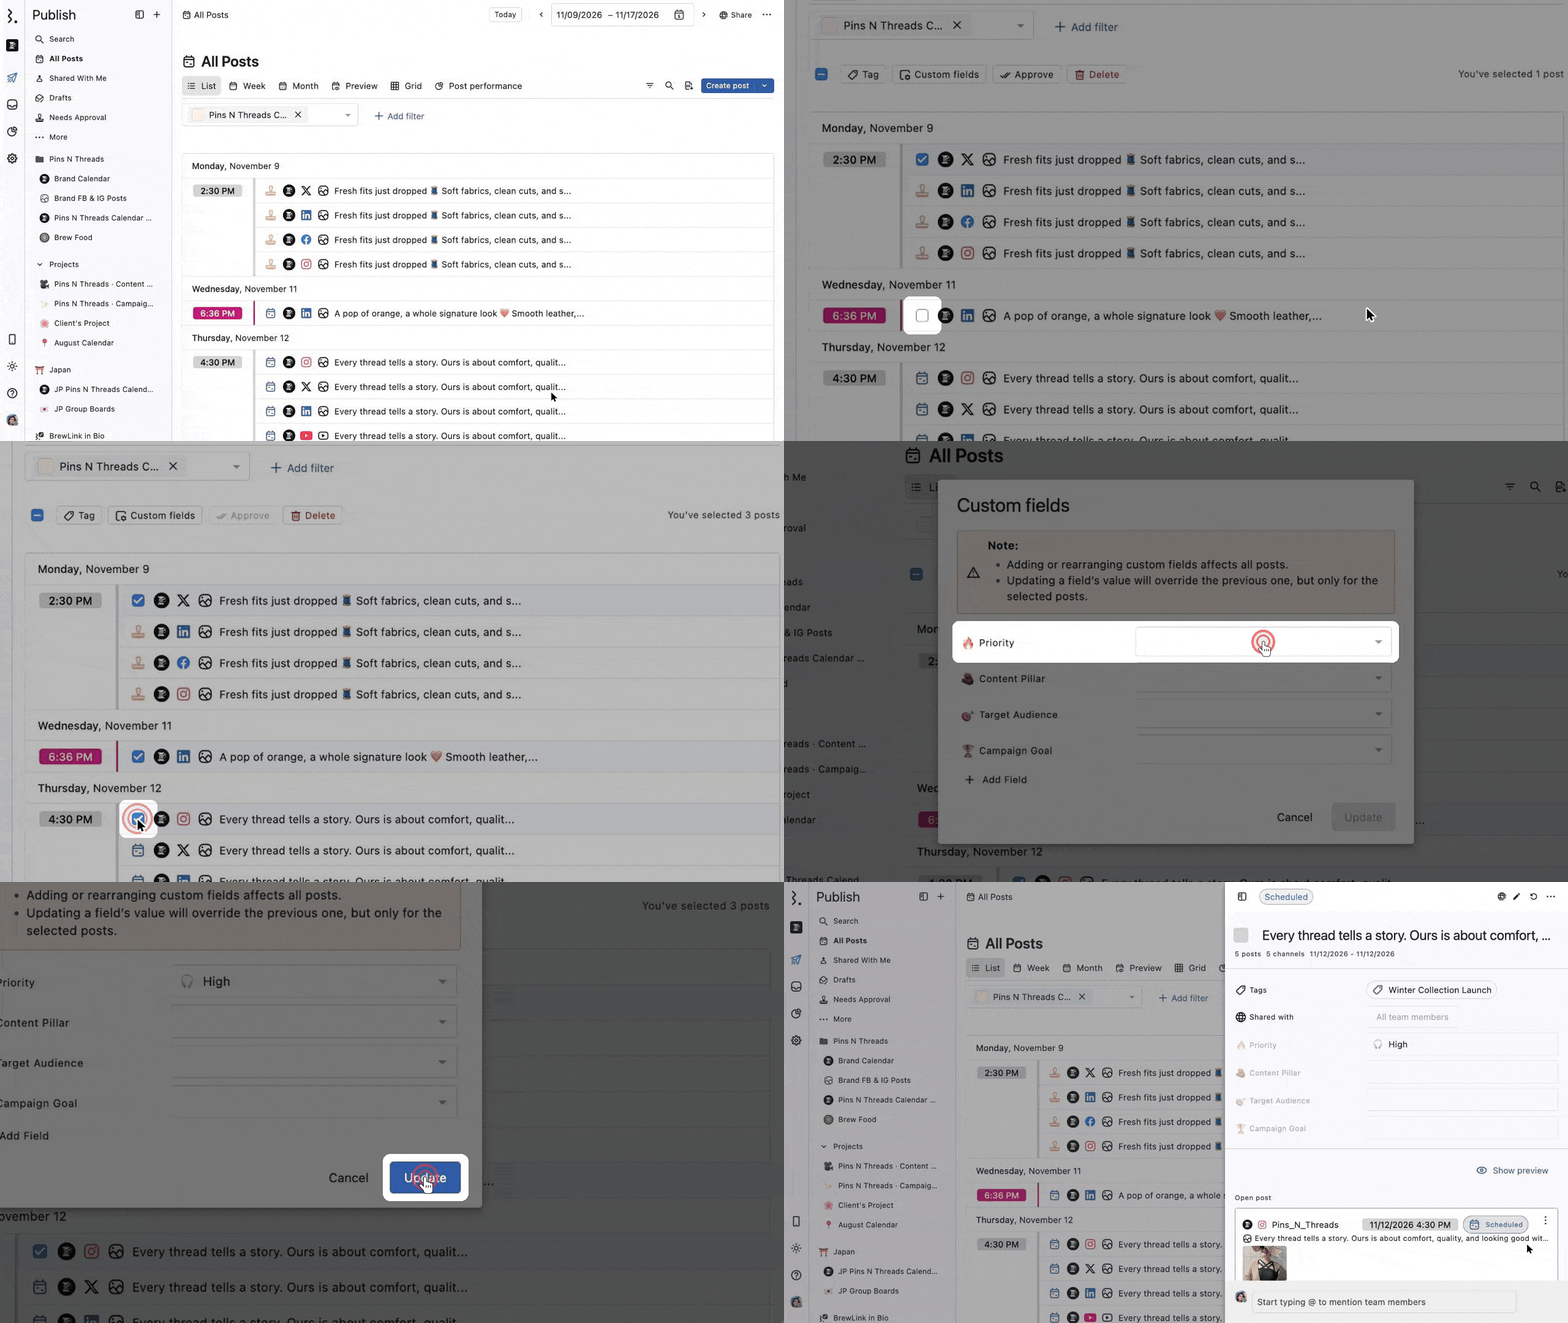
Go to Publish → All Posts and switch to the List view.
Hover over a post and tick its checkbox. Tick every post you want to update.
In the bulk actions bar (Tag, Approve, Custom fields, Delete), click Custom fields and update the field in the pop-up.
In Engage
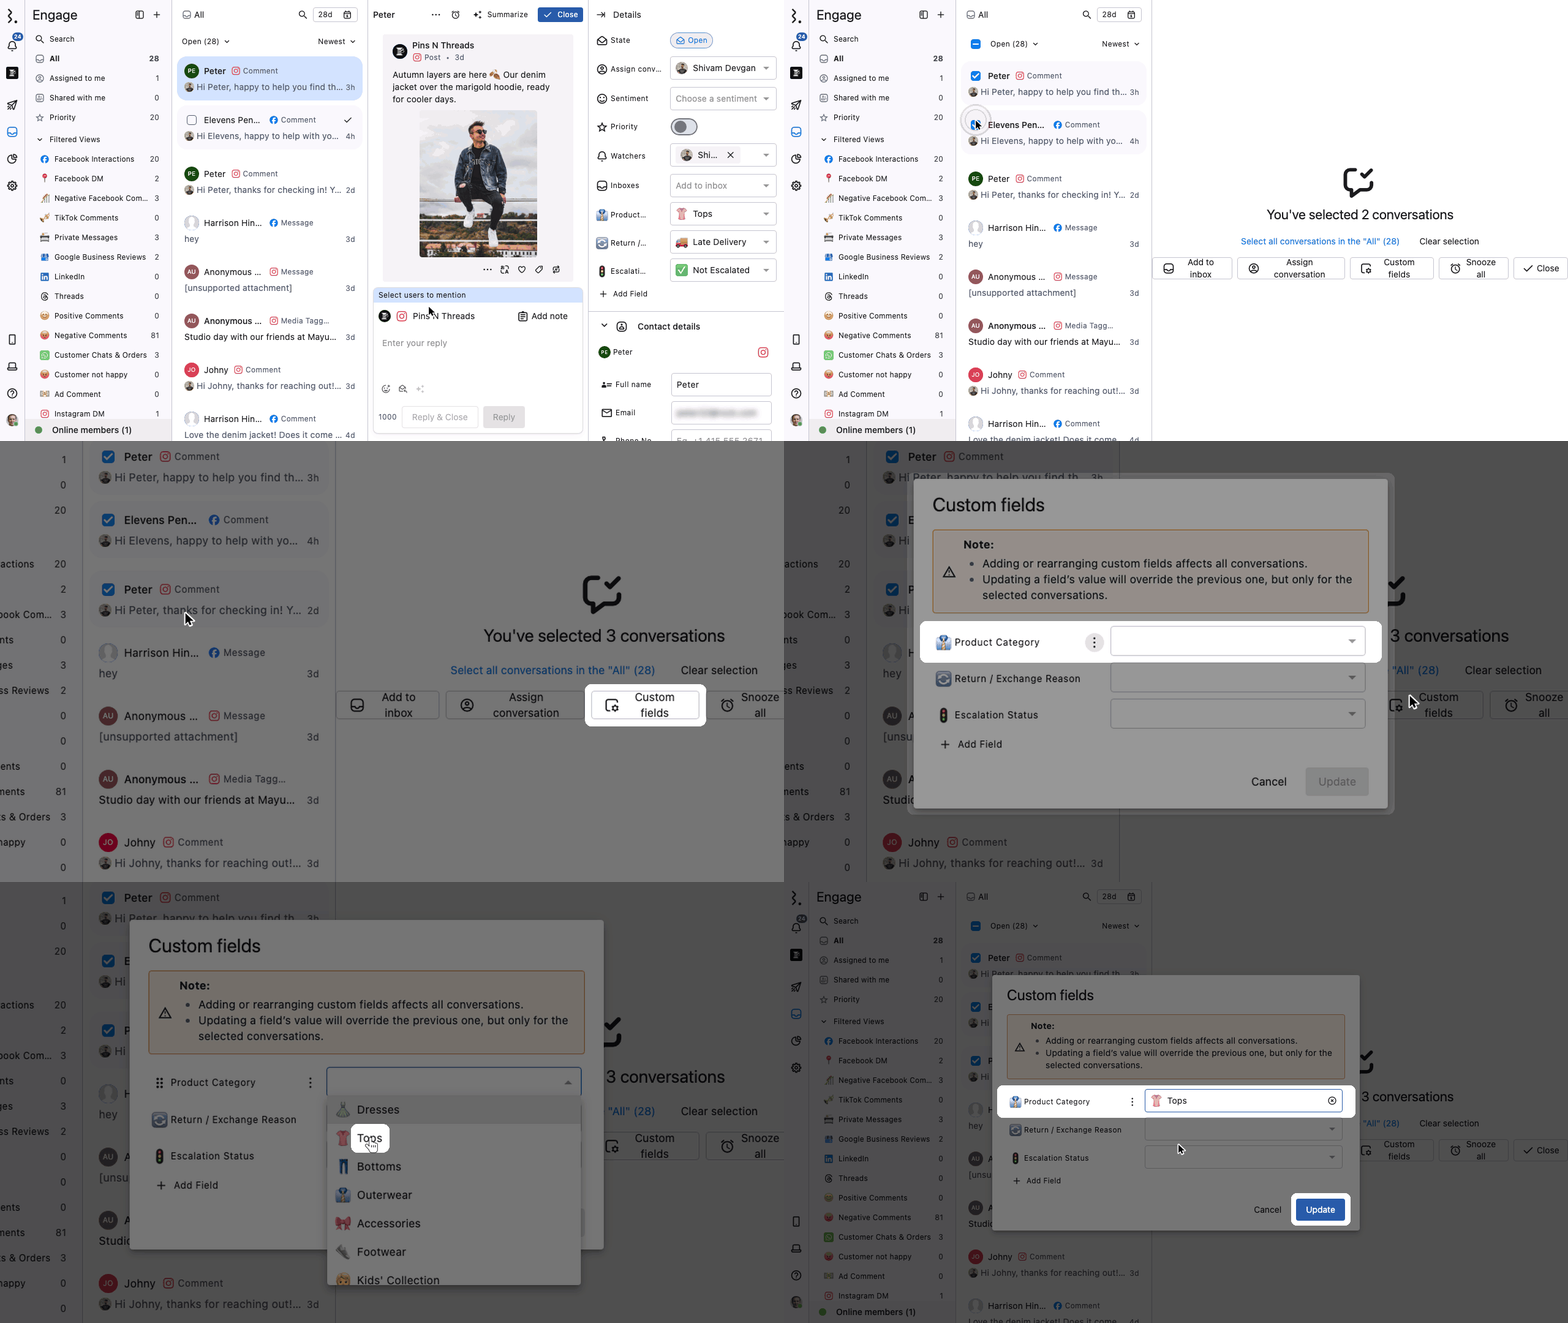
Hover over a conversation in the conversation stream and tick its checkbox. Tick every conversation you want to update.
In the bar that shows "You've selected N conversations", click Custom fields.
In the Custom fields pop-up, set the values. Click Add Field to add another field.
Click Update.
Updating a field's value overrides the previous value, but only for the selected conversations. Adding or rearranging custom fields here affects all conversations.
Delete A Custom Field
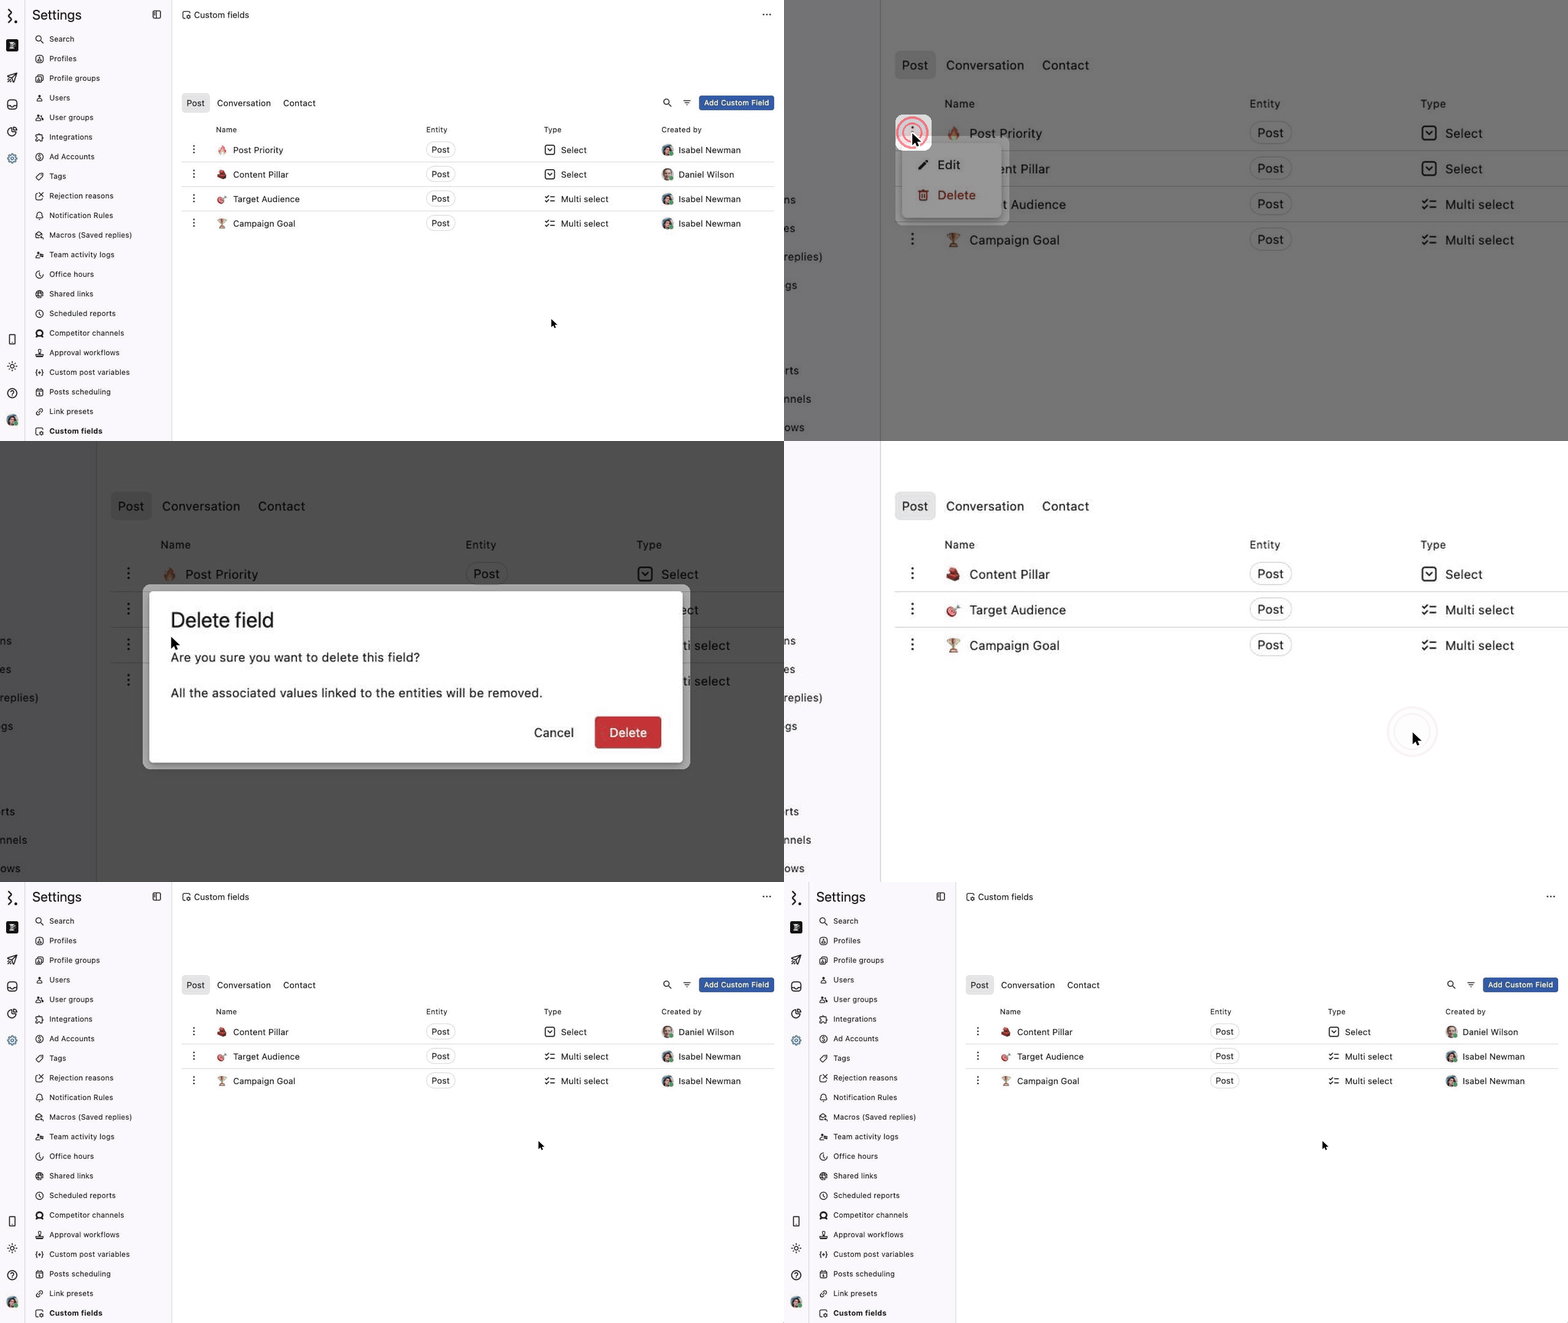
Go to Settings → Custom fields, or open any post in Publish or a conversation or contact in Engage.
Click More (three dots) next to the field. On a post, conversation or contact, hover over the field name first to show it.
Click Delete and confirm.
Deleting a custom field removes it from every post, conversation or contact that uses it, and its stored values are lost.
FAQs
If I Change A Custom Field On One Post In A Group, Do The Other Posts Change Too?
Yes. Custom fields are shared across a Post Group, so the change updates every post in the Group. The post stays in its Group. To give one profile's post a different value, it needs to be a standalone post, for example one you created with Separate posts.
What's The Difference Between Tags And Custom Fields?
Tags group items by campaign or theme, and an item can have many. Custom fields store one specific detail in a set format, such as a dropdown value, a number or a date, so your team records it the same way every time.
Can I Change A Custom Field's Type After Creating It?
No. A field's type, such as Select, Text or Checkbox, is fixed once you create it. Delete the field and create a new one with the type you need.
Can Everyone In My Space See Custom Fields?
Yes. Custom fields are shared across your space and visible to every user who can access the post, conversation or contact.
Can I See Custom Fields From Other Spaces?
Yes. Go to Settings → Custom fields, click the filter icon next to the search icon and select Organization to show all custom fields in the organization. Select Current space to see only the fields assigned to the space you're in.
Do Custom Fields Change How Or When A Post Publishes?
No. Custom fields are for internal tracking only. They don't change how or when a post publishes.
Can I Report On Custom Fields?
Yes. You can use custom fields as dimensions or filters in your reports.
Can Filtered Views Filter By Custom Fields?
Yes, by conversation custom fields. Filtered View filters show conversation fields, not contact fields.
Are Custom Fields Included In Exports?
No. Custom fields aren't included in exported data right now.
Why Can't I See Custom Fields?
Custom fields are available on the Premium and Enterprise plans. If your space is on another plan, custom fields don't show on your post, conversation or contact.
How Many Custom Fields Can I Create?
You can create up to 30 custom fields in each space and 200 across your organization. When you reach the maximum, you'll see a message asking you to contact support. Anything you already have above a limit is kept, but you can't add more until you are under it.