Understanding Approval Workflows
Every team has its own unique processes, so why should there be a limit on yours?
Statusbrew's Approval Workflows help teams collaborate by creating customizable multi-step and multi-user workflows that facilitate submitting, reviewing, approving, or rejecting outgoing social posts.
Use Approval Workflows to:
Mitigate errors 😵
Avoid grammatical mistakes ✍️
Ensure compliance ✅
Complete legal obligations 👩⚖️
Bolster agency collaboration 🤝
Approval Workflows are only available in Statusbrew's Premium and Enterprise plan.
You can create and manage multi-step, multi-level approval workflows from the approval workflow settings. The workflows will then be accessible from Compose for anyone with publishing permissions.
Only users with Primary Owner, Owner, or Admin access can create an approval workflow. If you do not see the option to create one, make sure your user role is one of the roles listed above.
How To Set Approval Permissions For Team Members?
Define who has specific publishing permissions for each profile/profile group.
You can assign team members who can approve posts before they are published, or set permissions for users (like interns) who can send posts for approval (and can’t publish or schedule posts directly).
You can manage these permissions while inviting a new user or later by editing the user settings.
Go to Settings.
Select Profiles.
Click (More) beside the profile you want to set permissions for.
Select Edit.
Click Add permissions.
Select the desired permission you would like to set.
Full Publishing: Users can create, schedule, and publish posts without needing approval. Users can also approve/reject posts sent for approval.
Create Post (needs approval): Users can create posts, but cannot schedule or publish posts directly. Once a post is created, they can either save it as a draft or submit it for approval.
In the field next to the selected permission, enter the user(s) and user group(s) you want to grant access to. You can select from Frequently used options or search for specific user(s) or group(s) using the search bar.
Click Update to apply the changes.
How To Configure Approval Workflows?

You have flexibility when setting up your workflows. You can create simple workflows with just one step and one approver, or build complex workflows with multiple steps and several users assigned to approve at each level.
Admins can set up custom content approval workflows. You can add as many steps or levels as needed and assign as many users/user groups as approvers at each level.
Each level can include one or multiple approvers, and only one approval is required to complete that step in the workflow.
If multiple people are included in a step of a workflow and you want to track who approved a post, you can review it in the Post Logs.
Approval rules automatically apply to all posts created by users with Create Post (needs approval) permissions.
To set up approval workflows:
Go to Settings.
Select Approval workflows.
Click Create Workflow.
Give an appropriate Workflow name (up to 64 characters).
Now, you can start adding steps to your workflow
Adding Steps
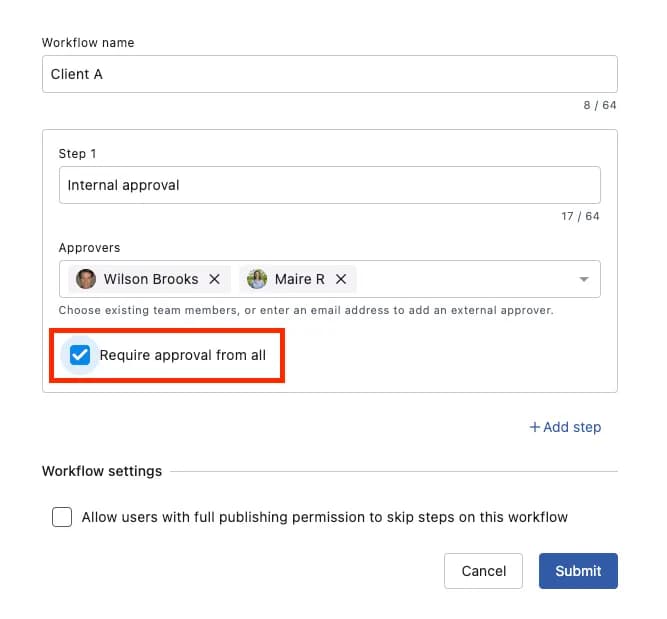
Add an appropriate name for Step 1 (up to 64 characters).
Select Approvers from the dropdown. Choose existing team members, or enter an email address to add an external approver.
For any step, if you want the post to move to the next step only after it has been approved by all approvers, you should check the box of Require approval from all. If this option is not selected, then the post will move to the next step in the workflow when any one of the approvers of that step approves the post.
Click Add step to add another step to your workflow.
If you need to delete a step, click Remove step.
Removing steps from a saved approval workflow is not possible. Steps can only be removed or deleted while you are still configuring the approval workflow.
To remove a user/user group as an approver, click (Close) next to a user or user group.
Click the Submit button once you've added all the steps in your workflow.
Note: If you want users with Full Publishing permission to bypass steps in an Approval Workflow, select Allow users with full publishing permission to skip steps in this workflow in Workflow settings before saving.

If you delete an approval workflow with active posts awaiting approval, the posts will be automatically rejected.
Learn more about Access Permissions
Post Detail View
When a post is submitted through an Approval Workflow, you can easily track its current progress and approval status directly from the Post Detail View.
The approval section displays the current step number, step name, and whether the step requires approval from all approvers or just a subset.
You can view the number of approvals required, how many have been completed, and who has already approved the post.
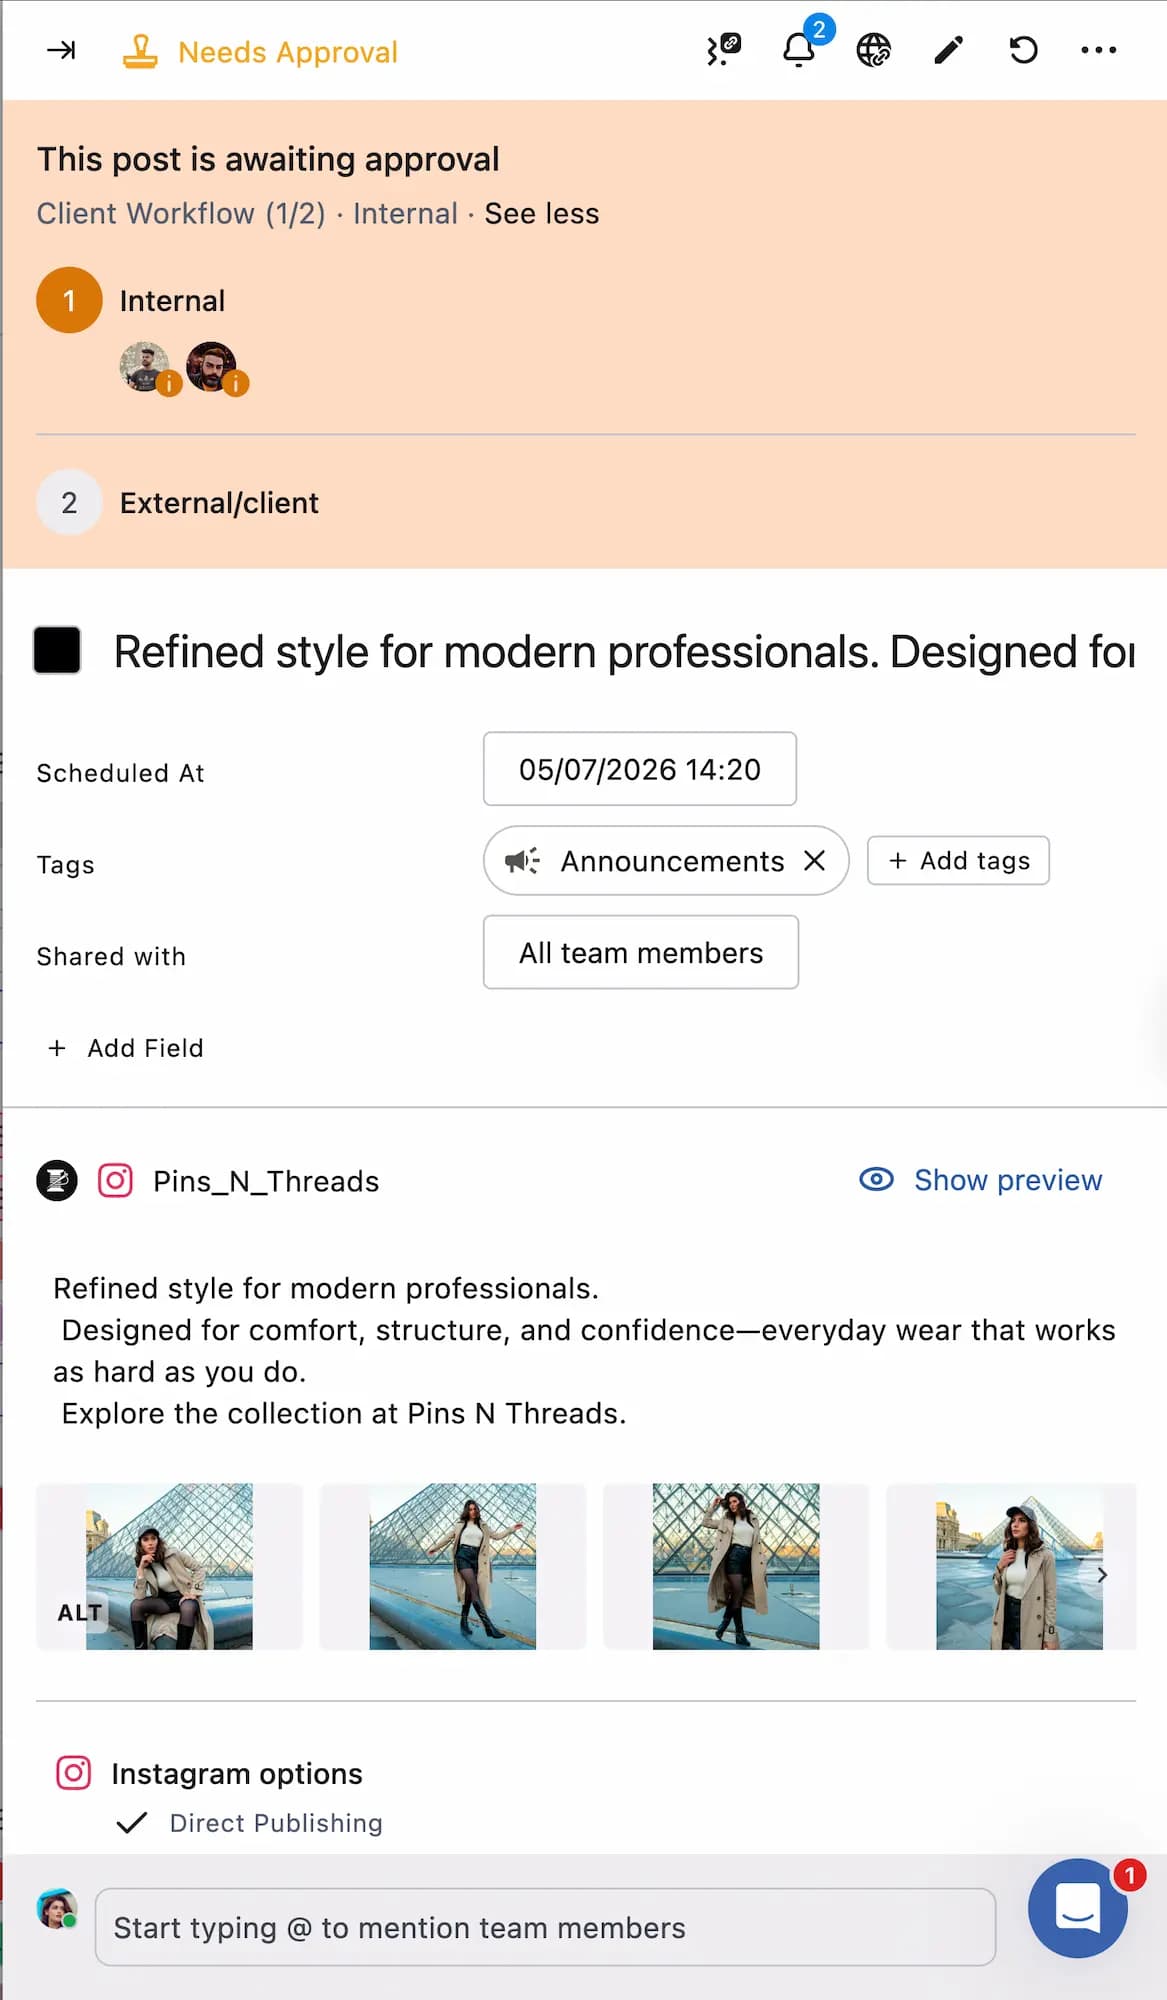
When you hover over a profile picture in the approval list, a tooltip appears showing whether that person has approved or if their approval is still pending.
How To Manage Approval Workflows?
Go to Settings > Approval Workflows. The Approval Workflow window will open, showing a list of all workflows you (or your team) have created. Here, you can see each workflow’s name, last edited time, number of steps, and its current status (active or paused). From here, you can select any workflow to manage or update, or use the search bar to quickly find a specific workflow.
To edit a workflow:
Click (More) beside the workflow you want to edit.
Select Edit.
Make the required changes to your workflow.
Click Submit
If you want to pause an approval workflow, deselect the checkmark for Activate workflow.
For a paused workflow, select the checkmark for Activate workflow to resume it.
To delete a workflow, select Delete from the dropdown that you get by selecting (More) beside the workflow you want to delete.
How To Send A Post For Approval?
To submit a post for approval:
Create your post in Compose.
Click Choose approval.
Select the Approval type from the dropdown.
Select users: Select specific user(s)/user groups(s) to approve the post.
Approval Workflow: Select the pre-configured approval workflows to send the post for approval. If you don’t have any approval workflows created yet and choose this option, you’ll see a Create a new workflow button in the Choose approval dialog box. Clicking this button will take you to the Create workflow window, where you can set up your desired workflow before sending the post for approval.
Click Save.
The Post now will change to Send for approval. Clicking on this option will send the post for approval with the message “Success! Your post is scheduled for publishing” and reopen a blank Compose screen to create new content.
Send for approval and duplicate
Clicking in front of Send for approval will reveal the Send for approval and duplicate option.
This option will send your post for approval and keep the post content and its settings in Compose for editing for other profiles or networks.
You can save the post as a draft without submitting it for approval. To do so, checkmark the Save as draft option without selecting approvers.
Users in the selected approval workflow will receive email, mobile, or desktop notifications when a post is submitted for their review.
If you use Slack, you can also connect your Statusbrew account with your Slack workspace to receive approval notifications directly in Slack. Learn more about Slack Integration.
Note: If a submitted post doesn’t get rejected or approved before the originally scheduled time, it is automatically rejected.
Posts awaiting approval will appear in the Publish. As the original submitter, you can edit the scheduled post before it’s approved.
Users with the Full publishing permission for profile(s)/profile groups(s) aren't required to submit the post for approval, but they can if they'd like to get it reviewed by another user.
Approving A Post
Approvers (Admins and users with Full publishing permission) can find posts awaiting approval in the Publish. These posts appear in the List, Week, Month, Preview, and Grid (only Instagram posts) tabs.
Needs Approval
The Needs Approval section contains all of the posts waiting on review.
You can toggle visibility of posts across:
All of my team's approvals: View every post that’s currently awaiting approval from your entire team — useful for managers or admins overseeing multiple workflows.
Posts I can approve: Filter the list to show only the posts you have permission to review and approve.
You can use the Sorting dropdown to organize posts in the Needs Approval section based on your preference:
Scheduled time soonest: Shows posts in order of the closest upcoming scheduled publish time, so you can prioritize what’s due first.
Scheduled time furthest: Displays posts starting with those scheduled to publish furthest in the future.
Last modified oldest: Lists posts starting with the ones that haven’t been modified for the longest time — helpful for spotting posts that may be stuck or overlooked.
Last modified newest: Shows the most recently edited posts first, so you can quickly find the latest updates or changes.
Hover over a post to open the Post Details. As an approver, you can Reject, Approve, Edit post, Delete post, Duplicate post, Show Preview, or Recall post. You can even mention a user/user group or add a comment to the post and review approval activity.
Rejecting A Post
If you approve a post and it has a multi-step approval workflow, it will move to the second step after approval.
If you reject a post, the Reject Post dialog box will open where you can select a Rejection reason and add any additional comments. You can customize these reasons by clicking Manage rejection reasons in the same dialog box.
When a post is rejected, the author will find it in their Rejected section. They can click on any rejected post to see the approver’s rejection reason and notes in the All activity section of the Post Detail. The author can then edit the post and resend it for approval, or choose to delete it if it’s no longer needed.
The All activity section of the Post Detail also displays when changes are made to the post, who made the changes, and any internal comments added by other team members.
Exporting Posts
If you wish to export Needs Approval posts, click (Export options) at the top right corner and select Export CSV.
Editing A Submitted Post
The original author and any Admins/Owners can edit the post content, recall it, duplicate it, delete it, select a different approval workflow, or update the schedule dates and times.
You can't change the profiles selected in the Profile Picker.
A post saved as a draft has to be sent for approval before it can receive approval.
Note: If a submitted post doesn’t get rejected or approved before the scheduled time, its status changes to Expired.
Expired Posts
Apart from showing posts waiting for approval, the Needs Approval section also displays Expired posts. These are posts whose scheduled publish time has passed without being approved or rejected in time.
Expired posts can still be rejected to provide feedback to the original creator, but they cannot be approved once the scheduled time has expired. To publish the content, the post must be edited and resubmitted with a new schedule and approval.
Approval Notifications
To ensure you never miss an important approval update and keep your publishing workflow running smoothly, Statusbrew notifies post approvers and authors of updates requiring attention.
You can choose to receive these notifications by email, desktop, or mobile, based on your preference.
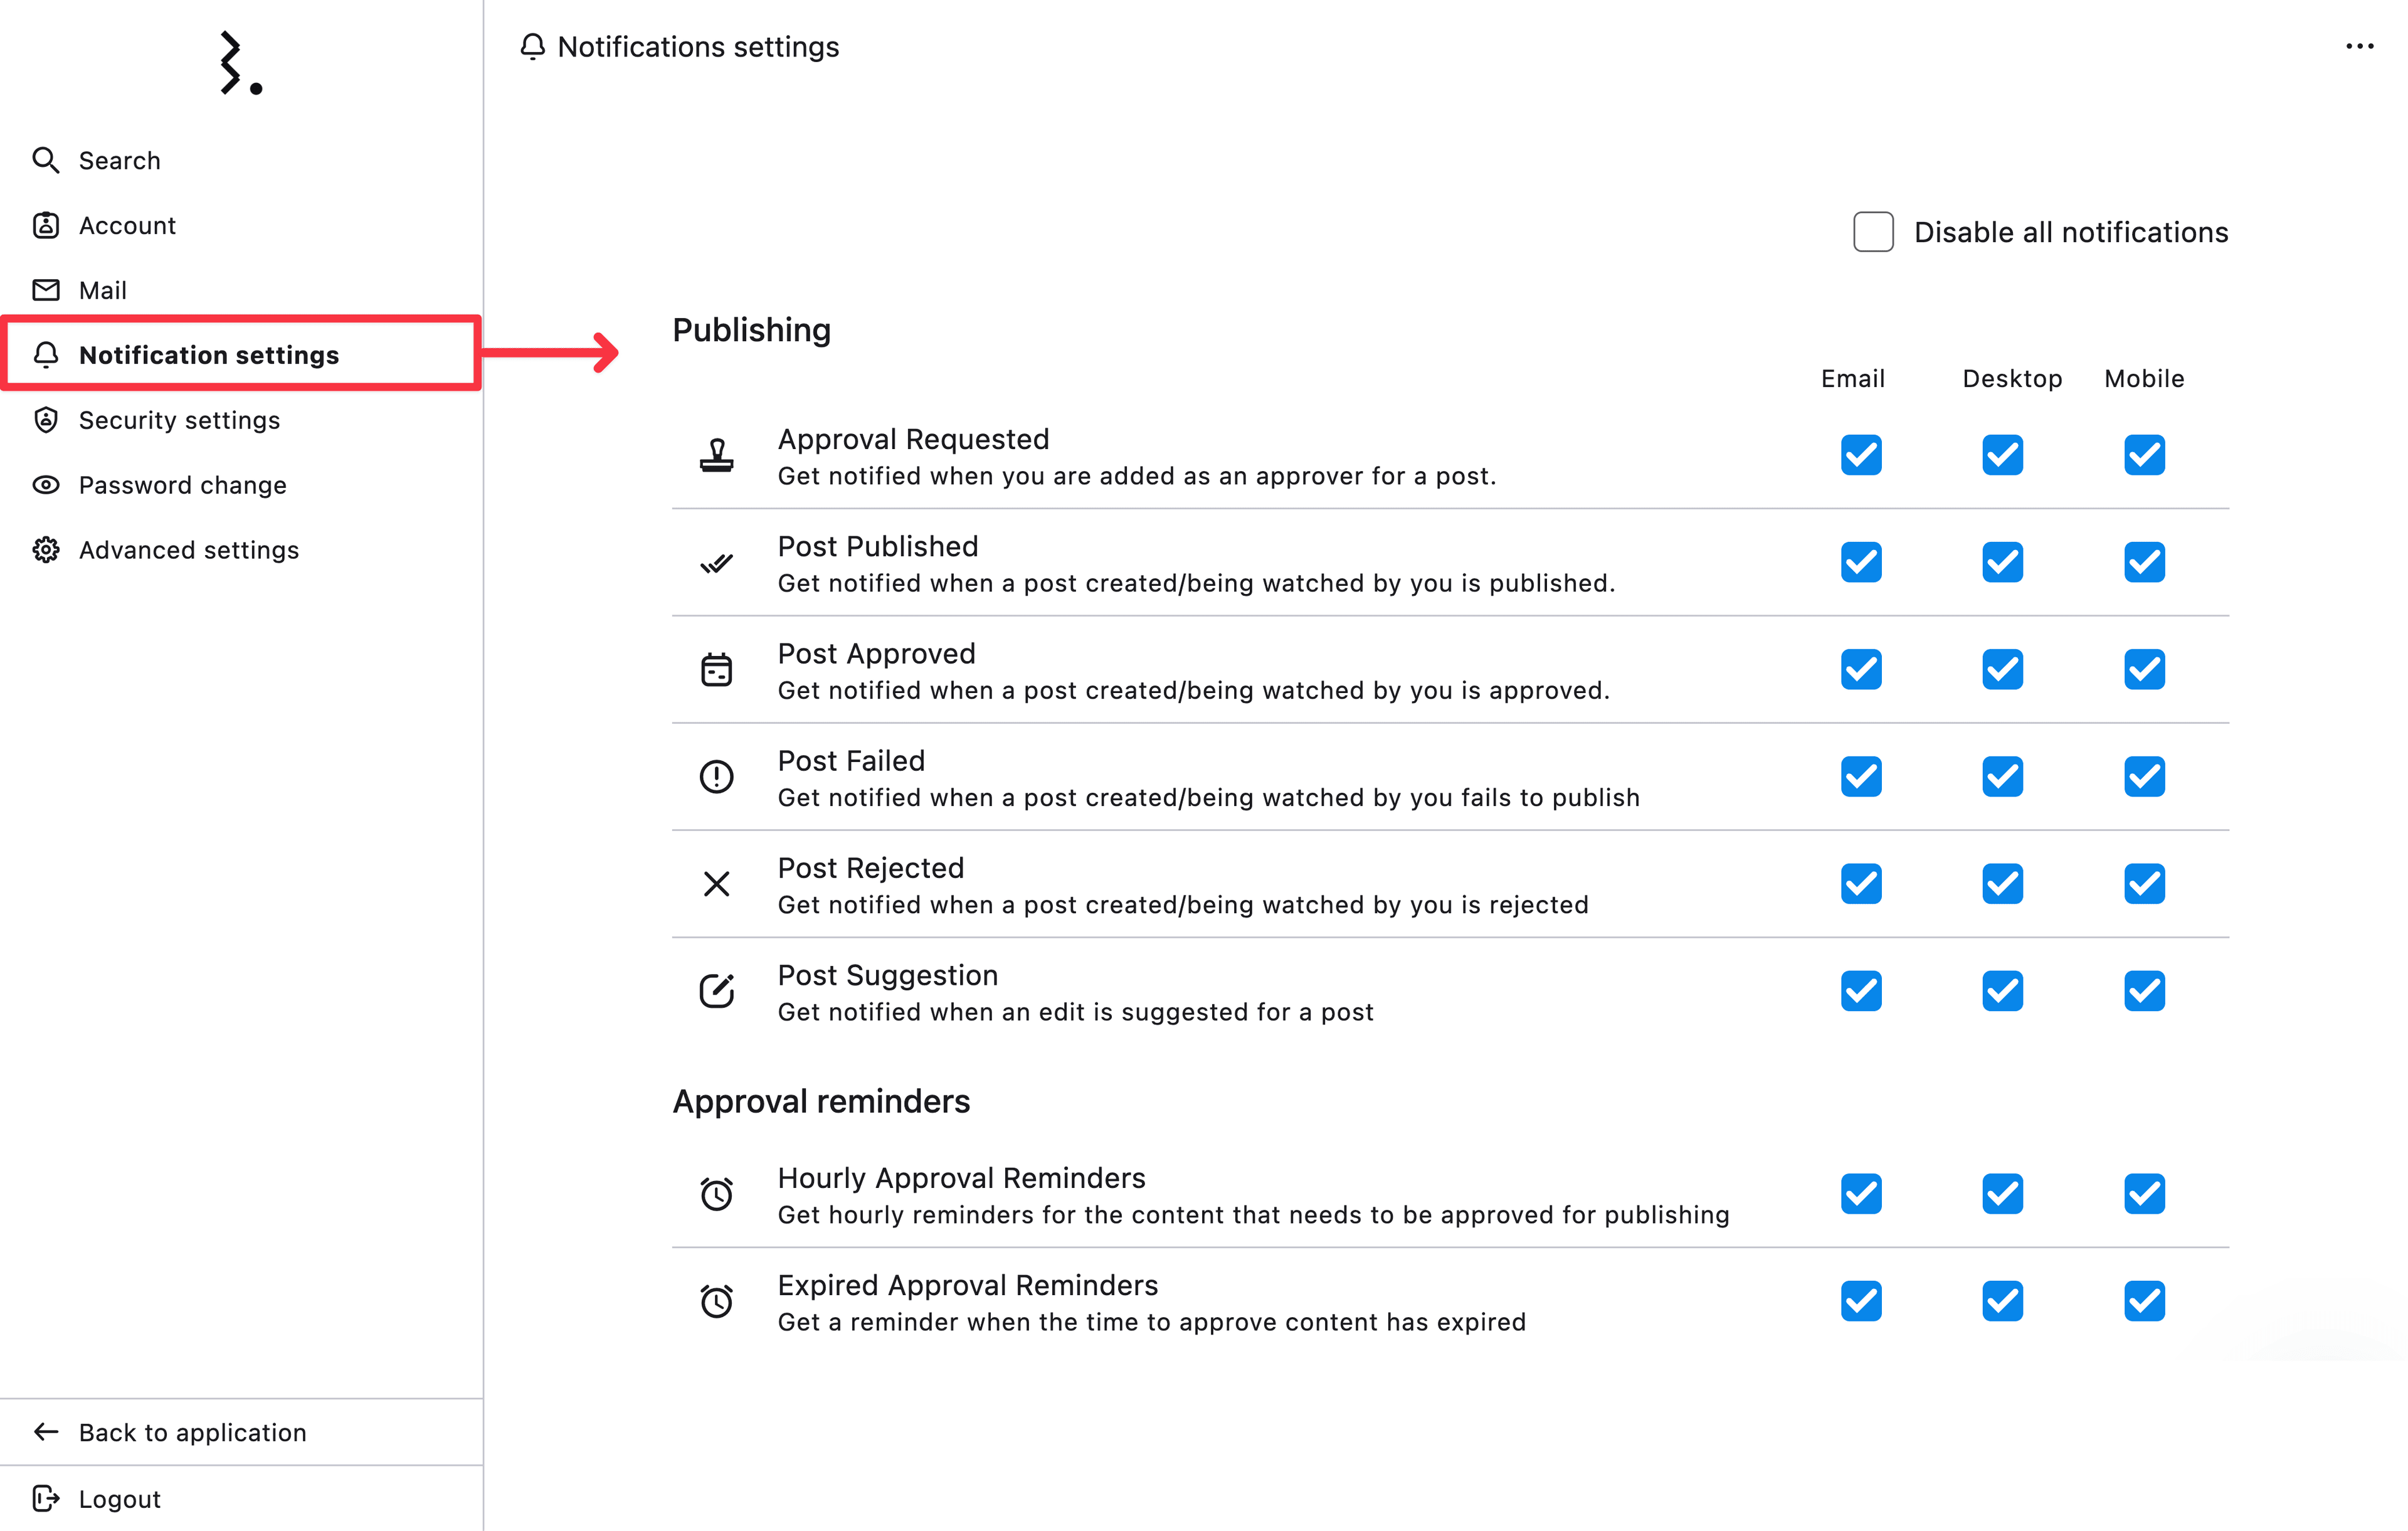
Here are the types of approval notifications you can enable:
Approval Requested: Get notified when you are added as an approver for a post.
Post Published: Get notified when a post that you created or are watching has been successfully published.
Post Approved: Get notified when a post that you created or are watching has been approved and is ready to be published.
Post Failed: Get notified if a post that you created or are watching fails to publish, so you can take quick action.
Post Rejected: Get notified when a post that you created or are watching is rejected, along with the rejection reason and comments.
Hourly Approval Reminders: Receive hourly reminders for any posts that are waiting for your approval, helping you keep time-sensitive content on track.
Expired Approval Reminders: Get notified when the time window to approve a piece of content has passed, so you can address overdue approvals promptly.
To enable/disable these notifications, click on your profile picture in the bottom left corner of the Statusbrew dashboard and select Your account > Notification settings (from the left nav section) and select the checkmark in front of the notification you wish to enable or deselect the checkmark to disable.
Suppress Approval Notifications
By default, every time you send or update a post that requires approval, all assigned approvers receive an immediate “Needs your approval” notification.
When you check Suppress approval notifications for this post, Statusbrew will:
Silence the initial approval request: Approvers will not get the initial notification when the post is created or updated.
Silence any subsequent pings: Edits, resubmissions, or moving the post through workflow steps will not trigger new notifications.
Still honor reminders: Any configured hourly or daily reminders for pending approvals will still be sent, so time-sensitive posts don’t get missed.
Why use it
Reduce noise in high-volume workflows: In teams that handle a large number of posts each day, especially when posts are frequently updated, approvers can easily get overwhelmed by repeated “Needs your approval” notifications for the same or multiple posts. Suppressing approval notifications helps avoid unnecessary alerts every time an edit is made, so you can stay focused on your tasks without constant interruption.
One-and-done approvals: If your team prefers to handle detailed reviews asynchronously (for example, using a shared link), you may not need every status change to trigger an instant notification. By suppressing approval pings, you can rely on scheduled reminders to prompt approvers only when their input is actually needed.
How To Suppress Approval Notifications?
Create your post or open a post to edit in Compose.
Select a custom date and time or category to schedule.
Click Choose approval.
Select the Approval type (Users or Workflow).
Check Suppress approval notifications for this post.
Click Save (and then Send for approval).
FAQs
Will suppressing notifications stop all reminders?
No, your hourly or daily reminders for overdue approvals will still be sent, so you stay informed and don’t miss important deadlines.
Can I re-enable notifications later?
Yes, you can easily re-enable notifications at any time. Just open the post in the composer, uncheck the suppression box, and save, future approval actions will then send immediate notifications again.
Does this affect other users’ settings?
This setting only applies to the specific post, not to individual user preferences. Anyone with permission to edit the post can turn suppression on or off as needed.
How can I track a post's progress through a multi-step approval workflow?
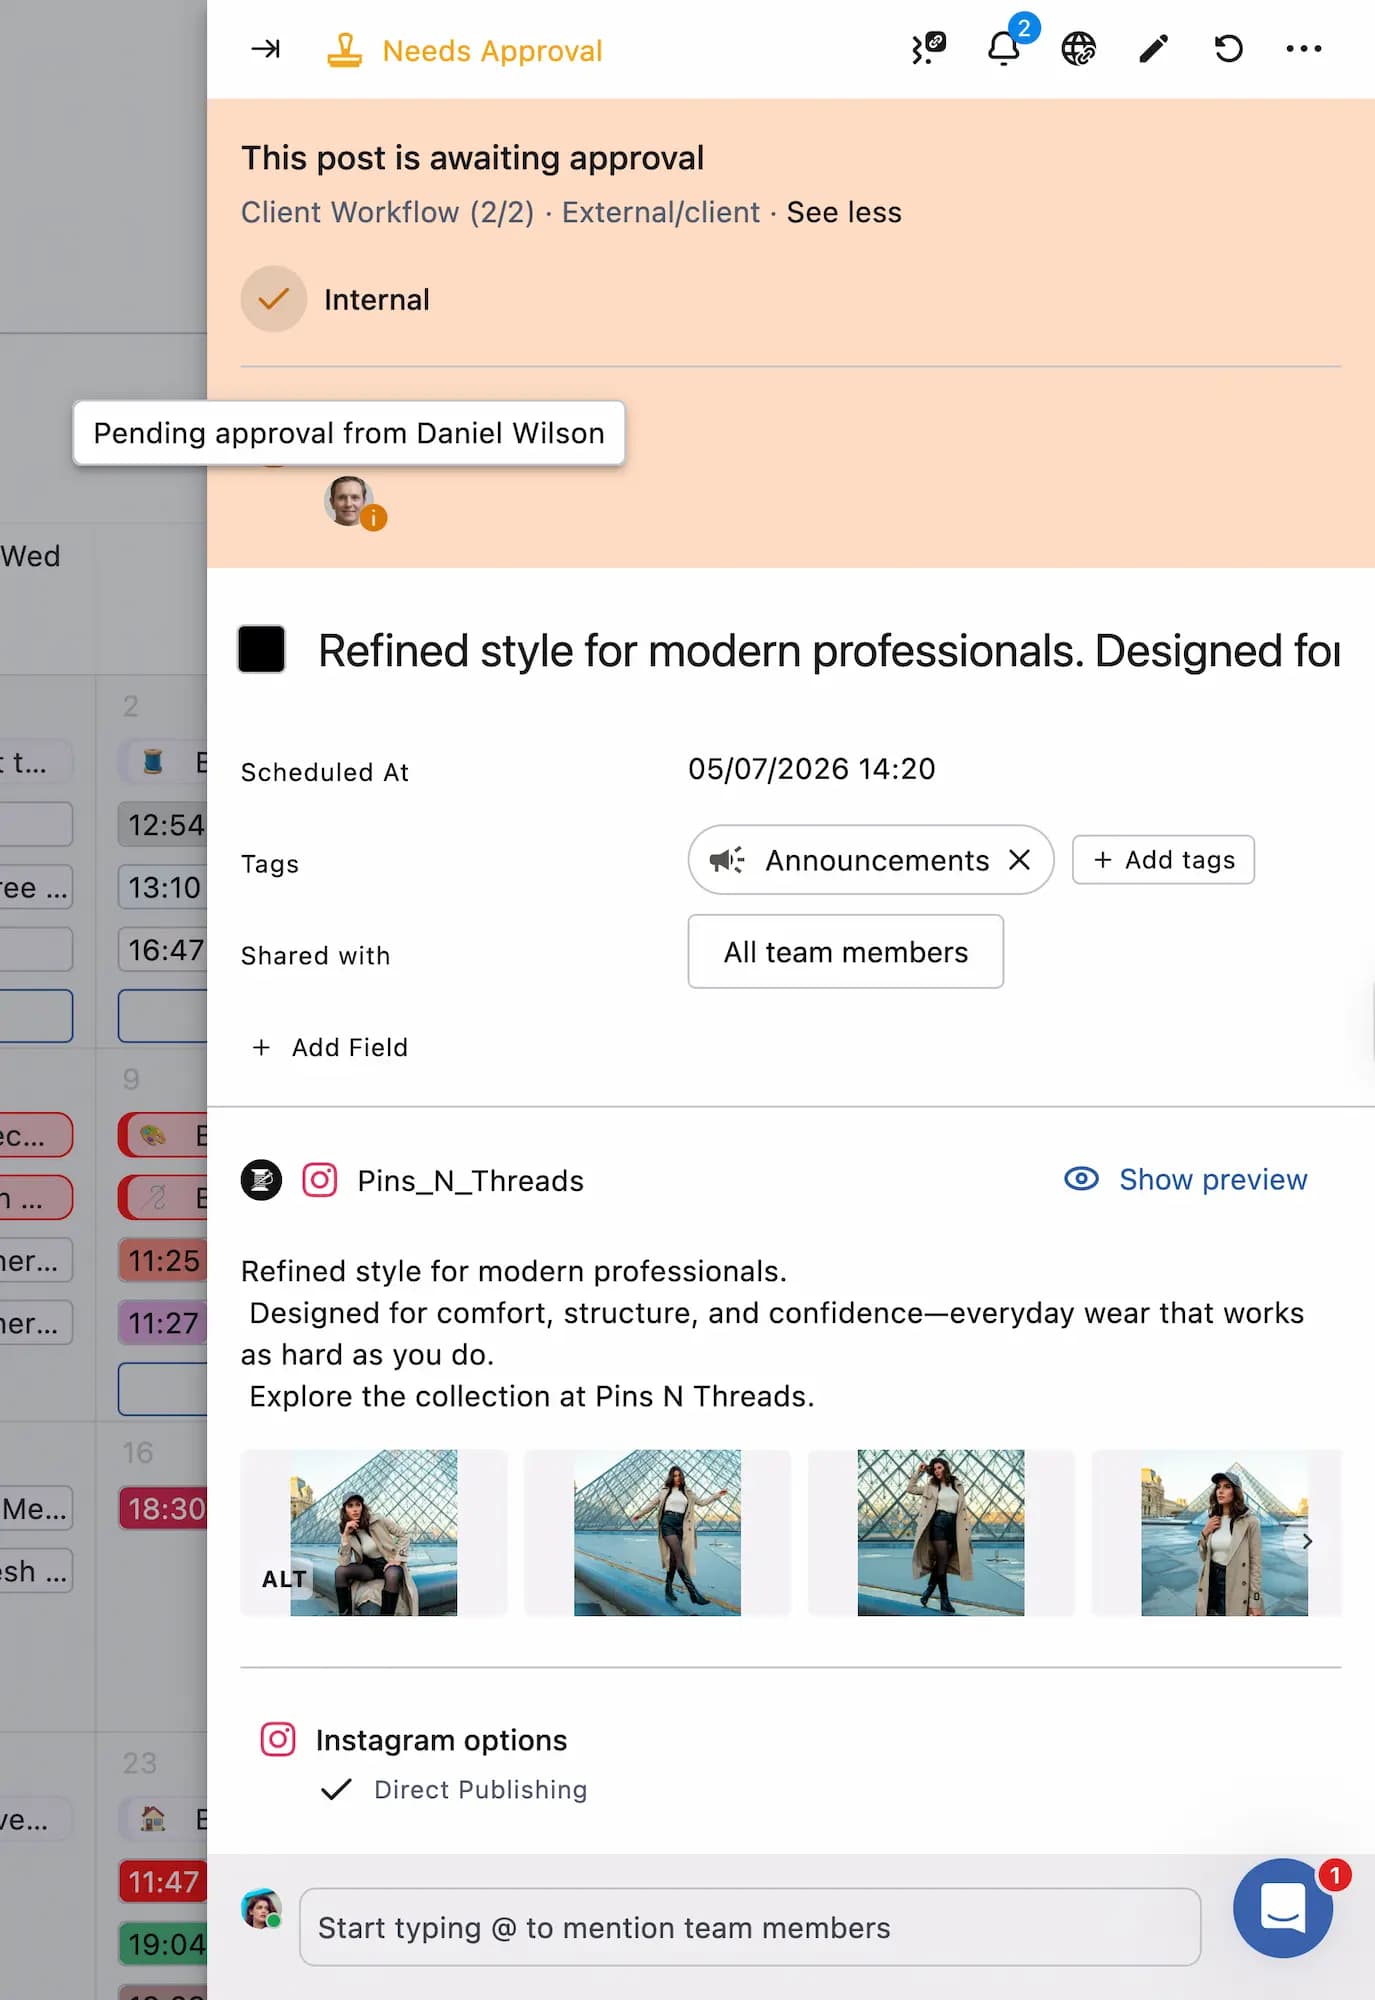
Every post submitted through an Approval Workflow has a visual approval tracker in the Post Detail. Open any pending post from Publish to see it.
The tracker shows each step and its current status. Completed steps show a checkmark next to the step name. The current active step shows a pending indicator with the name of the person whose approval is needed next.
So if your workflow has four steps and Step 1 is done, you'll see a checkmark on Step 1 and "Pending approval from [Name]" on Step 2. Steps 3 and 4 haven't started yet.
Do pending posts show to everyone or only assigned approvers?
It depends on what you're looking at.
In the Post Detail, the visual approval tracker shows the exact status of each workflow step. Completed steps show a checkmark. The current active step shows a "Pending approval from [Name]" indicator with the specific person whose turn it is to approve. So even if the post is visible to others, the tracker makes it clear who still needs to act and who is already done.
In the Needs Approval section of Publish, all Admins and users with Full Publishing permission can see pending posts across the team under All of my team's approvals. To see only posts waiting on your specific approval, switch to Posts I can approve.
Can I prevent approved posts from auto-publishing so my team can post manually from native apps?
It depends on which networks you're managing.
For Instagram and TikTok, yes. When composing your post, select Publish via mobile reminders under Publishing Type. Instead of auto-publishing, Statusbrew sends a push notification to your selected users via the Statusbrew mobile app at the scheduled time. Tapping it opens Instagram or TikTok directly. For TikTok, the post is already saved as a draft in the TikTok app, ready to publish. Statusbrew never posts it on your behalf.
You can choose which users or user groups receive the reminder. If you don't select anyone, all users with publishing access to that profile will get it. Make sure the Statusbrew mobile app is installed and notifications are enabled on the publisher's device.
For all other networks, this isn't currently possible. Once a post is approved, it publishes automatically at the scheduled time. There's no Publish Rule that can hold or delay an approved post from going live.
If your team needs to publish manually on networks other than Instagram and TikTok, the content must be created outside Statusbrew and published directly from the native app.
Why is one approver not seeing the Approve or Reject option on a post?
This usually happens when multiple approvers are added to the same approval step, but Require approval from all is not enabled.
In that case, the step is completed as soon as any one approver takes action. Once that happens, the other users in the same step will no longer see the Approve or Reject option.
If you want every approver in that step to see and act on the post, enable Require approval from all in that workflow step.
Why am I not getting an approval email when I add myself as the approver?
If you do not have Full Publishing access and your publishing access requires approval, you cannot approve your own post.
When scheduling or publishing content, you need to add someone with Full Publishing rights as the approver. If you add yourself as the approver, you will not receive an approval email, and the post will still need approval from an eligible user.
Why are no posts showing in the Approvals section of my Calendar Board?
The Approvals section shows posts awaiting your review. If it's empty, here's what to check:
Date range: The board's date range may not cover the period when the posts are scheduled. Check the date range in the top right corner and adjust it to include the relevant dates.
No posts are pending approval: If no posts have been submitted for approval yet, the section will be empty.
Check filters: Please make sure there are no unnecessary filters selected on your calendar board, so that "needs approval" posts appear.
The post hasn't reached your step yet: If the post is part of a multi-step approval workflow, it will only appear in your Approvals section once all previous steps have been approved. If someone earlier in the workflow hasn't approved yet, the post won't show up for you.
Permissions: Posts assigned to a different approver won't appear in your view. If you don't have Full Publishing rights for the profile, check with your admin to confirm you're added as an approver for the relevant workflow or posts.
External reviewer access: If you're accessing the board via a shared link, posts only appear once the team has submitted them for your approval by adding you as a Recipients and your step in the workflow has been reached.
Why is one approver not seeing the Approve or Reject option on a post?
If you simply copied the calendar's shared link and sent it to the client without adding them as a recipient, they can only view the calendar and cannot take any action. For them to approve, reject, or make any comment, you have to add the client as a recipient in the shared link.
If this is happening because you added the client as an approver in an approval workflow, it usually occurs when multiple approvers are added to the same approval step, but the "Require approval from all" option is not enabled.
In that case, the step is completed as soon as any one approver takes action. Once that happens, the other users in the same step will no longer see the Approve or Reject option.
If you want every approver in that step to see and act on the post, enable Require approval from all in that workflow step.
How can I track approval progress across posts?
Statusbrew does not have a direct approval-stage tracker that shows which post has reached which approval step across the whole calendar.
For each post, you can open the approval tracker to see who has approved it and who still needs approval.
To track approval progress across multiple posts, you can create Calendar sections in List view by approver or approval step.
For example, if you want to see posts pending with a specific approver, create a section like:
Section name: Pending with <approver name> View type: List Filter: Approvers is <approver name>
If your approval workflow has multiple users in a single approval step, create a section for that step and select all users in that step in the Approver filter.
Example:
Section name: <step 1> View type: List Filter: Approvers is [all users responsible for first review]
Section name: <step 2> View type: List Filter: Approvers is [all users responsible for final review]
This does not work as a direct approval-stage tracker, but it helps you review multiple posts based on whose approval is pending or which approval group/step the post is currently waiting on.
Note: If you want an approver to see only posts pending on their end, they can go to Needs Approval.
To make it easier for them, you can also create a Calendar section with the Approvals view and name it 'Pending My Approval'. When a user opens that section, they will see posts with pending approval.
Why is my client receiving an email for every post approval?
Clients or guest users may receive approval emails for each post when they are added to an approval workflow.
If you do not want the client to receive approval emails, select Suppress approval notifications for this post while sending the post for approval.
For posts that are already scheduled or already sent for approval, you will need to open each post and select Suppress approval notifications for this post manually.
Going forward, the best practice is to select Suppress approval notifications for this post when you add the approval workflow, so the client does not receive separate approval emails for each post.
If there are already many posts where this option was not selected, and the client is receiving too many emails, another option is to convert the guest/client into a regular Statusbrew user. Then they can manage watcher-related email notifications from:
Account Settings → Notification Settings