Schedule YouTube Videos
You can publish or schedule videos and shorts to your YouTube channels from Statusbrew.
By prioritizing video content, brands can foster deeper relationships with their audiences, leading to higher conversion rates and stronger business outcomes.
You can access Compose to draft, schedule, or publish videos directly to YouTube, while still using familiar publishing tools like tagging and message approvals.
Media Specifications
Keep in mind the following specs before you post:
Supported Formats | .mp4, HEVC |
File size | 75 kb – 200 MB |
Max videos per post | 1 |
Length (in secs) | 3 – 1800 |
Width | Refer here |
Height | Refer here |
Aspect Ratio | 16:9 |
Video Bitrate | 50 or 80 Mbps |
Video Frame rate | < 30 fps |
Video Pixel Aspect Ratio | Refer here |
Video Chroma Sub Sampling | 4:2:0 |
Video Scan type | Progressive |
Video Color space | Refer here |
Audio codec | AAC, MPEG2, Dolby AC-3 |
Audio Profile | Eclipsa PCM/Opus |
Audio sample rate | ≤ 48 kHz |
Audio bitrate | ≥128 kbps |
Audio channels | N/A |
Caption format | srt |
Thumbnail supported | Yes |
Thumbnail File format | JPEG, PNG |
Thumbnail File size | ≤ 2 MB |
How To Schedule A YouTube Video In Statusbrew?
Go to Compose.
Select a YouTube profile from the Profile Picker.
Upload a video using the following options. Videos are limited to 15 minutes in length for unverified YouTube users and 12 hours for verified YouTube users.
Video upload: Upload a video from your device
Upload by URL: Add video from its publicly accessible URL link.
Pick from Asset Manager: Select from your library of saved media assets in Statusbrew.
Dropbox: Import video files from your connected Dropbox account.
Add Video title.
Add YouTube video tags in a comma-separated manner. YouTube limits tags to 500 characters; recommend using up to 15 tags. YouTube video tags are descriptive keywords you can add to your video to help viewers find your content. You can also add video tags by clicking , Pick from Asset Manager & select from your library of saved assets.
Choose the desired Date and time option and press the Post Now or Schedule button. Learn how to select the right posting time.
You can also do the following:
Add a caption (up to 5,000 characters). You can also use Brew AI to write or refine the post caption.
Shorten links in the video description and add tracking parameters. After adding a link within the caption, select Link shortener option to shorten it, then click Add campaign parameters to append tracking details.
Upload a thumbnail. Hover over the video and click Edit options.
Choose Thumbnail: You can add a custom thumbnail by either:
Clicking Upload to add a thumbnail from your device.
Clicking Asset Manager to select a thumbnail from your existing assets.
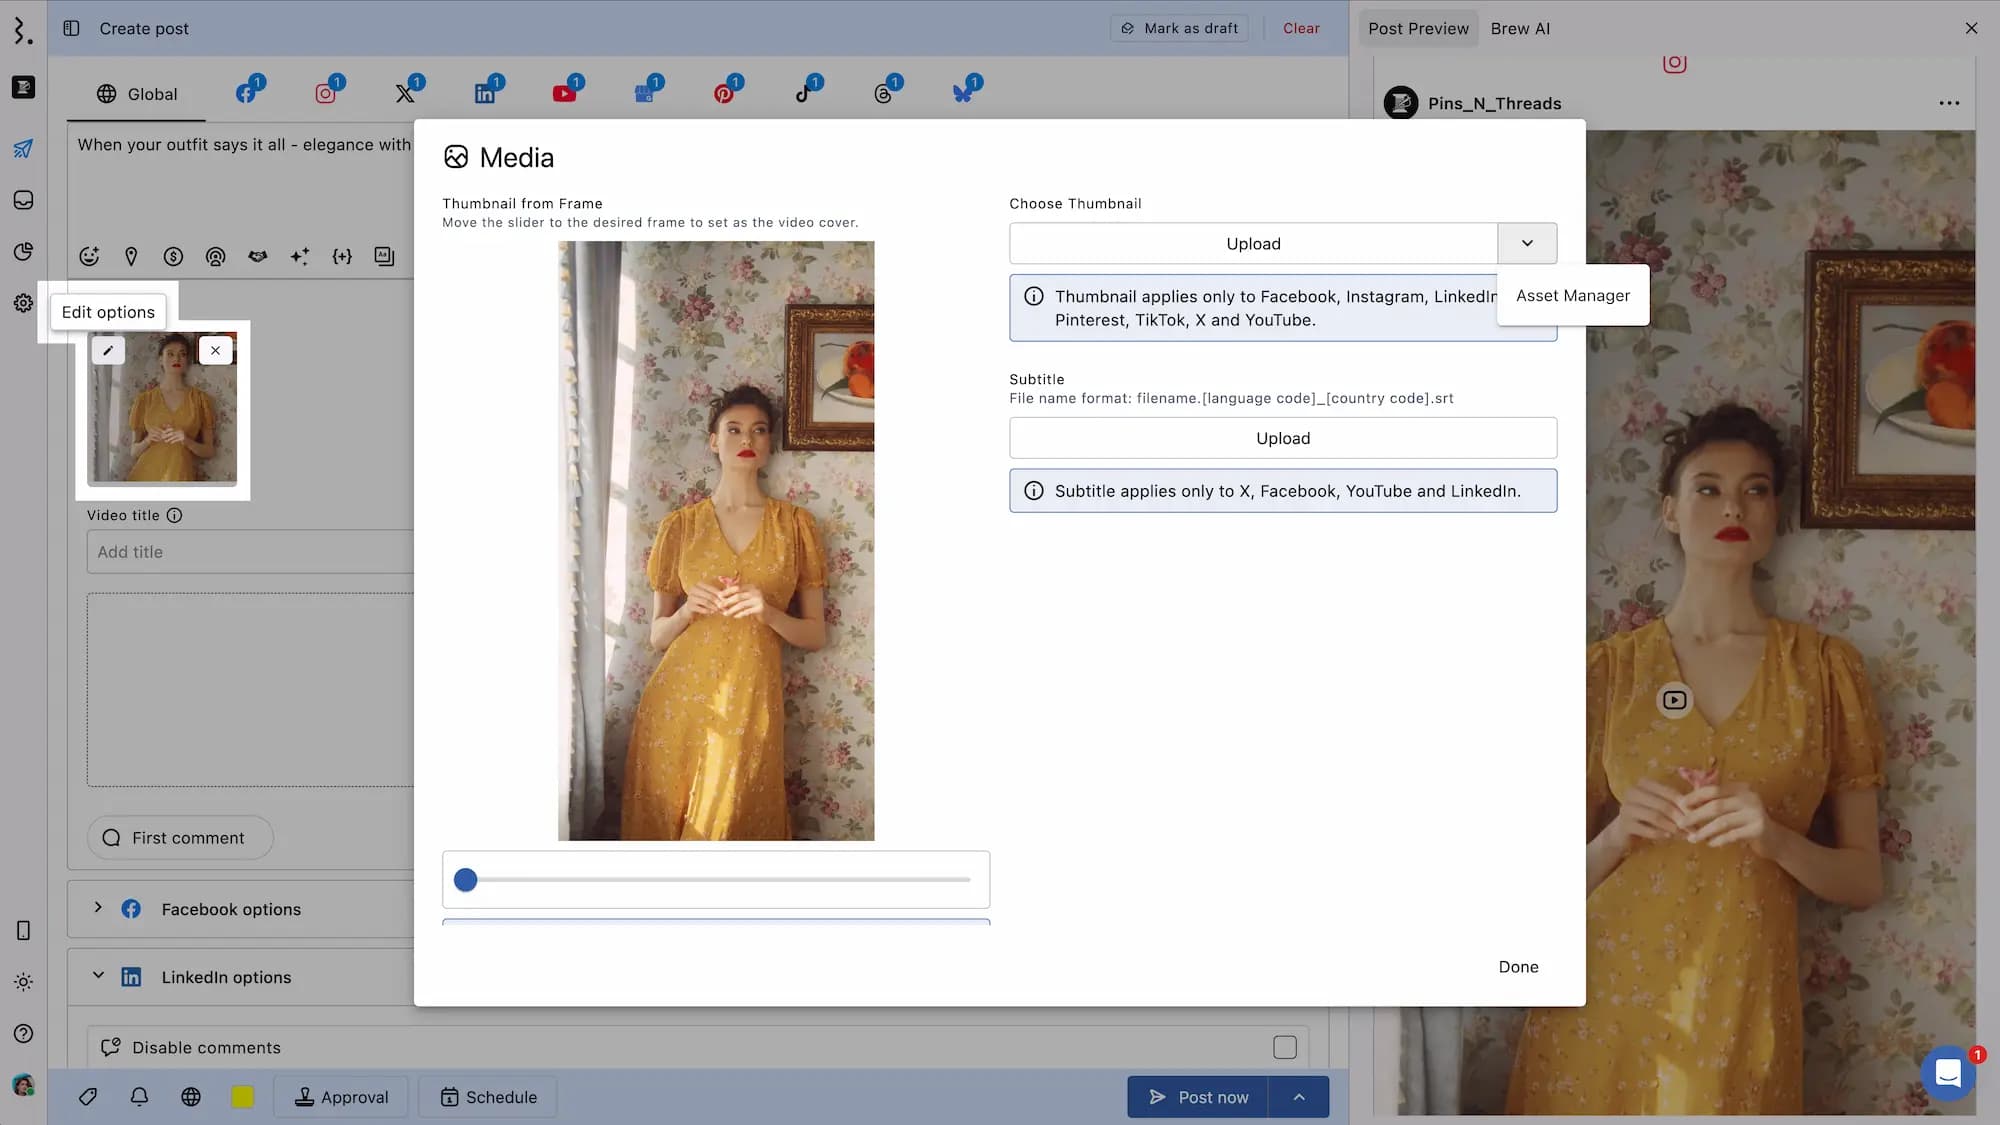
Upload Video subtitle file in File Format: filename.(two-letter language)_(two-letter country code).srt
Add First comment. Posting the first comment is useful if you want to add hashtags, extra context to the post, or a call-to-action without cluttering your main caption. The first comment should be of a maximum of 10,000 characters.
Add Video category. By default, the Film & Animation category is selected.
Select Video privacy, whether you want the video to be Public, Private, or Unlisted. The default video privacy setting is Public. Public videos are viewable by anyone and appear in searches and feeds, while private videos are only visible to you and those you specifically invite via email. Unlisted videos can be viewed by anyone who has the direct link but will not appear in search results or on your channel page.
Choose the Playlist to which you want your video published.
Set License rights & ownership settings.
Select License
Standard YouTube License: While viewers can watch and share your video on YouTube, they cannot reproduce, distribute, or reuse the content elsewhere without your permission.
Creative Commons - Attribution: The Creative Commons - Attribution is the default license selected. Others are generally allowed to edit, remix, or adapt your video, even for commercial purposes, as long as they credit the original creator.
Configure the Audience options.
Select if the video is made for kids. If it’s not made for kids, select if you would want to restrict your video to an adult audience.
Choose if you want others to embed your video on external websites. This helps expand your reach by making your video playable directly on blogs, news sites, and other platforms.
Enable Publish to subscription feeds and notify subscribers to have your video appear in your subscribers’ feeds and send them a notification. It helps drive immediate engagement from your existing audience.
If you're unsure about the meaning of any setting, hover over the icon to view a tooltip with a description.
You can use to expand or to collapse any part of the Compose window.
How To Schedule YouTube Shorts In Statusbrew?
You can publish YouTube Shorts through Statusbrew using the same workflow.
To publish YouTube Shorts:
Keep your video 3 minutes or less.
Use a square or vertical aspect ratio.
Include #shorts in the title or description for better visibility.
Follow the standard YouTube publishing steps.
Note: Shorts metrics are counted as part of total video views.
YouTube does not support uploading thumbnails for Shorts via third-party applications like Statusbrew. However, you can select one of the automatically generated thumbnails directly in YouTube Studio. This feature is available within YouTube Studio and not through our app.
FAQs
Is it possible to schedule a YouTube video via the Statusbrew mobile app?
Yes. Scheduling and publishing YouTube videos is available on Statusbrew’s iOS and Android apps.
Is audience targeting supported for YouTube videos in Statusbrew?
No, YouTube doesn’t support audience targeting for published videos, so this feature isn’t available in Statusbrew.