Bulk Scheduling (CSV Uploads)
Bulk scheduling helps you save time by automating the process of uploading and scheduling posts. You can upload a single file with captions, post times, images, GIFs, and video links to populate your calendar. This will help you keep up with your posting schedule and free up time for other tasks while ensuring a steady flow of content. You can save your bulk posts as drafts and select approval methods.
Users can schedule up to 400 posts (at once or in one upload). Use Bulk scheduling to create and schedule posts for Facebook Pages, LinkedIn Pages and profiles, GMB, Threads, X, Bluesky, and Instagram Business profiles (Direct publishing).
Note: The CSV upload feature is only available on the Statusbrew Web App and isn't accessible in mobile apps.
Creating Bulk Scheduling File
Before you bulk schedule your posts, you need to create a CSV file.
To create your own CSV file, you can use Google Sheets, Numbers (on Mac), or Microsoft Excel (on Windows/Mac). There are two formats for CSV files: Date-time based CSV and No Date-time based CSV.
Date-time Based CSV
A Date-time based CSV file contains three columns:
Date & time: The first column specifies the date and time when your post should be published in format 'MM/DD/YY HH: MM.' Example: 07/11/24 10:08
Content: The second column contains the content of your post.
Image (Optional): The third column includes direct downloadable URLs for images, GIFs, or videos of your post.
Upload this CSV file when using the Date-time based scheduling option.
Example of a Date-time based CSV:

No Date-time Based CSV
A No Date-time based CSV file contains two columns:
Content: The first column contains the content of your posts.
Image (Optional): The second column includes URLs for images, GIFs, or videos.
Upload this CSV file for the "Pre-select category" or "No date-time" scheduling options.
Example of a No Date-time based CSV:

Downloading & Creating Your CSV File
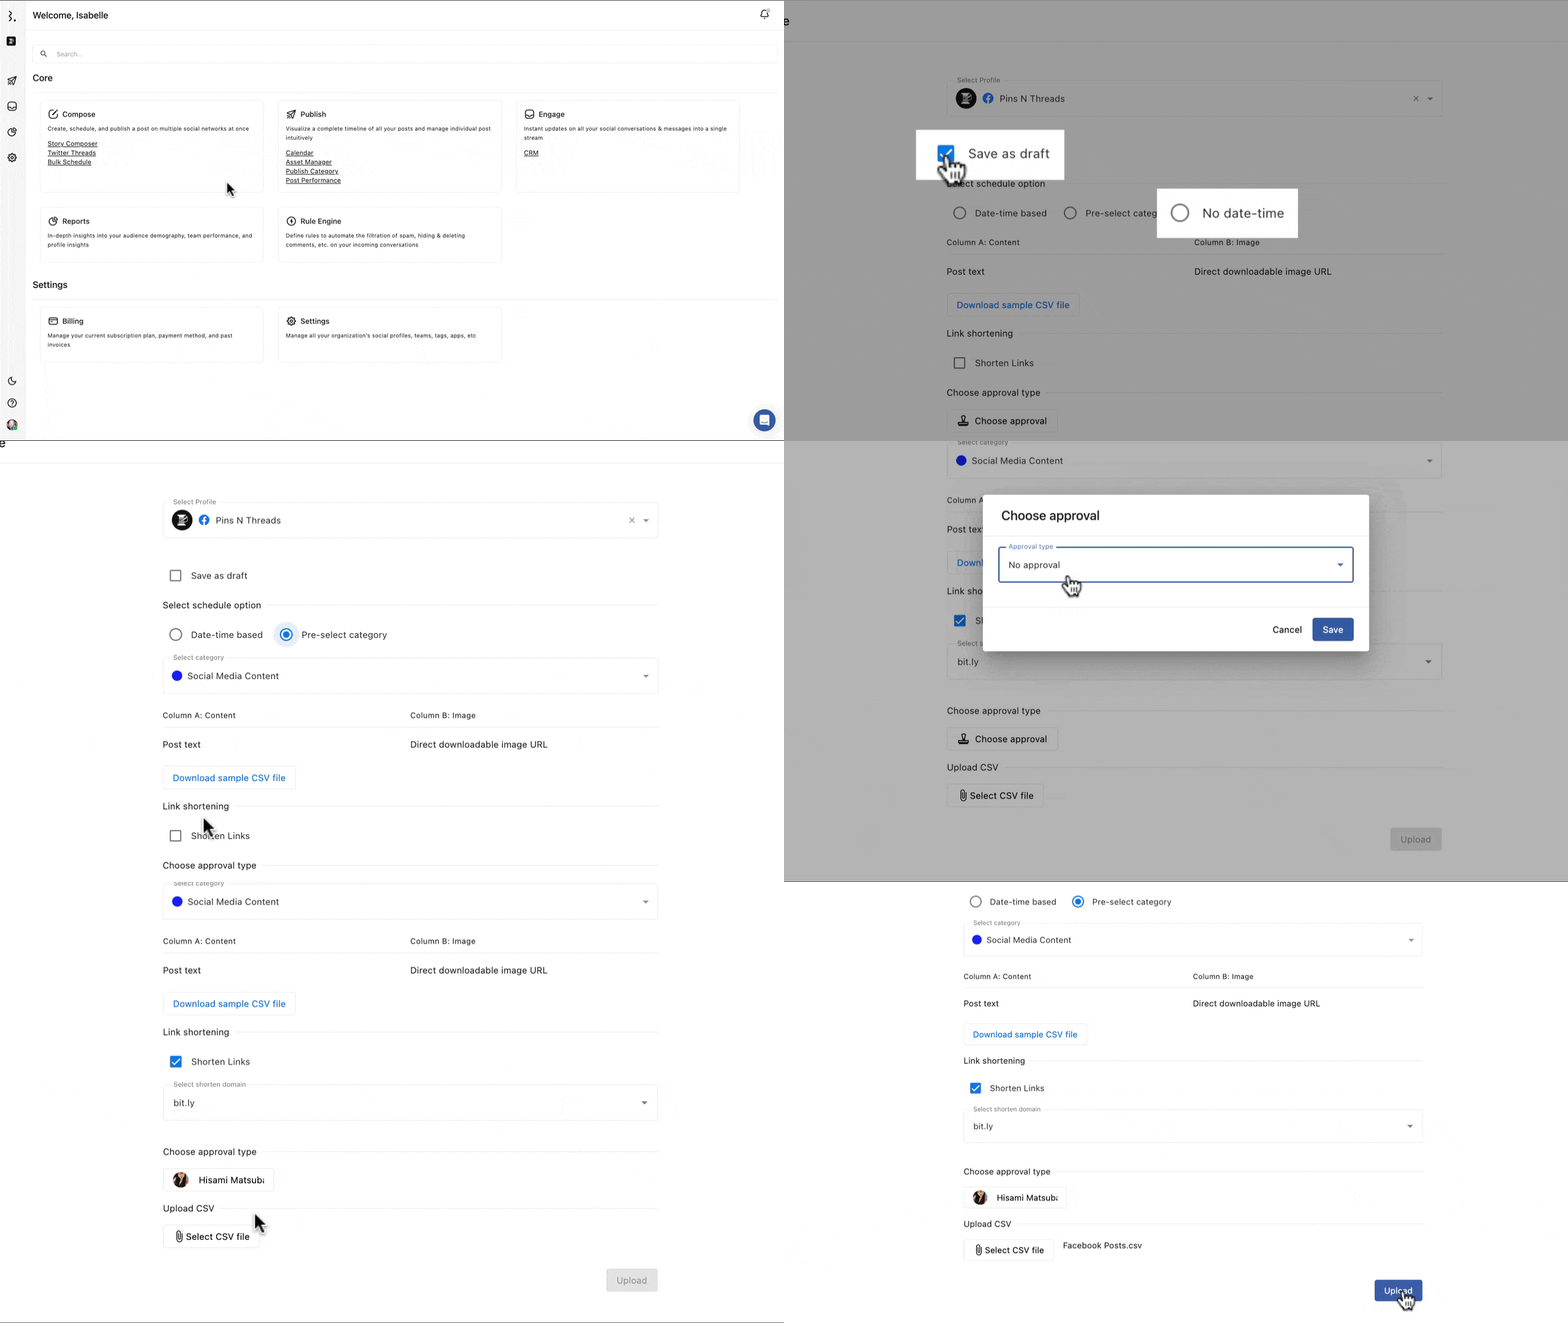
Go to Bulk Schedule in Compose from the Statusbrew dashboard.
Select schedule option from Date-time based or Pre-select category.
Click on Download sample CSV file.
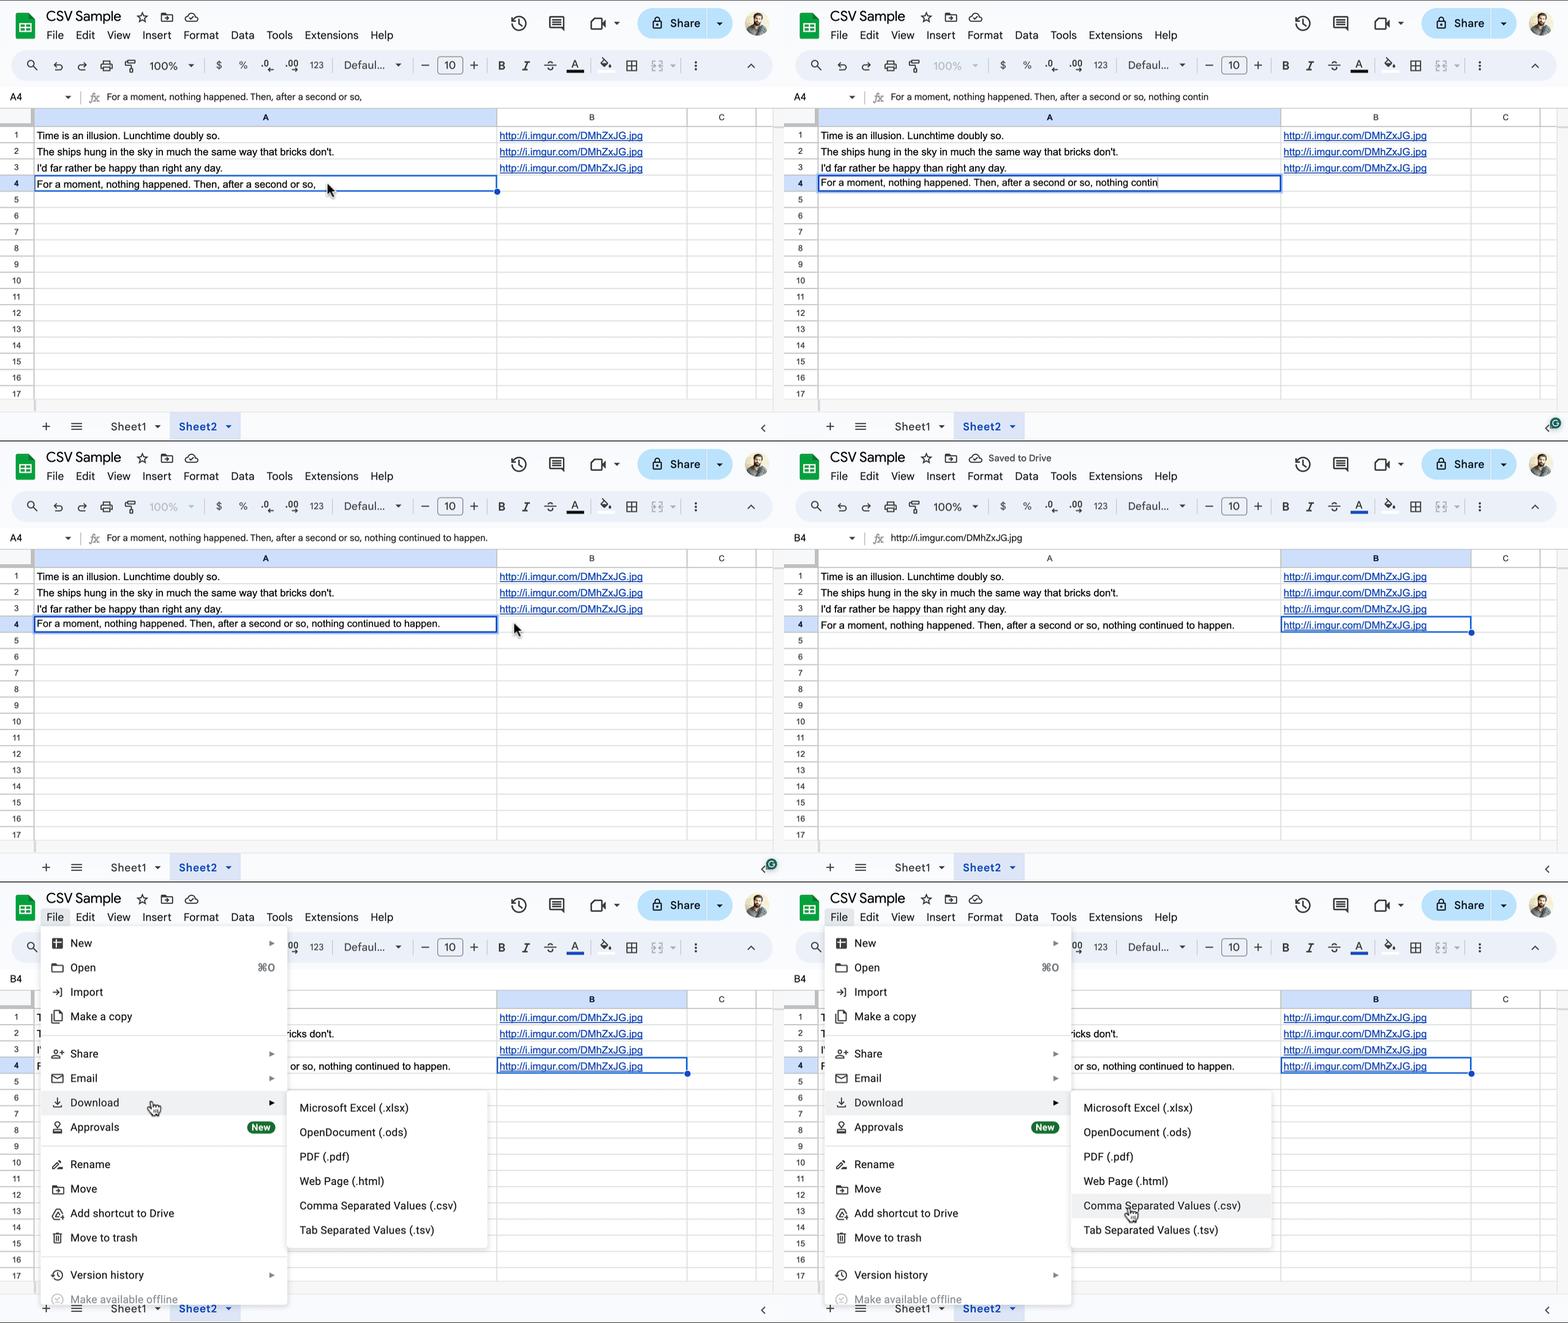
Open the sample CSV file in Google Sheets, Numbers (on Mac), or Microsoft Excel (on Windows/Mac).
Fill in the file with your content
Save or export the file to CSV format.
Important Note for Excel Users: Microsoft Excel can cause errors by converting years into YY format instead of the required YYYY when exporting to CSV. If you only have Excel, set the format for the date column to General, not Date, to avoid this issue.
CSV File Structure For Bulk Scheduling
When creating a CSV file for bulk scheduling, you will use two or three columns, depending on the type of CSV file:
Date & time
For Date-time based CSVs, this will be the first column.
Define only one post per time slot.
Use GMT format (mm/dd/yy hh). For example, for a post scheduled for 3:30 PM on December 23, 2024, enter "12/23/24 15:30".
Posts must be scheduled at least 1 hour apart from one another and at least 1 hour after the time you upload the CSV to Statusbrew.
Content
This column includes the text of your post, which may also include URLs to your blog, video links, discount coupons, etc.
The post content should not exceed the maximum character count for the network.
For Instagram, links will appear as text, not as active links.
Image
Add URLs for images, GIFs, or videos you wish to publish with your posts.
URLs must be publicly accessible without requiring a login.
Ensure the URL directs to the image itself (e.g., ends in .png, .jpg).
For Instagram, this column is mandatory for posts.
Note: CSV uploading only allows you to attach 1 single image per post. To add multiple images, go to the Statusbrew Planner after uploading the CSV file, view the post in detail, and click Edit post to add additional images.
Once you have filled all the content in the CSV file, save it in .csv format or download it as a CSV file if using Google Sheets.
Tip: We recommend that Windows users save all CSV files in UTF-8 encoding.
Uploading A CSV File

From the Statusbrew dashboard, click on Bulk Schedule under Compose.
Select the profile you want to schedule messages for. You won’t be able to bulk-schedule for multiple profiles.
(Optional) To save your posts as drafts, check the Save as draft checkbox. Once you select this option, the No date-time scheduling option will appear.
Select the appropriate scheduling options:
Date-time based: Choose your timezone.
Pre-select category: Select a category from the category picker drop-down.
No date-time: Available if you checked the Save as draft checkbox, for posts without pre-decided dates and times.
Note: Posts saved as drafts will remain as drafts, even with Date-time based or Pre-select category schedule options.
(Optional) To shorten URLs in your post content, activate the link shortener by checking the Shorten Links checkbox and selecting the shorter domain.
Click Choose Approval to select the approver(s) or an existing approval workflow. After bulk scheduling, all posts will be submitted for approval.
Click Select CSV file & upload the appropriate file according to your selected scheduling options.
Select Upload.
You can view all your posts in the Planner, where they will be grouped by your selected scheduling options.
Image, Video, Or GIF Link Considerations For CSV Files
When adding image, video, or GIF URLs to your CSV file in the Image column, ensure the URLs direct to the file itself, not a page displaying it.
The URL should end with the file format (e.g., .png, .jpg, .gif, .mp4) and not the page format showing the image (.com, .html etc.).
Tip: To verify if your image, video, or GIF URL is valid, paste the link into a private or incognito browser window. If the file renders properly, the link is valid.
To make your images public, use one of the following resources:
For images hosted on a public server, simply host the images on your website or server and copy the direct URL.
If the files are already publicly available, copy the direct URLs of the desired files and paste them into the Image column of your CSV.
Using Statusbrew Asset Manager For a Better Success Rate
Sometimes, posts that include assets hosted on third-party tools may fail during bulk publishing.
To avoid this, upload your assets directly to Statusbrew’s Asset Manager.
Once uploaded, copy the file URL and add it to your CSV file.
Then upload the CSV to Statusbrew to bulk schedule your content.
Using media hosted in the Asset Manager improves the success rate of bulk posts to go live.
Bulk Scheduling FAQs
My posts aren't going at the time that I added in my Date and time-based CSV. What should I do?
If you are adding your posting times within your CSV file, the interface will assume that the dates and times that you have added are in the GMT format. Hence, make sure that you add your scheduling times in the GMT format in a CSV file.
I am a Windows user. I tried to save my CSV properly but it is still showing some errors. What should I do?
We recommend Windows users to set UTF-8 as their default character encoding to avoid upload errors. All the CSVs should be saved in the UTF-8 encoding only.
