Microsoft Teams Integration
If your organization uses Microsoft Teams for workplace communication and team collaboration, you can integrate it with Statusbrew to stay updated on your social media activities.
Teams Integration is available in Standard Plan as well as Plans above it. See full feature comparison of Statusbrew here.
How Does Teams Integration Work With Statusbrew?
By integrating Teams with Statusbrew, you will receive real-time notifications for content publishing, community engagement, and admin activities on your chosen channels.
For example:
Team members who don't have access to Statusbrew can stay in the loop of your content creation workflows by receiving notifications for social media content marketing activities with this integration
If you require approvals from your client for social media posts, you can set up a shared Teams Channel. Clients will get notifications in the channel when approval is requested for quick feedback
To better manage your community on social media and improve your brand response times, you can choose to get notified for new messages, comments, and mentions on your social profiles in your desired channel
Connect Your Teams Channel With Statusbrew
To receive social updates in your Teams Channel, you must first set up a connection between Teams & Statusbrew. Only Statusbrew account owners & admins in Statusbrew can configure this integration.
Steps To Be Done In Teams - Creating The Webhook
To connect a Teams channel with Statusbrew, you'll need to configure an Incoming Webhook for Statusbrew. Follow these steps:
Go to teams.microsoft.com and log in to your teams account.
Once you see a list of all your Team and Channels, choose a Channel where you want the alerts
You can also create a new channel specifically for Statusbrew updates.
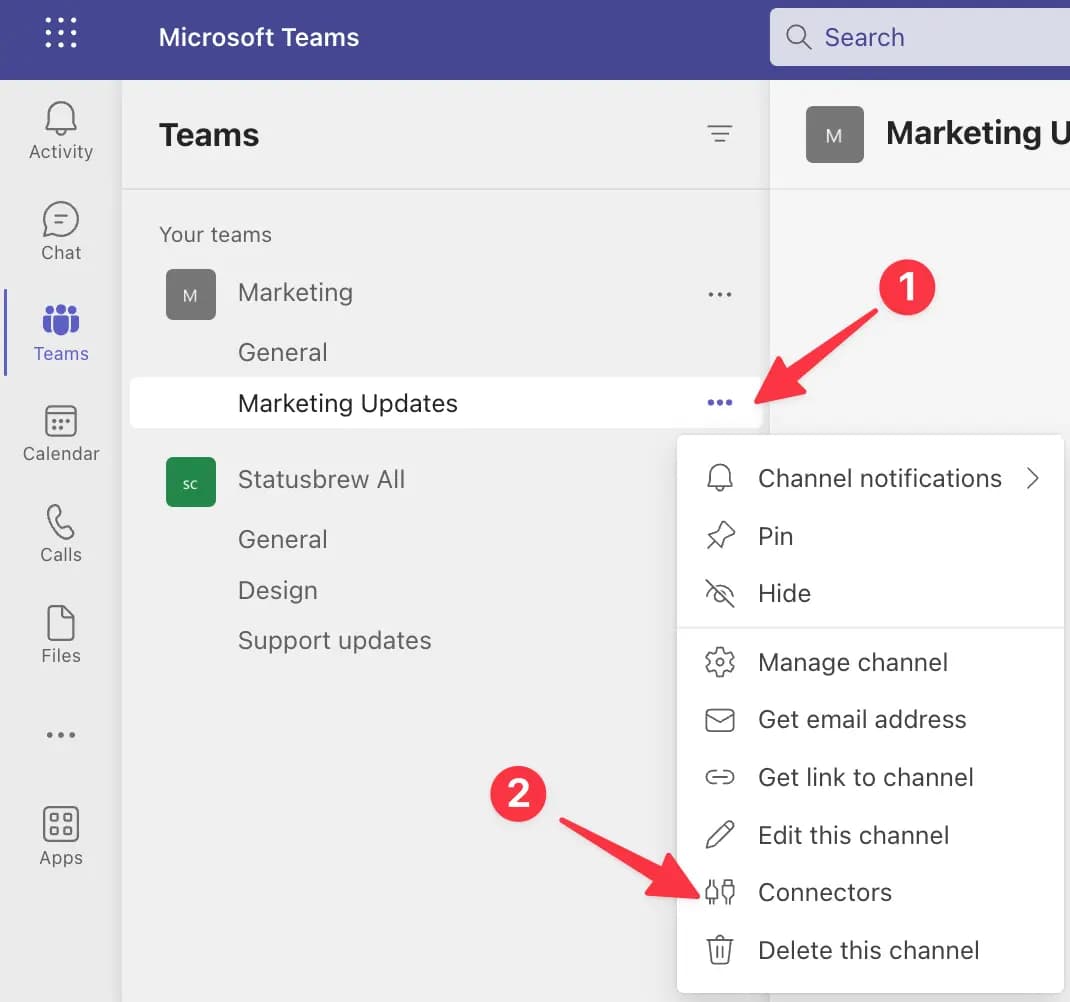
Hover over the desired Teams channel, click the three-dot menu, and select Connectors.
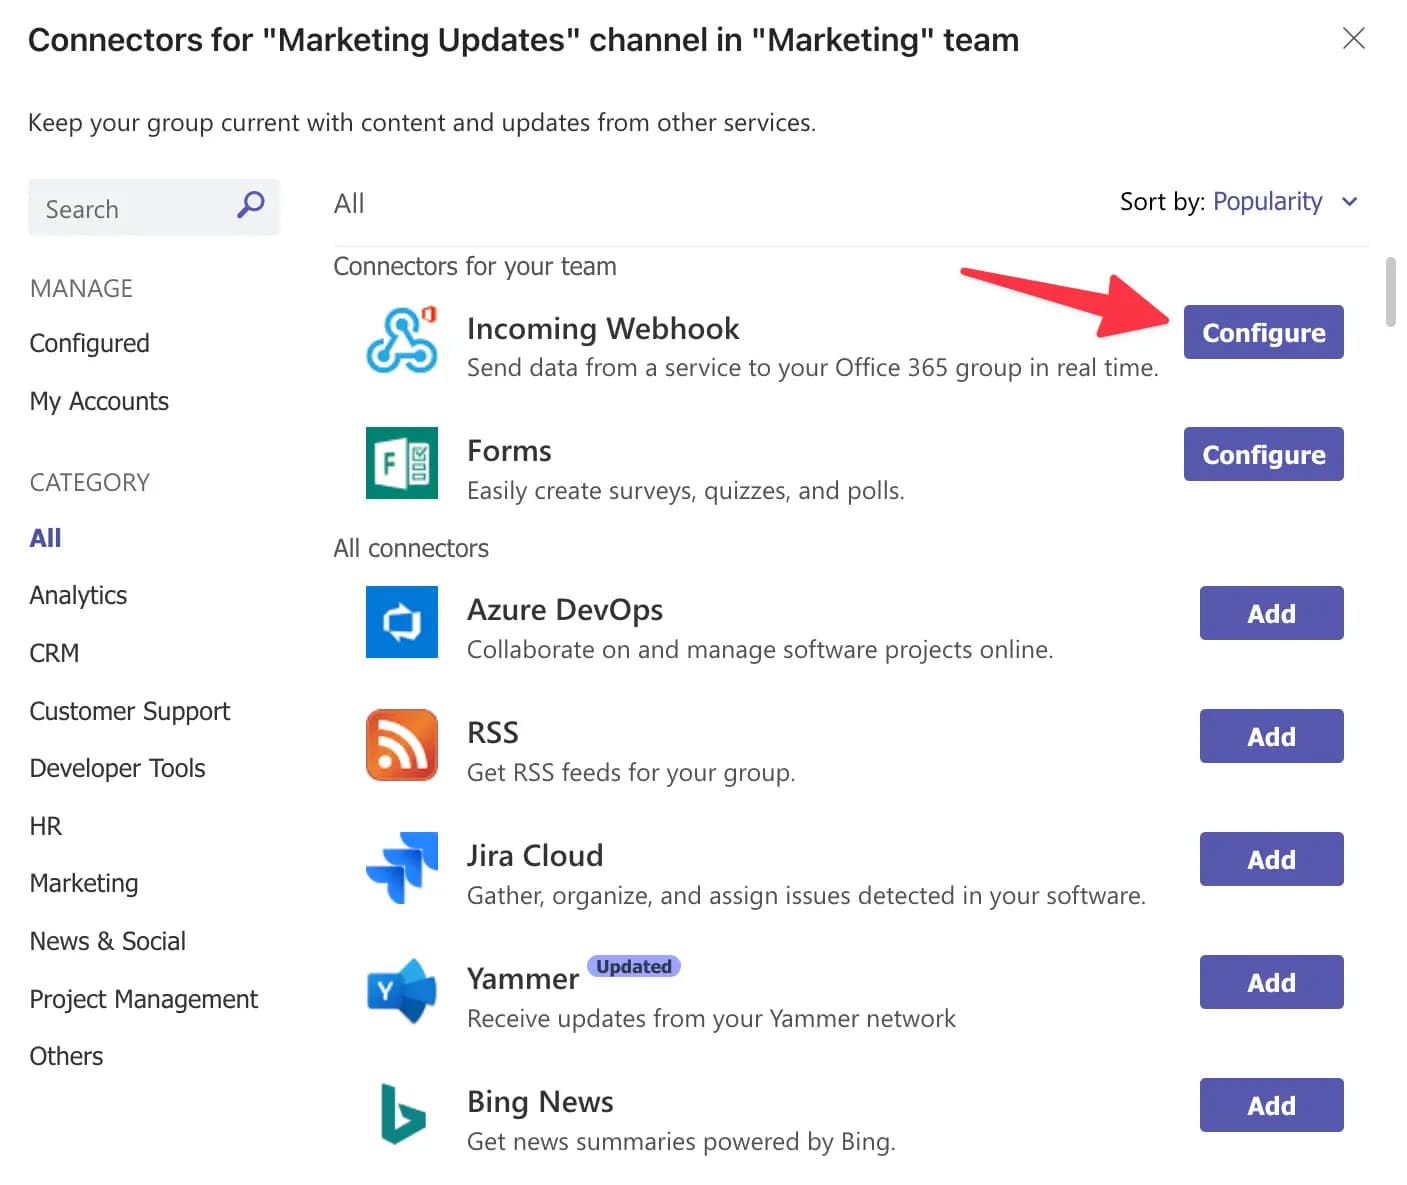
In the dialog box, click Configure next to Incoming Webhook.
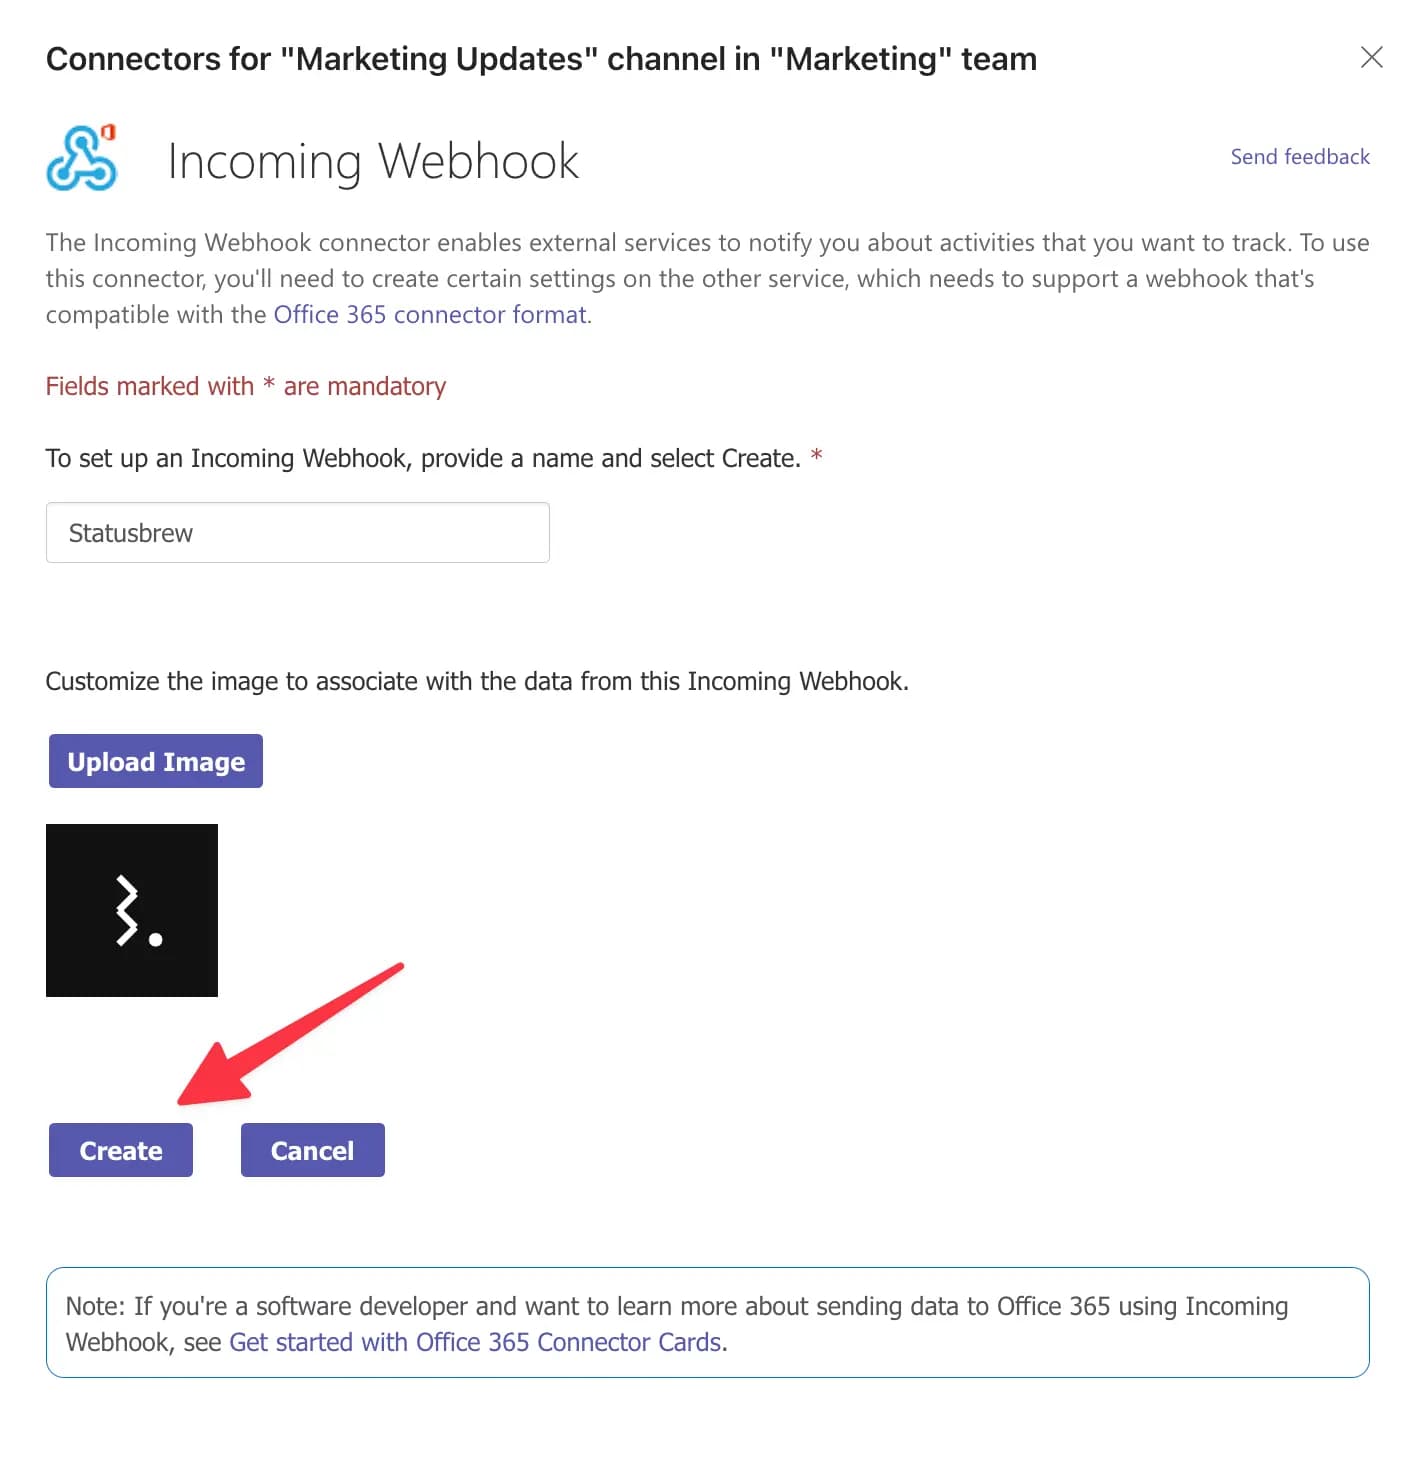
Name the webhook "Statusbrew" and upload the Statusbrew logo to easily recognize the alerts. Click Create.
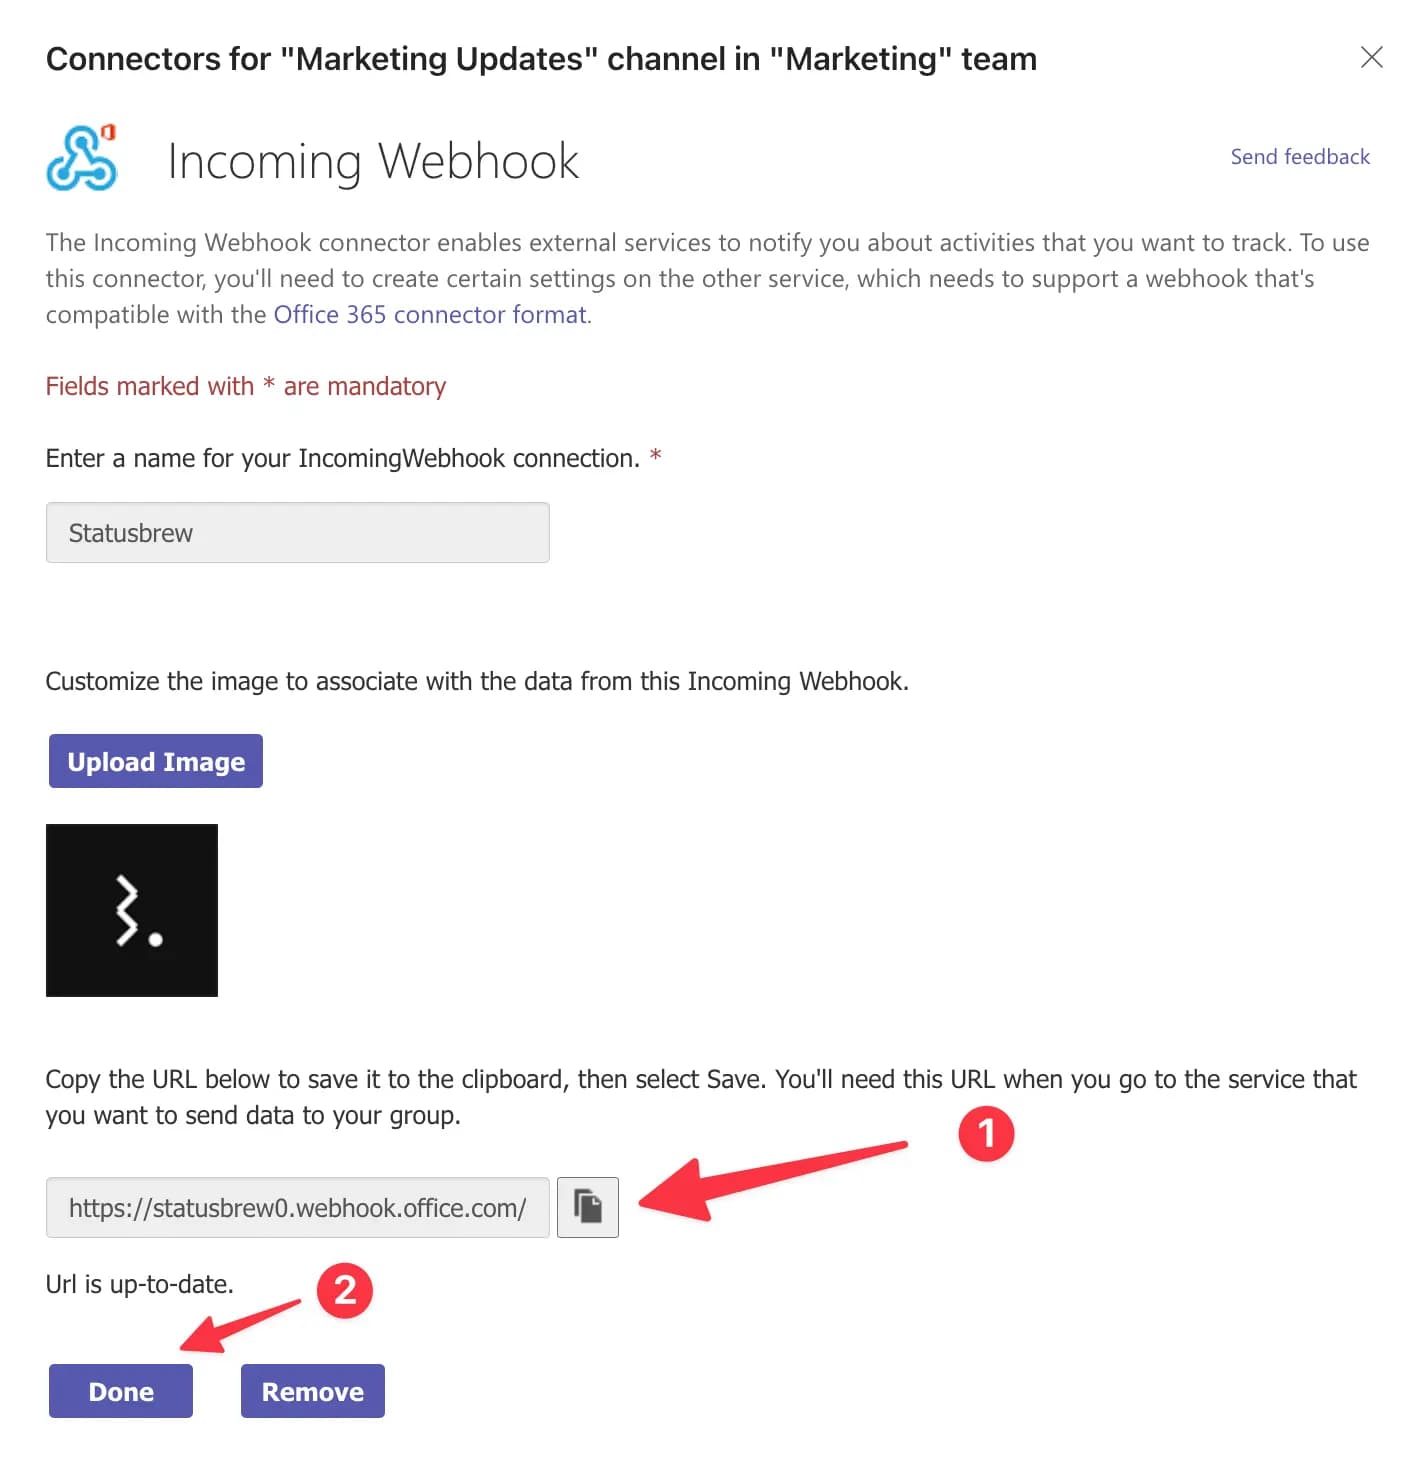
Copy the URL, save it to your clipboard and click on Done. You will have to paste it in Statusbrew when you will be setting up the connection
It's time to head back to Statusbrew now.
Steps To Be Done In Statusbrew - Connecting the Webhook
Go to Settings > Integrations.
Click Manage beside Microsoft Teams Connectors.
Click Add Connector.
Add Connector Name.
Paste the Webhook URL you generated in Teams.
Click Save.
Your connector has now been added correctly, so it's time to set up alerts.
Microsoft Teams Notifications (Alerts)
Learn the different trigger types for which you can choose to receive Microsoft Teams notifications.
How To Set Up Microsoft Teams Notifications (Alerts)?
Go to Settings > Integrations.
Click Manage beside Microsoft Teams Connectors.
Click Manage notification rules
Click Add new rule.
Add a rule Name
In Data sources, add the Profile/Profile Groups you want to set the alerts for
In Trigger type, select all the activities you wish to be notified for
Click Add a new action > Microsoft Teams Alerts.
Select the appropriate connector and click Add
Click Submit to set up the rule.
You can set up multiple alerts by adding a new rule to receive different notifications in different Teams channels, depending on where the concerned team members or clients are available.
How To Manage Microsoft Teams Alerts?
Here's how you can duplicate, edit, or delete Microsoft Teams alerts in Statusbrew:
Go to Settings > Integrations.
Click Manage beside Microsoft Teams Connectors.
Select Manage notification rules
Click (More) besides the rule you wish to Duplicate, Edit, or Delete
If you want to edit the rule, click Edit rule, make the changes, and click Submit. If you want to duplicate the rule, click Duplicate, make the changes and click Submit. If you want to delete the rule, click Delete. Select Delete Rule on the confirmation dialog box, and the rule will be deleted.
If you want to stop the alerts on a temporary basis, instead of deleting the rule, you can pause the rule. It will stop executing the rule on a temporary basis unless you activate it back. To pause a rule, you can click on Pause rule in the edit rule window.
You will be able to find all paused rules under the Paused rules tab in the Notification Rules window.
To activate the rule, click (More) beside the rule, click Edit rule > Activate rule.
How To Manage Microsoft Teams Connector?
Here's how you can edit or remove a connector in Statusbrew:
Go to Settings > Integrations.
Click Manage beside Microsoft Teams Connectors.
Click (More) besides the connector you wish to edit or remove.
If you want to edit the connector, click Edit. Edit the Connector Name, Language or Webhook URL and click Save. If you want to remove the connector, click Remove.