How To Upload Media In Compose?
Add images, videos, GIFs, and documents to your posts from Compose in Statusbrew. Each social network accepts different file types and different numbers of files, so refer to Media Specifications For Different Social Networks for formats and size limits.
Who Can Upload Media?
You need one of these publishing permissions on the space:
Create post (needs approval)
Full publishing access
Both let you add, edit, and remove media on a post. They differ in whether the post needs approval before it is published, not in what you can do with media.
How Do I Add Media To A Post?
Go to Compose.
Select the profiles you want to post to from the Profile Picker.
In Media, drag and drop your file, or click Browse options.
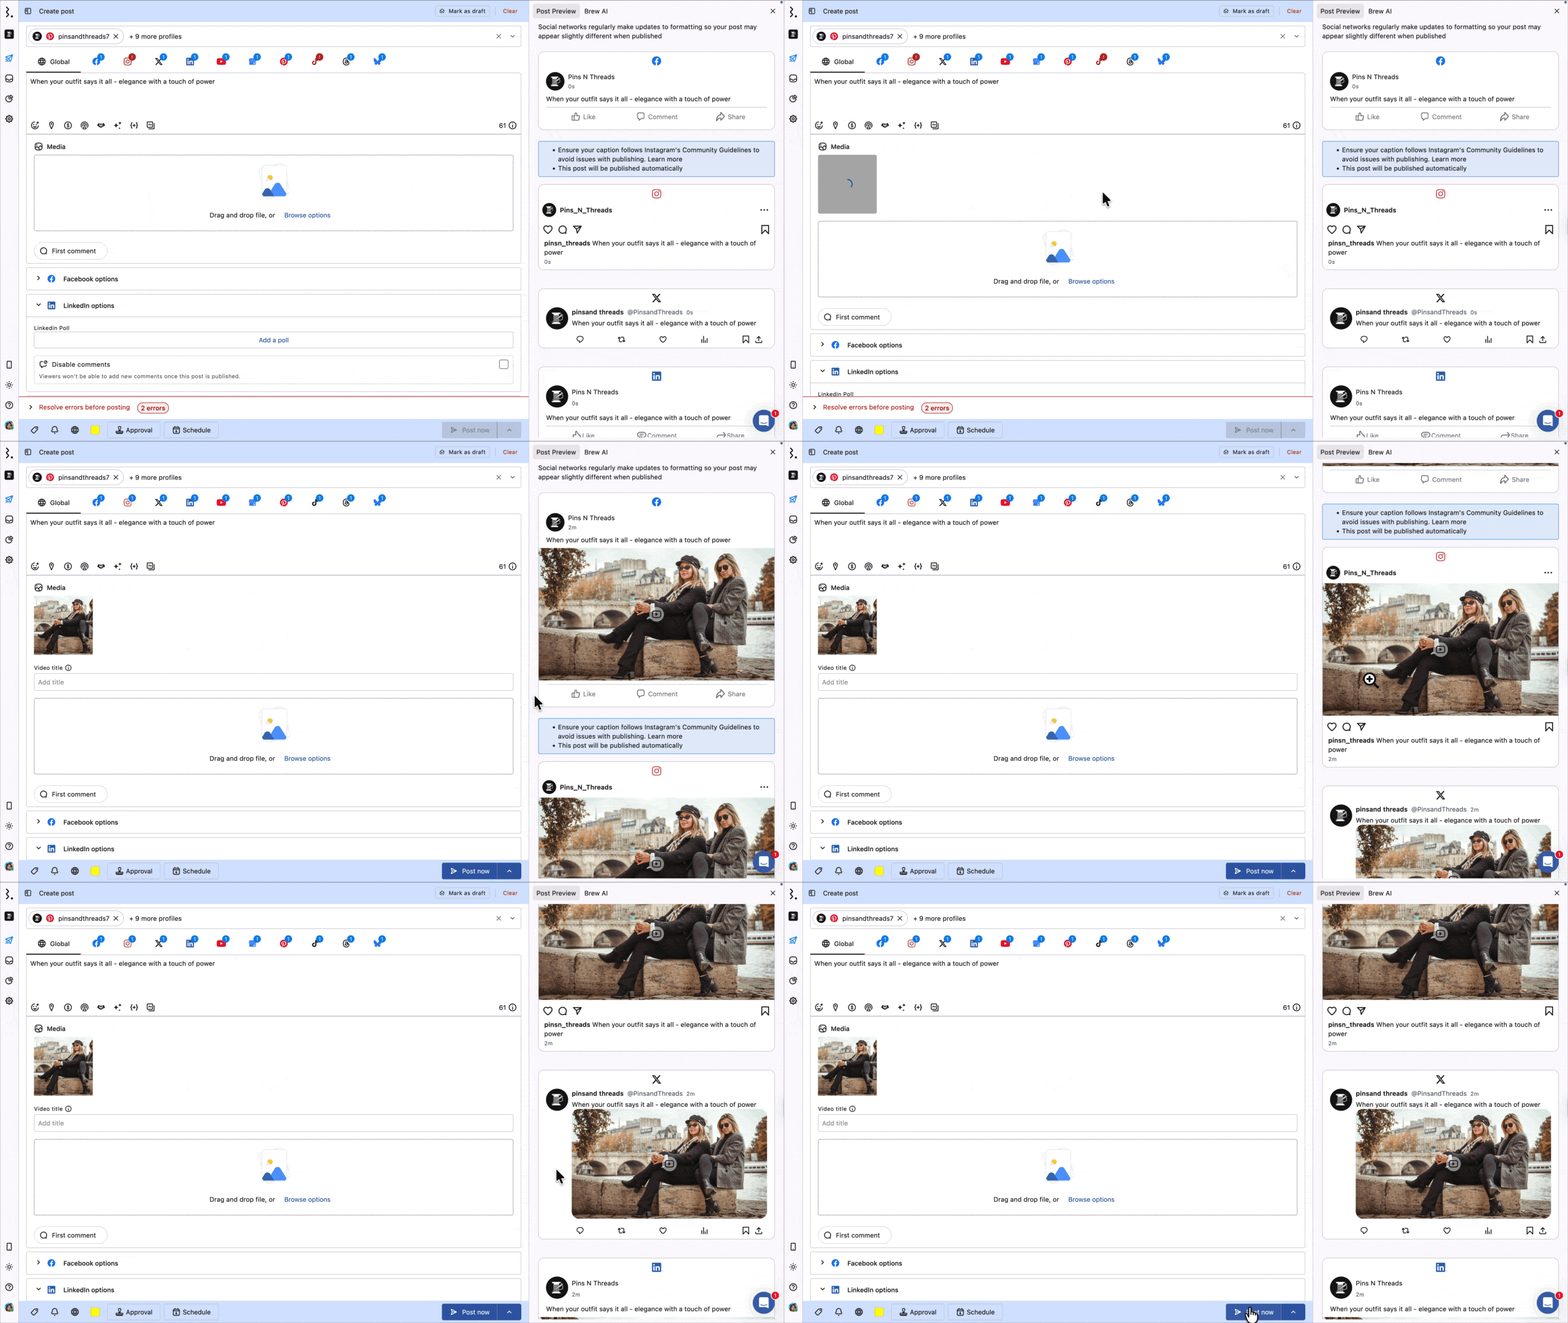
To add media to a post you already created, open it in Project and click Edit post. That opens the same Compose screen, so the steps above stay the same.
Browse Options
Browse options gives you eleven ways to add media.
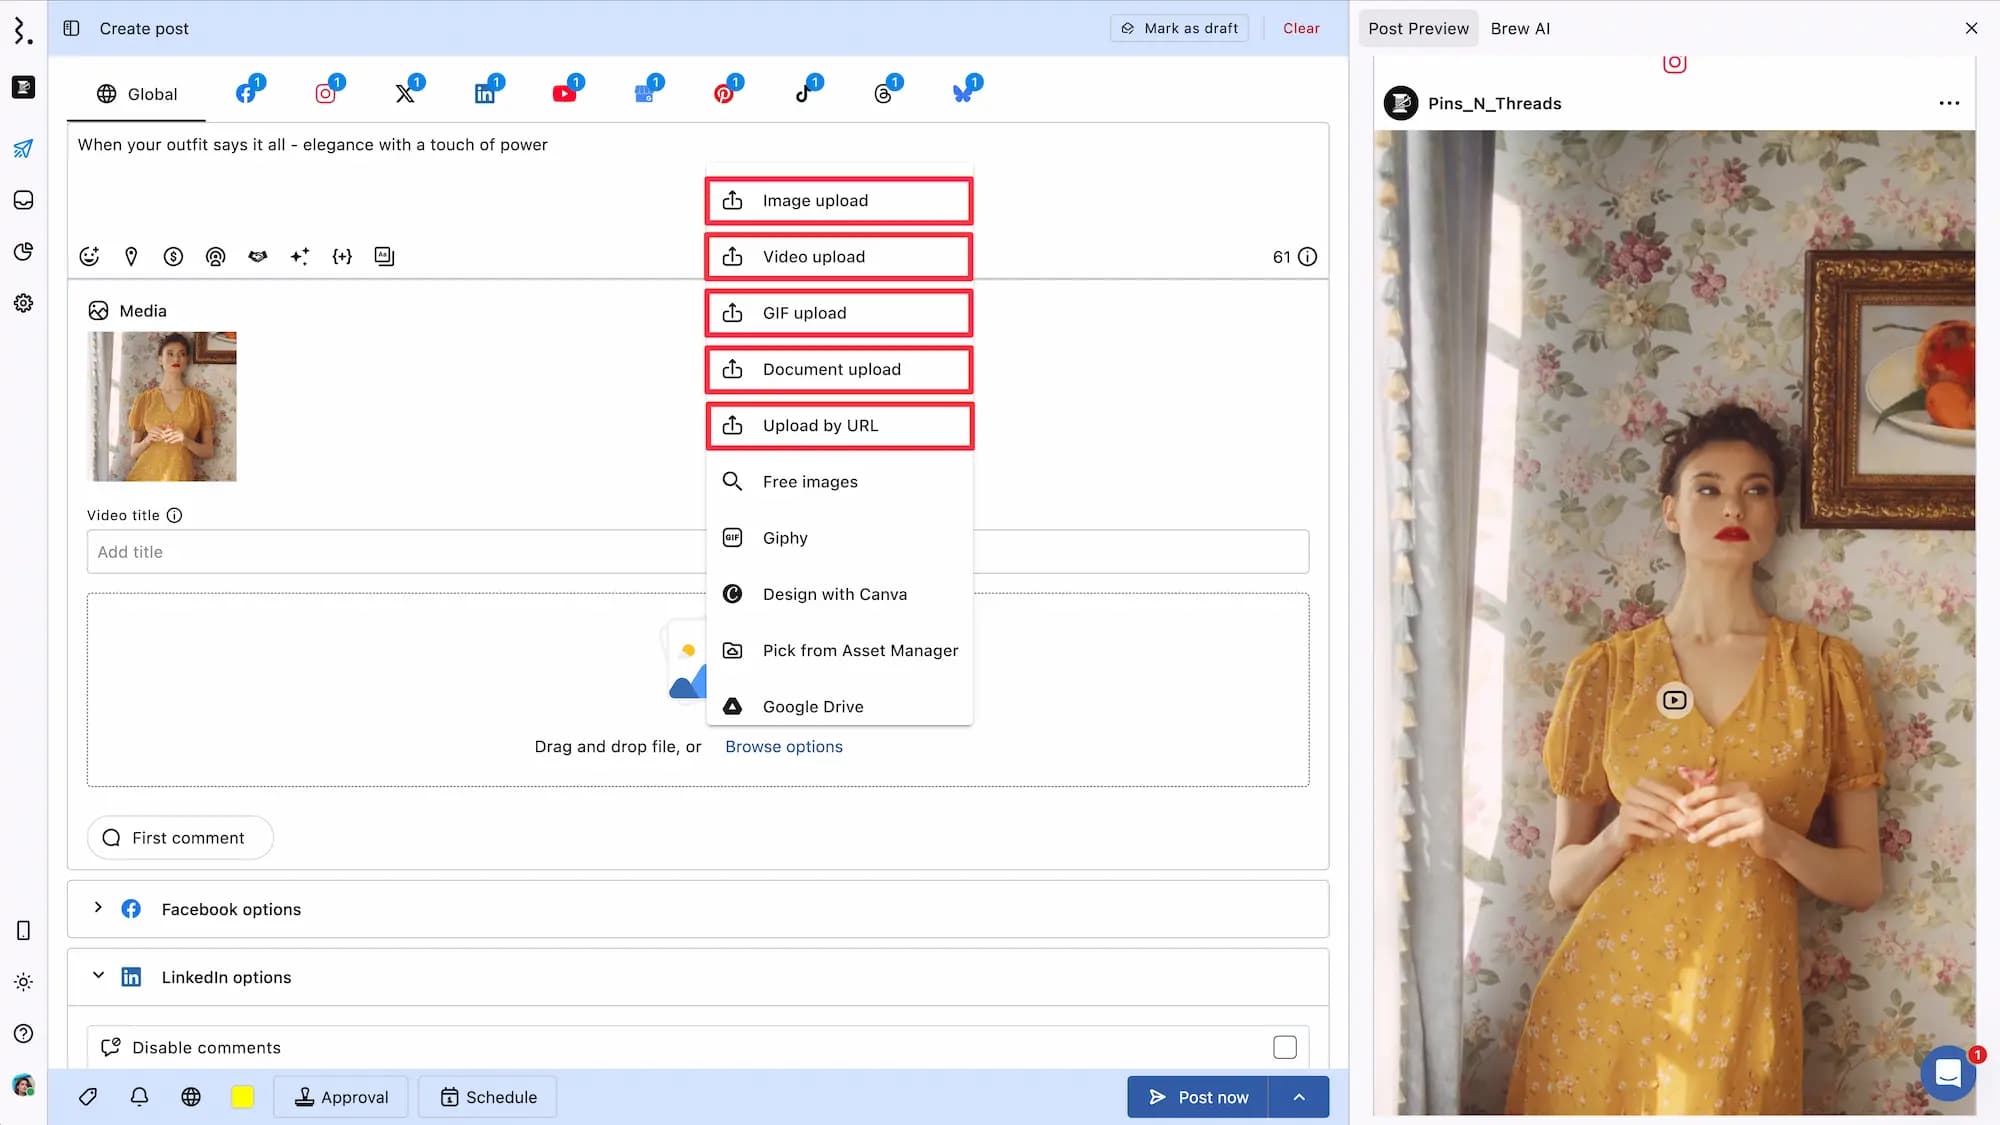
Image upload: Upload single or multiple images from your device.
Video upload: Upload single or multiple videos from your device.
GIF upload: Upload GIF files from your device.
Document upload: Upload a document from your device. Documents go only to LinkedIn, where they are published as a carousel. Upload a PDF with the pages in the order you want them read.
Upload by URL: Add media from a publicly accessible URL.
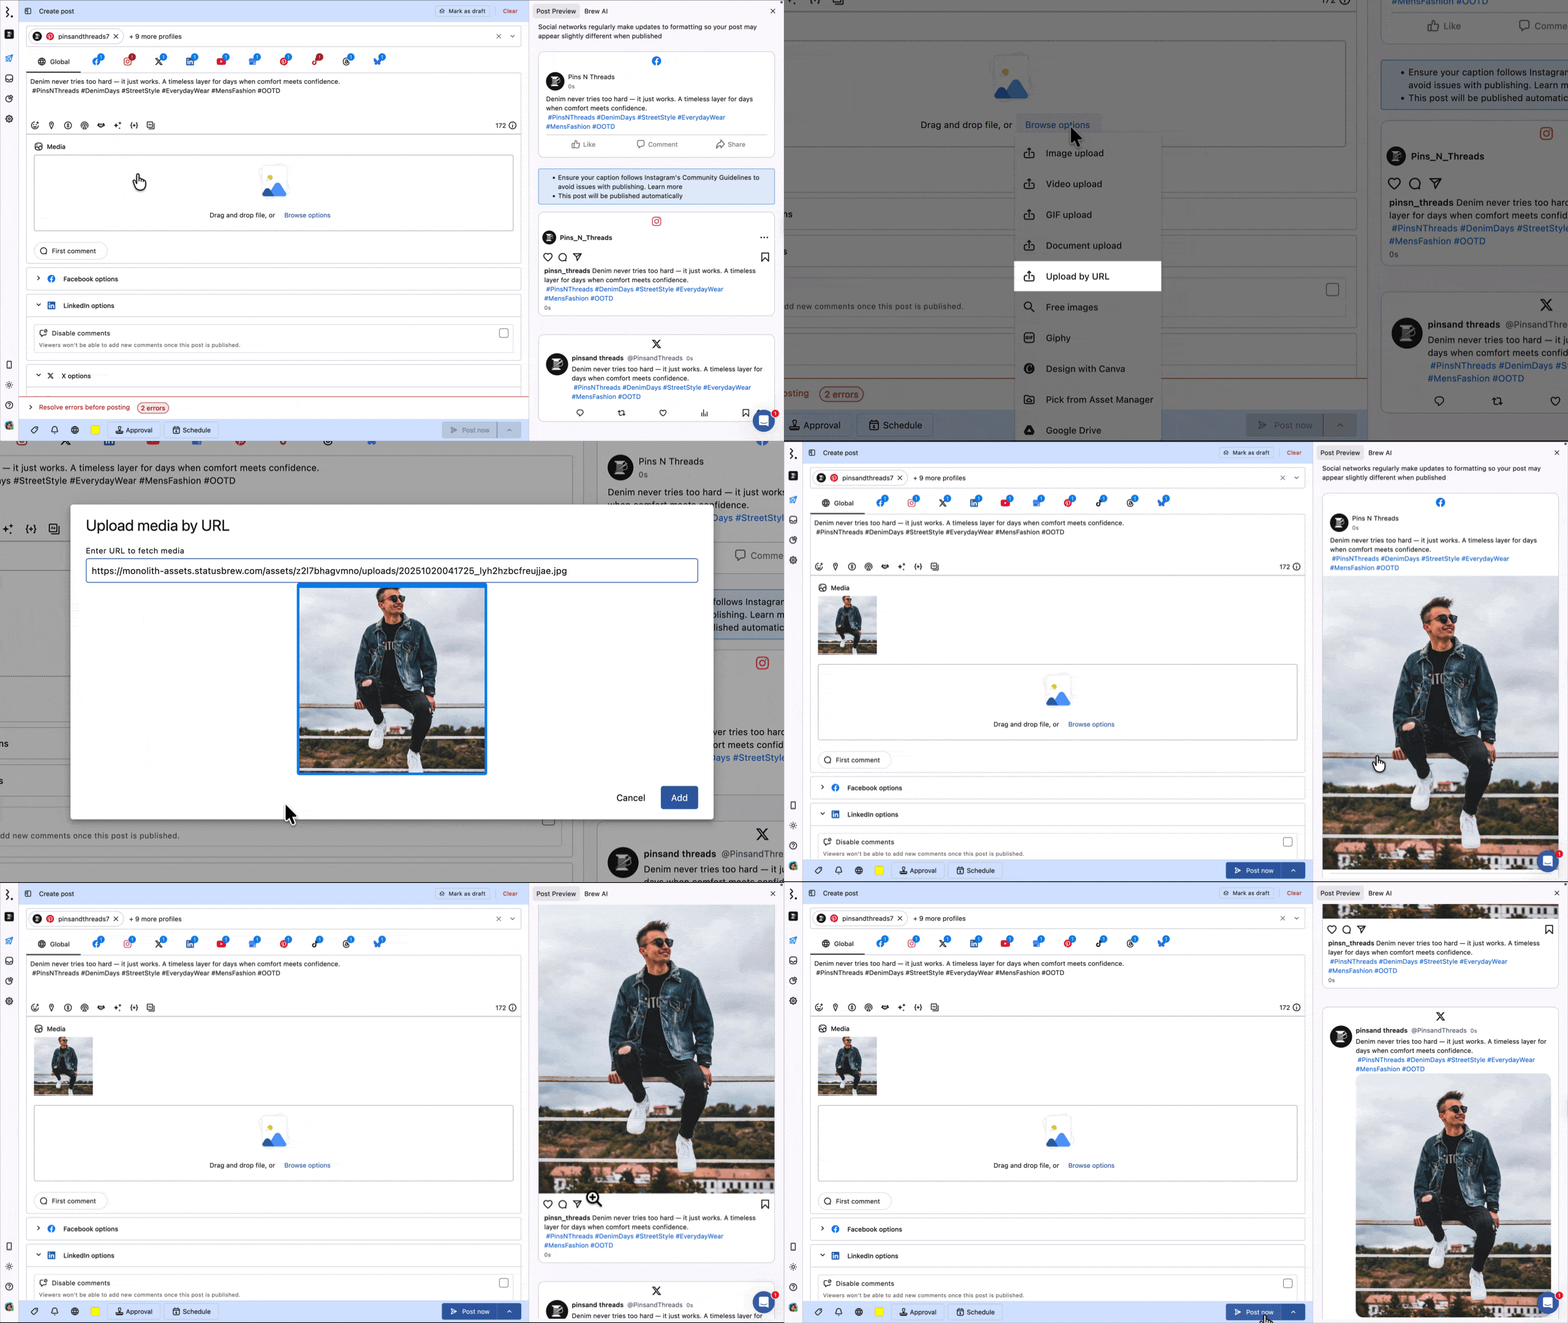
Click Upload by URL in Browse options. The Upload media by URL dialog will open.
In the Enter URL to fetch media field, paste the direct link to your image, video, or GIF.
Once the media preview appears, confirm it is the correct file.
Click Add to insert the media.
The URL must point to the media file itself, such as a Google Drive share link or a direct image or video URL. Links to video platforms like YouTube or Vimeo will not work, because they point to a webpage, not the raw file.
Free images: Search a library of free stock images. Statusbrew integrates with Unsplash and Pixabay.
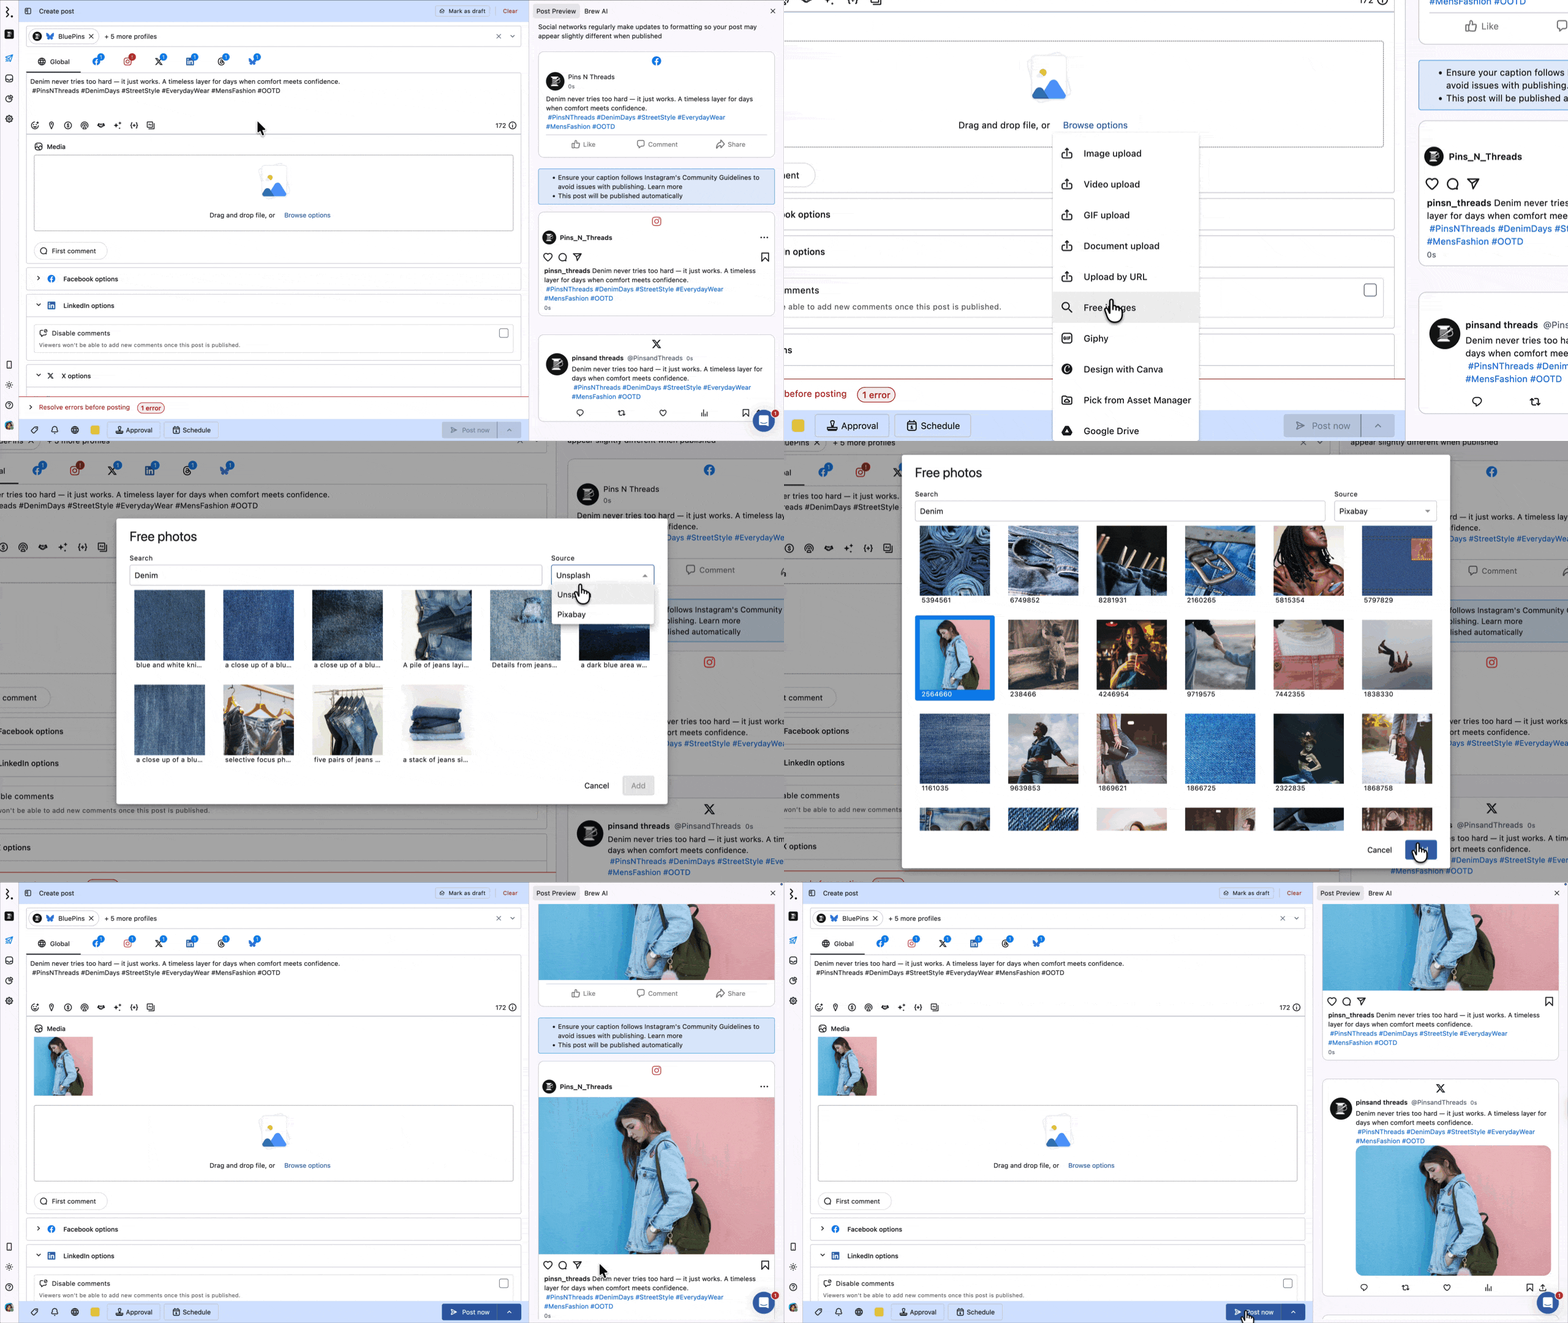
Click Free images in Browse options. The Free images dialog will open.
From the Source dropdown, choose Unsplash or Pixabay. Unsplash is selected by default.
Type a keyword in the search box.
Click an image to select it.
Click Add to insert it.
Giphy: Browse and add GIFs from Giphy.
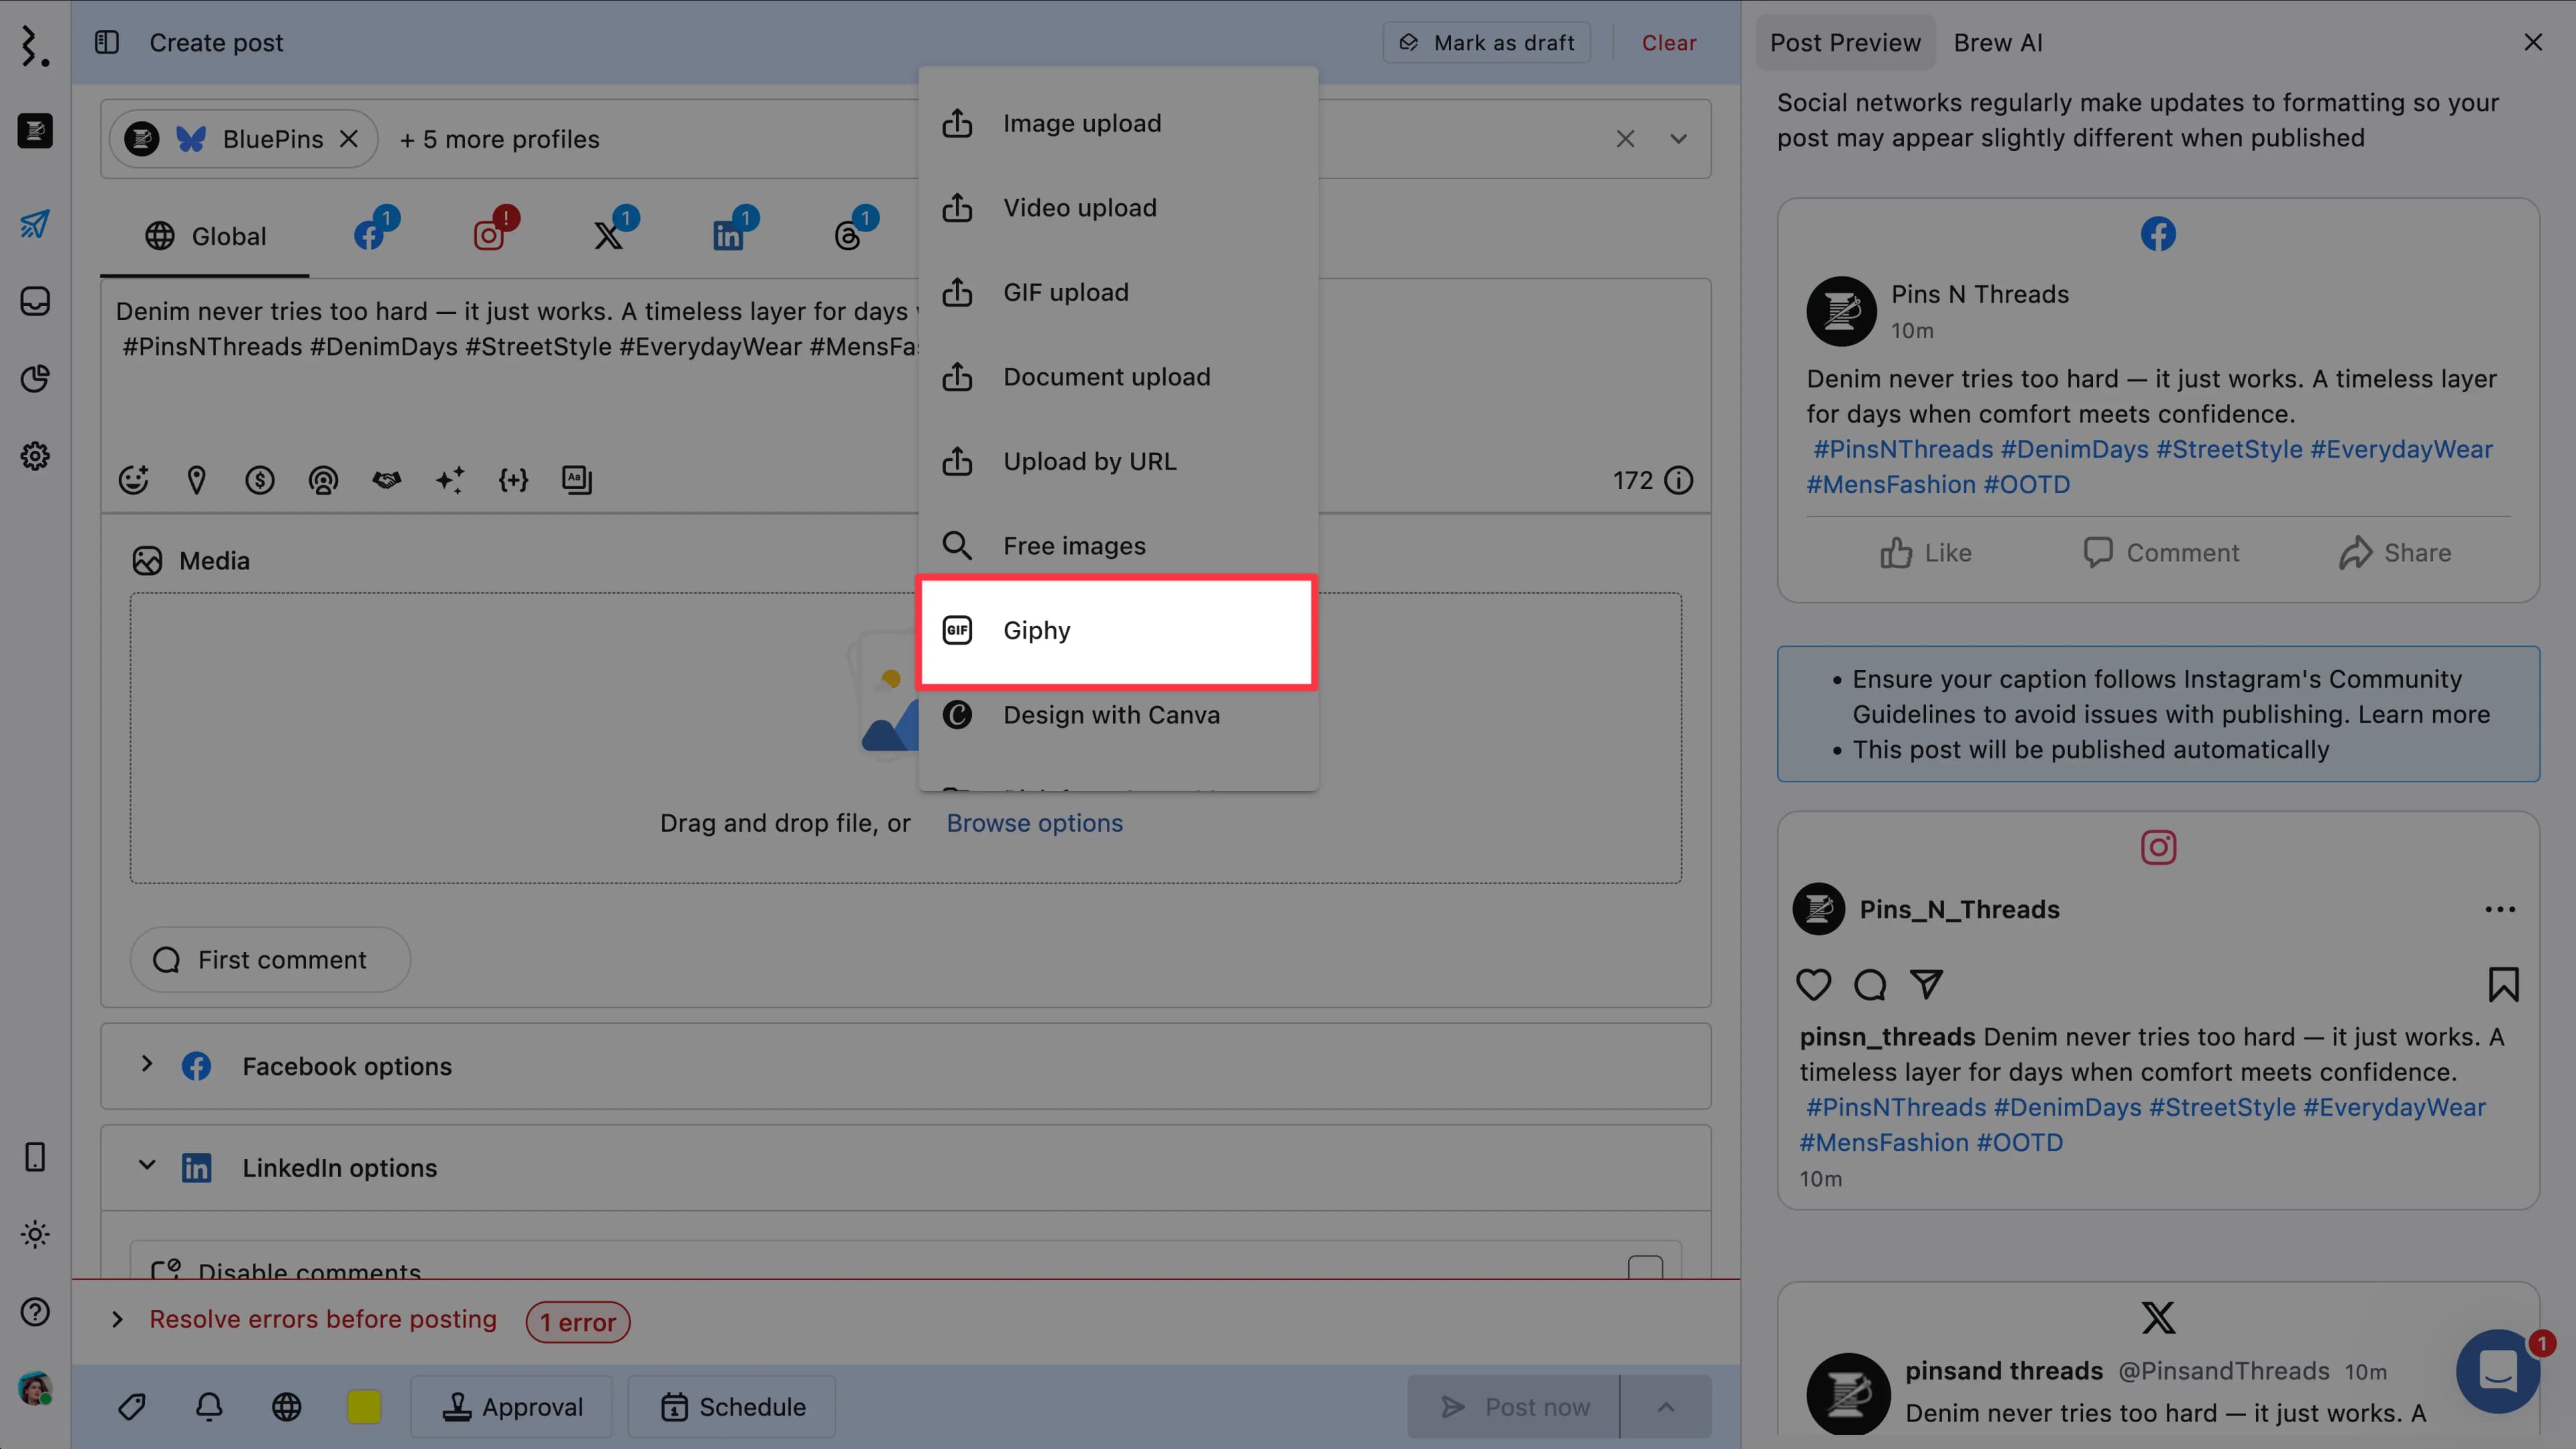
Click Giphy in Browse options. The Free GIFs dialog will open.
Type a keyword in the search box, for example, cat.
Click a GIF to select it.
Click Add to insert it.
Design with Canva: Create a design in Canva and add it without leaving Compose.
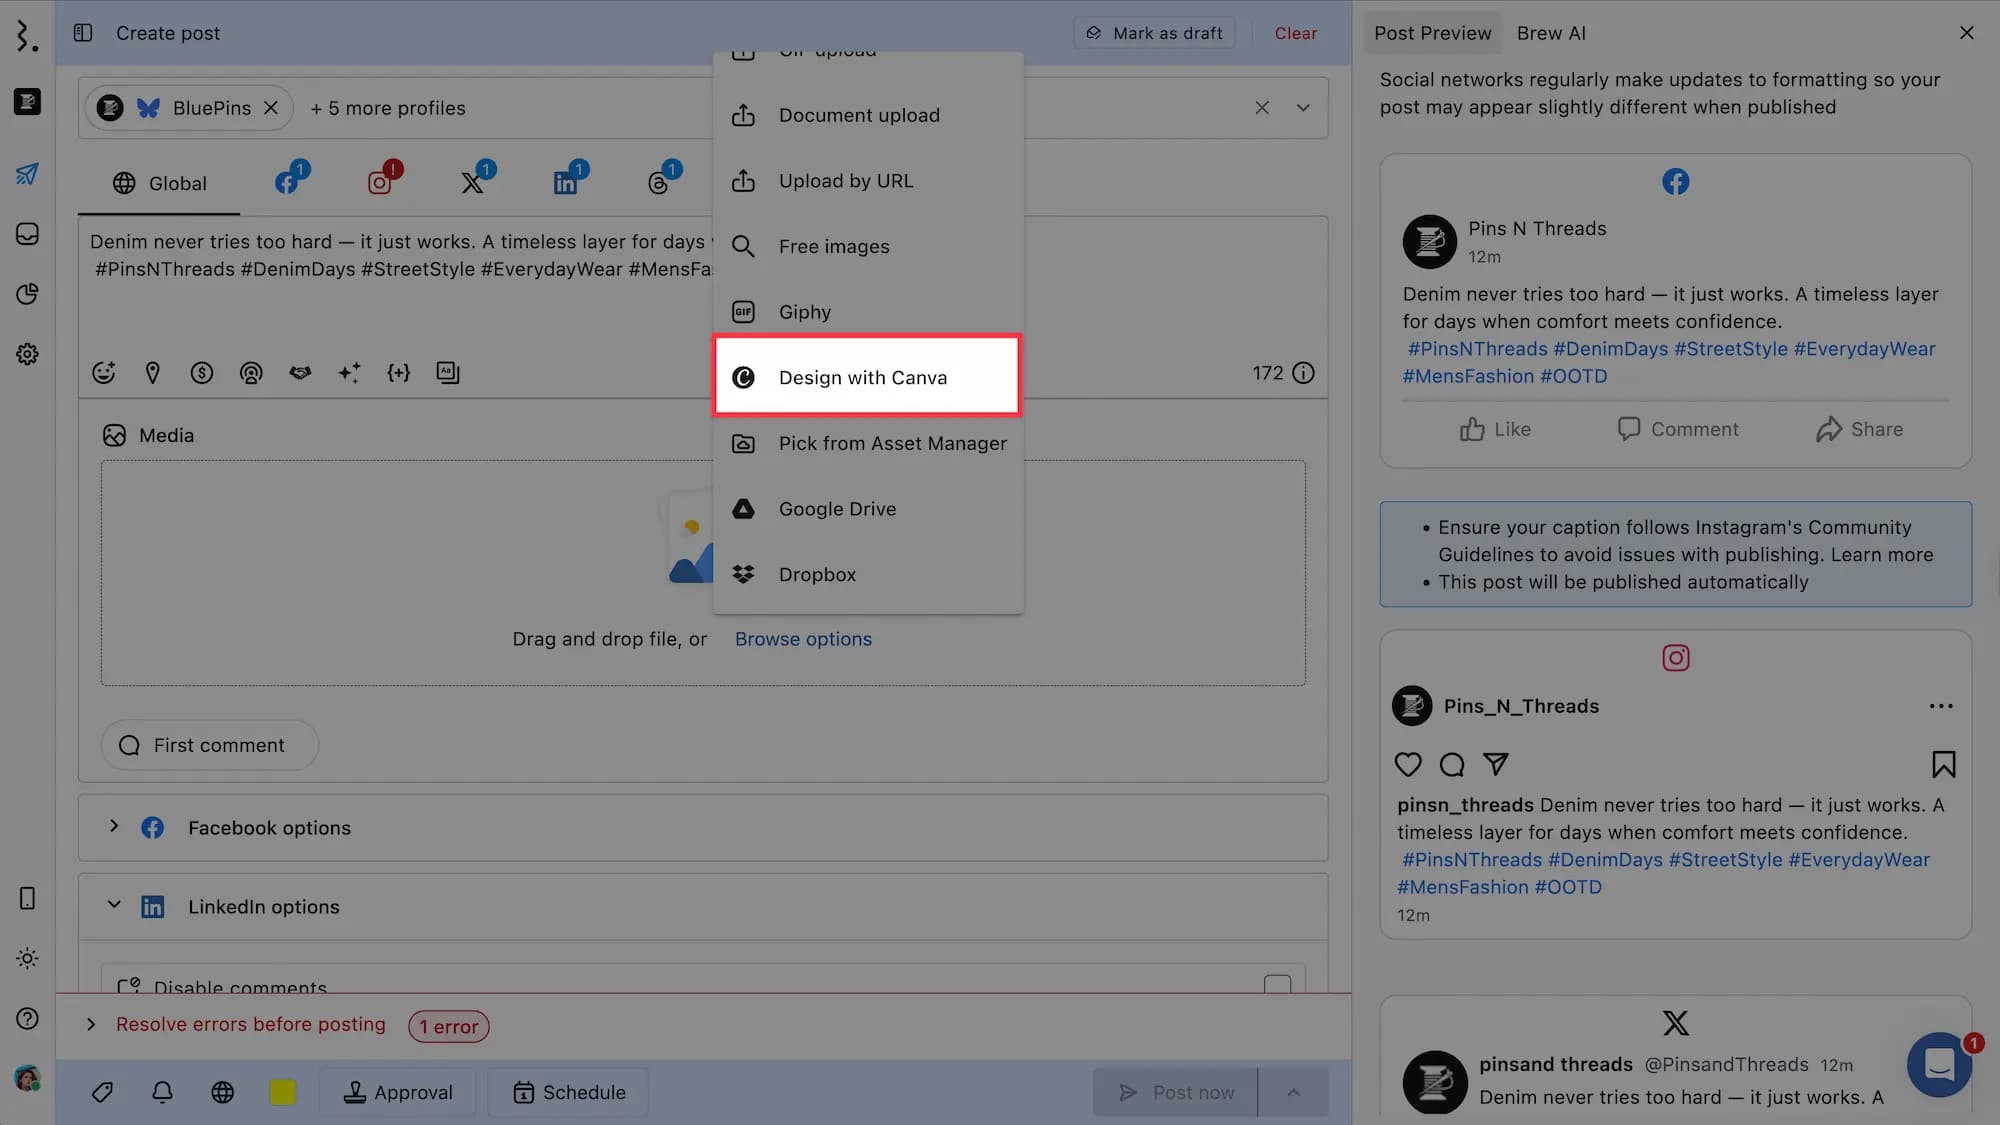
In Media, select Browse options > Design with Canva.
Choose a template. Templates are pre-sized to each network's recommended dimensions, and you can also set a custom size. The Canva design editor will open.
Select a template, choose a file from a folder, or upload one from your device to edit in Canva.
Click Publish. Your image is added to Compose.
The first time you use Canva in Statusbrew, you will need to log in to Canva or sign up.
Pick from Asset Manager: Select from your library of saved media assets in Statusbrew.
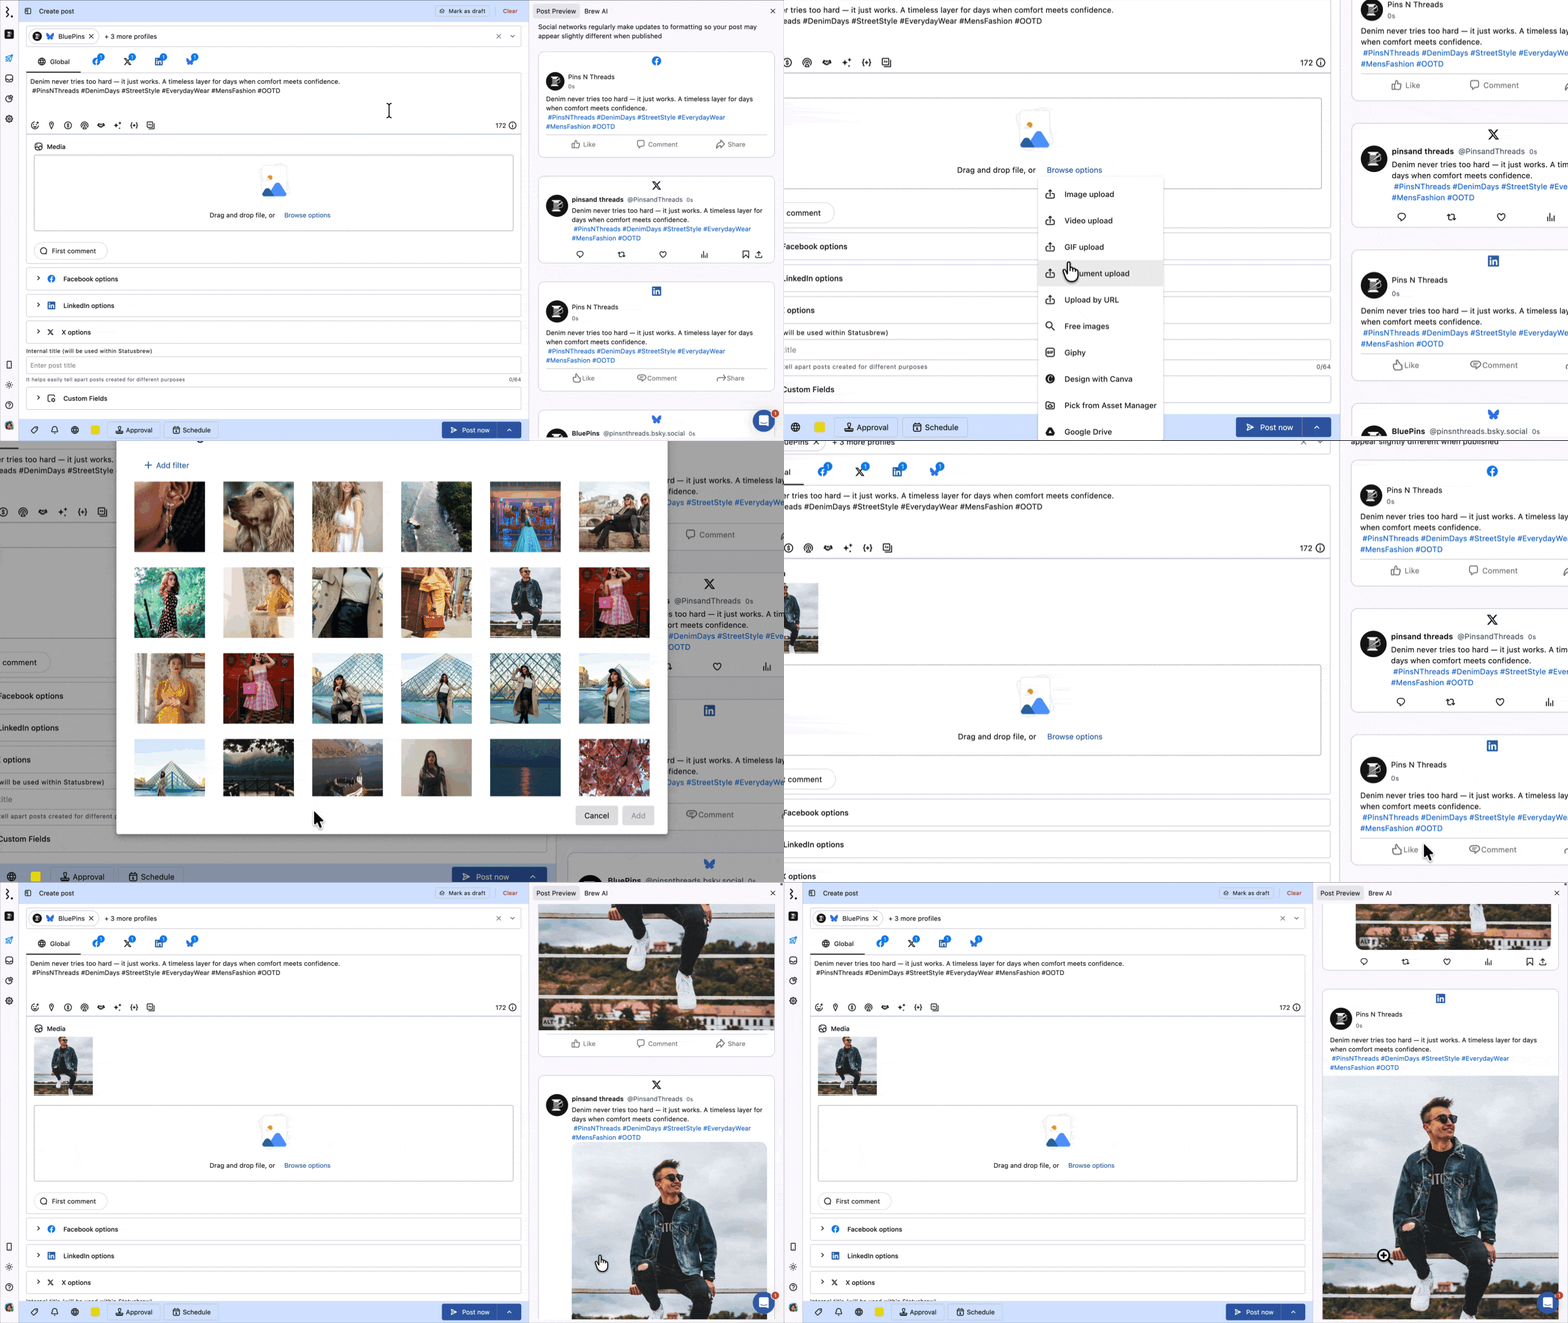
Google Drive: Import files from your connected Google Drive account.
Click Google Drive in Browse options. The Google Drive dialog will open.
Select the file you want.
Click Add to insert it into your post.
Dropbox: Import files from your connected Dropbox account.
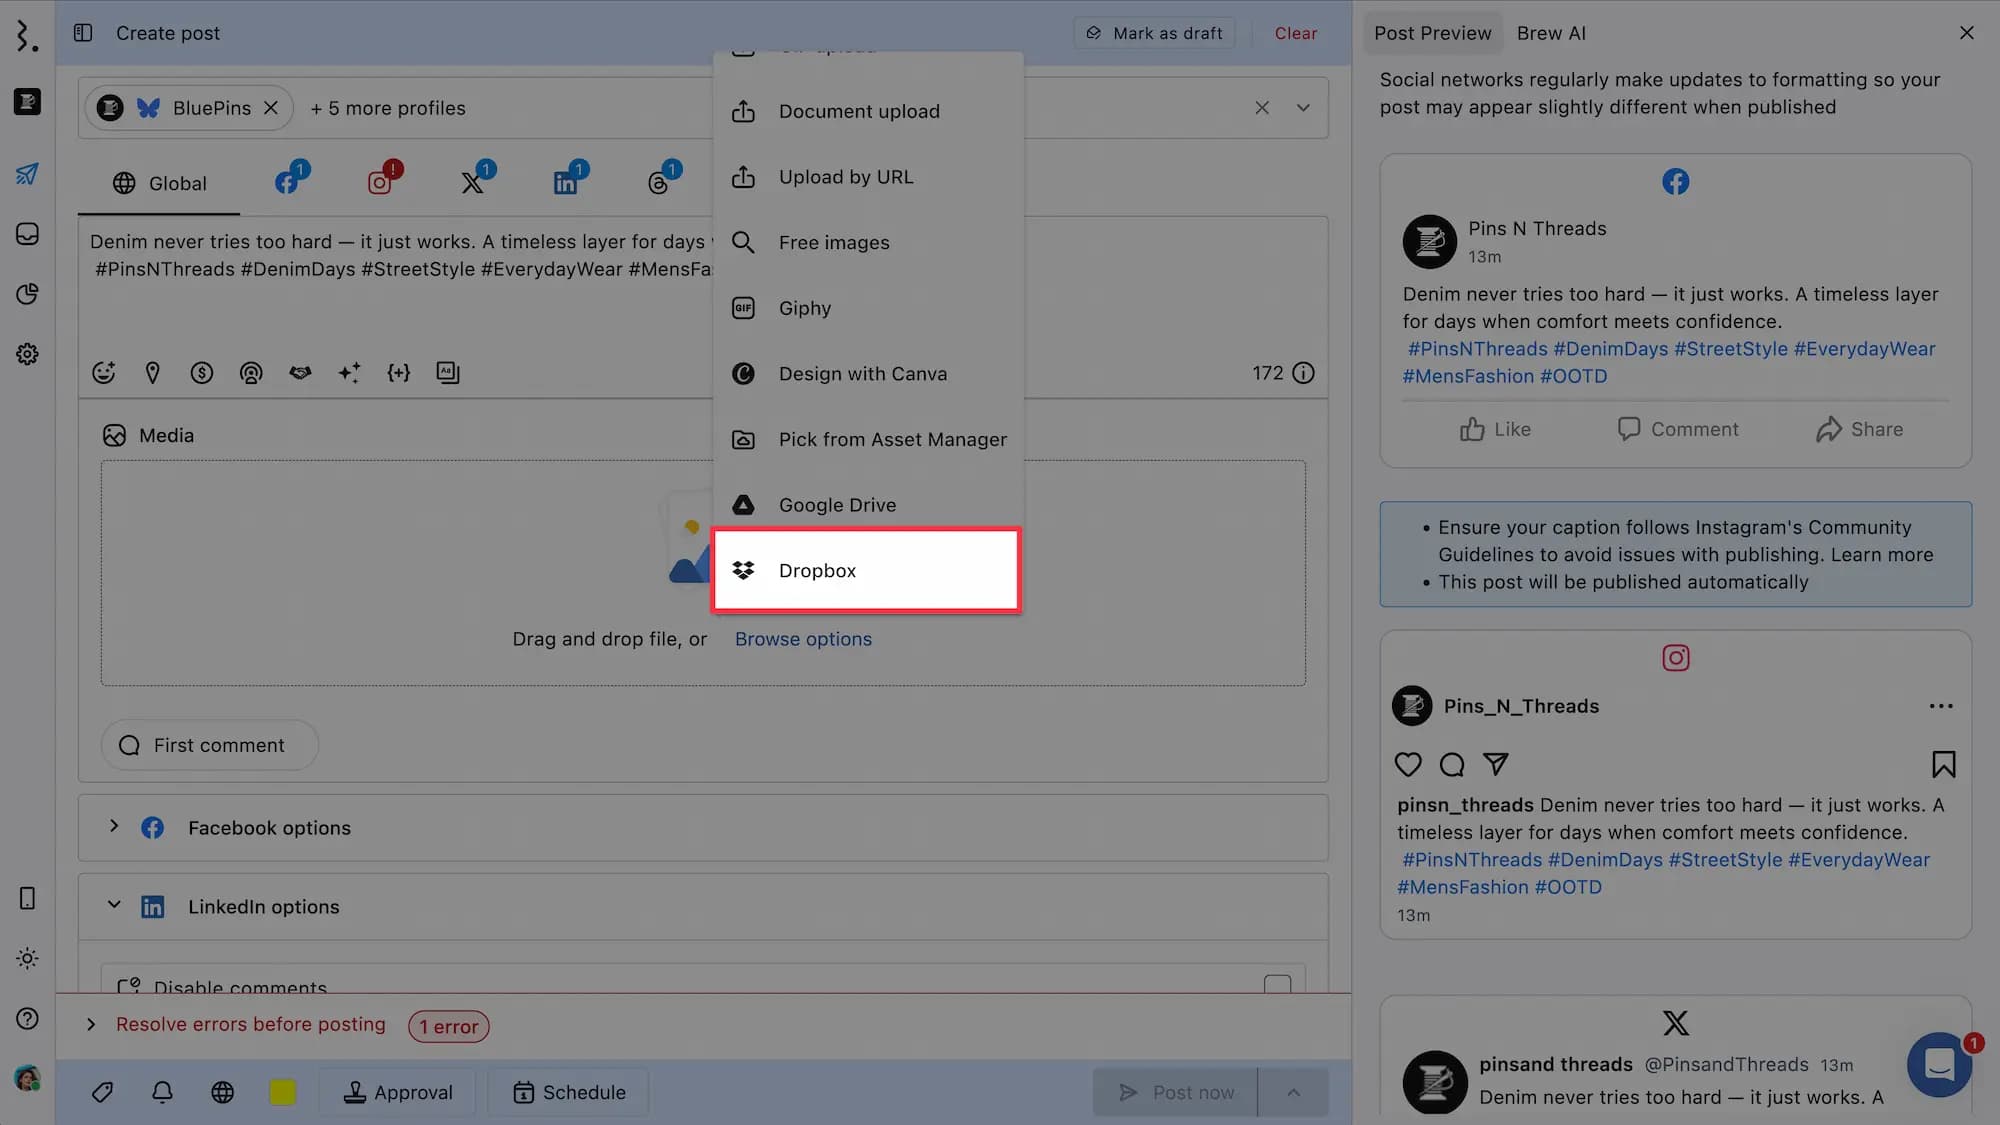
Click Dropbox in Browse options. The Dropbox dialog will open.
Select the file you want.
Click Add to insert it into your post.
How Many Files Can I Add Per Network?
Each network tab shows its own limit in the Media area.
Network | Limit |
|---|---|
10 images, or 1 GIF, or 1 video | |
10 images or videos in any combination | |
X | 4 images, or 1 GIF, or 1 video |
9 images, or 1 GIF, or 1 video, or 1 document | |
YouTube | 1 video |
Google Business Profile | 1 image |
5 images, or 1 video | |
TikTok | 35 images, or 1 video |
Threads | 10 images or videos in any combination |
Bluesky | 4 images, or 1 video |
A few things to know:
GIFs are published to Facebook, X, and LinkedIn only.
Documents are published only on LinkedIn as a carousel.
Pinterest needs at least one image or video. A Pin cannot publish without media.
What Is The Difference Between The Global Tab And Network Tabs?
Media you add in the Global tab goes to every profile on the post.
Open a network tab above the caption box to give that network something different, such as its own image or its own crop. Changes in a network tab apply only to that network, and the Global tab keeps what you originally uploaded.
Editing Images
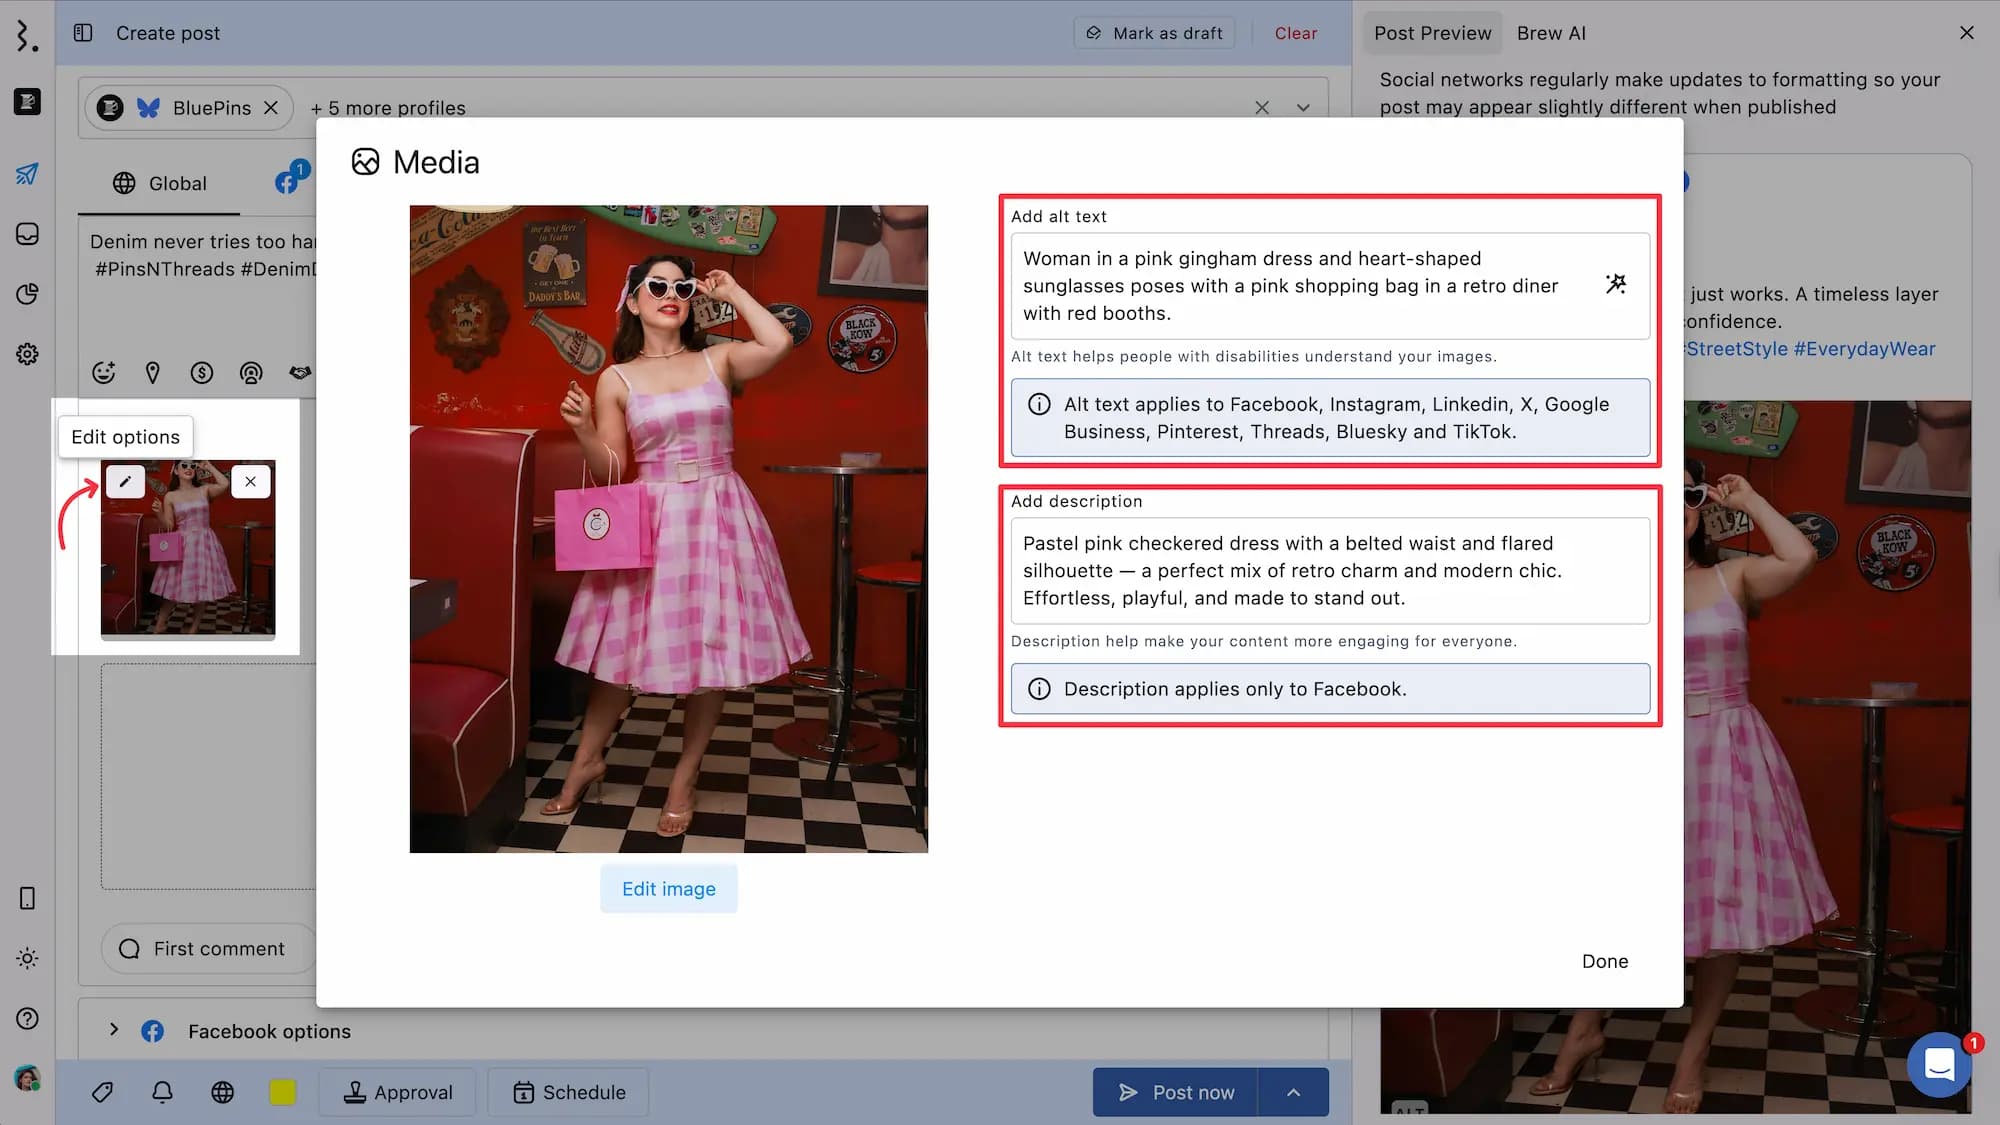
Hover over an uploaded image to get these options:
Edit options: Opens the media editor, where you can Add alt text (Facebook, Instagram, LinkedIn, X, Google Business, Pinterest, Threads, Bluesky, and TikTok) and Add description (Facebook).
Smart crop: Resizes the image to the aspect ratio each network prefers. See Smart Crop below.
Remove: Deletes the media from your post draft.
Built-in Image Editor
To edit the image itself, click Edit options > Edit image. Statusbrew's built-in image editor opens, where you can change the ratio, apply filters, or add text. Click EXPORT IMAGE to keep your changes, or Close to discard them.
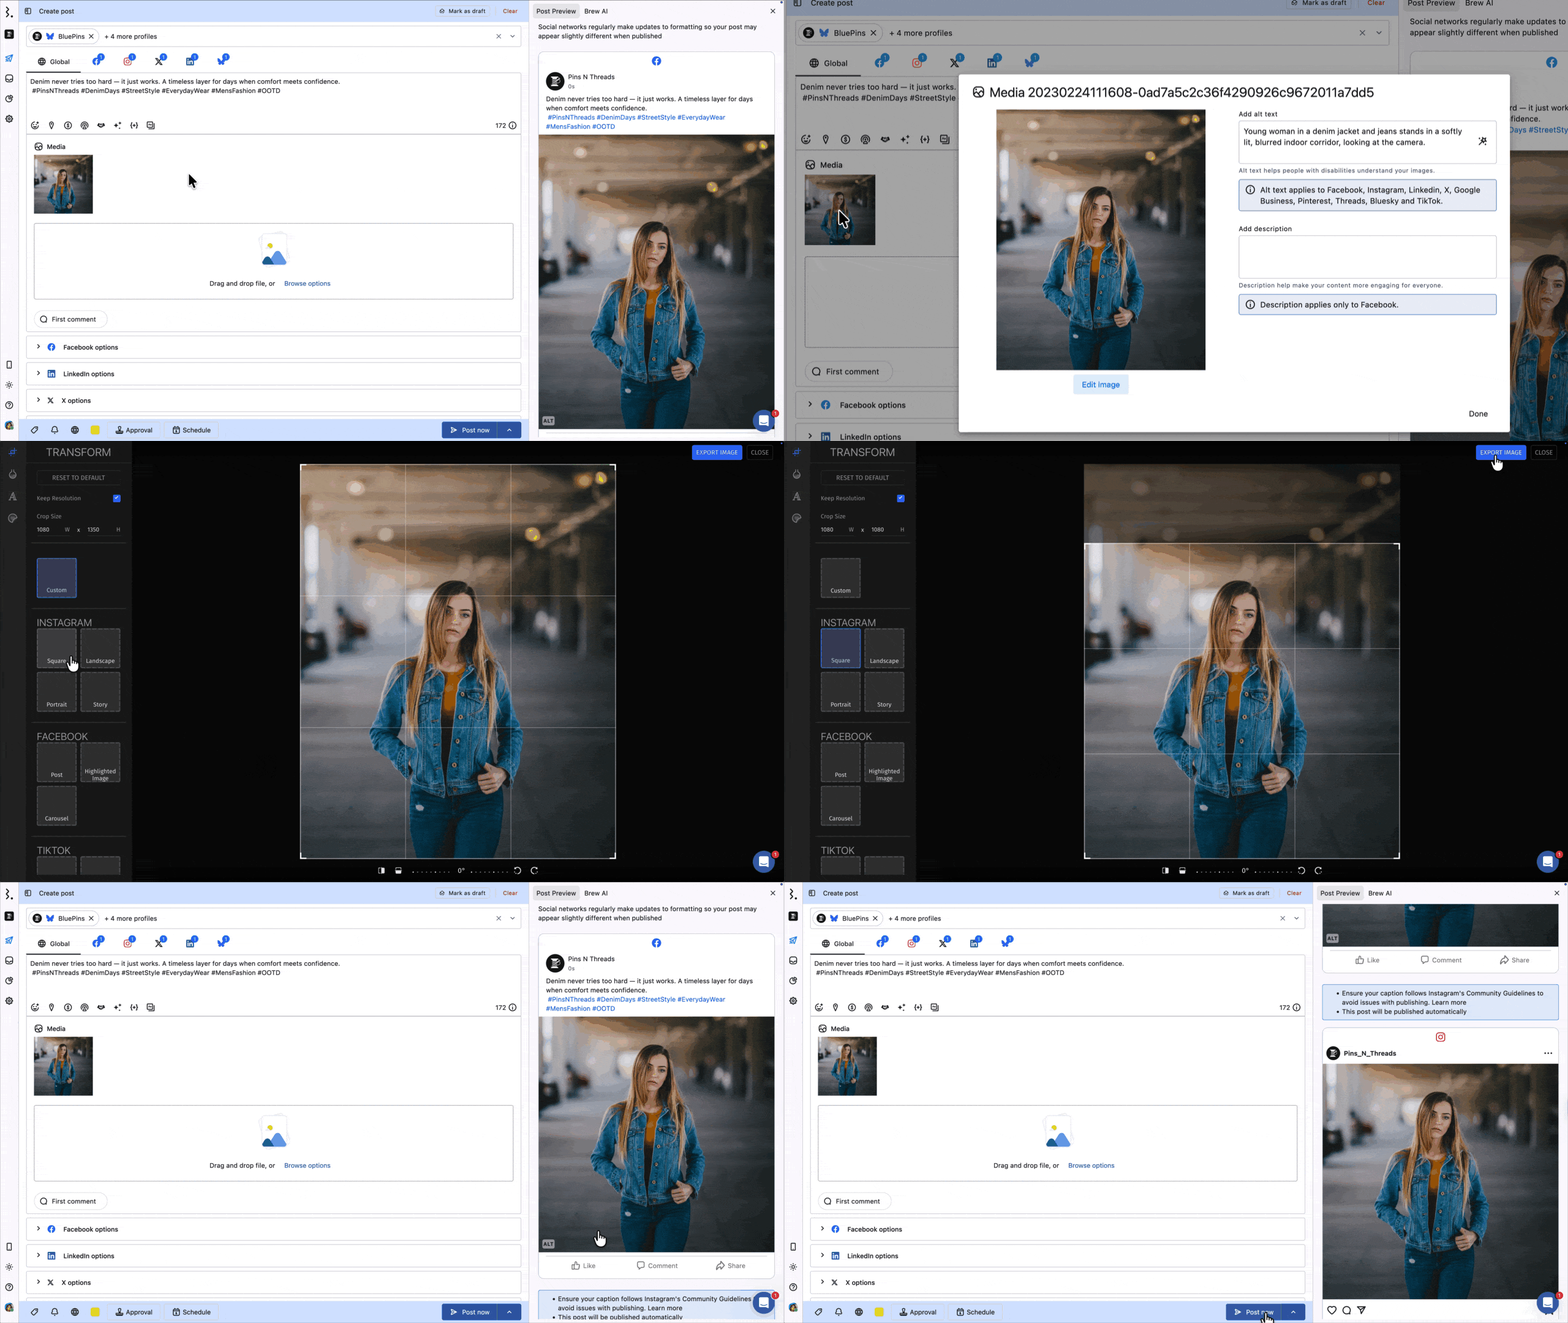
Tip: When multiple images are attached, drag and drop them to change the order they publish in.
Generating Alt Text With AI
Alt text describes your image for people using screen readers.
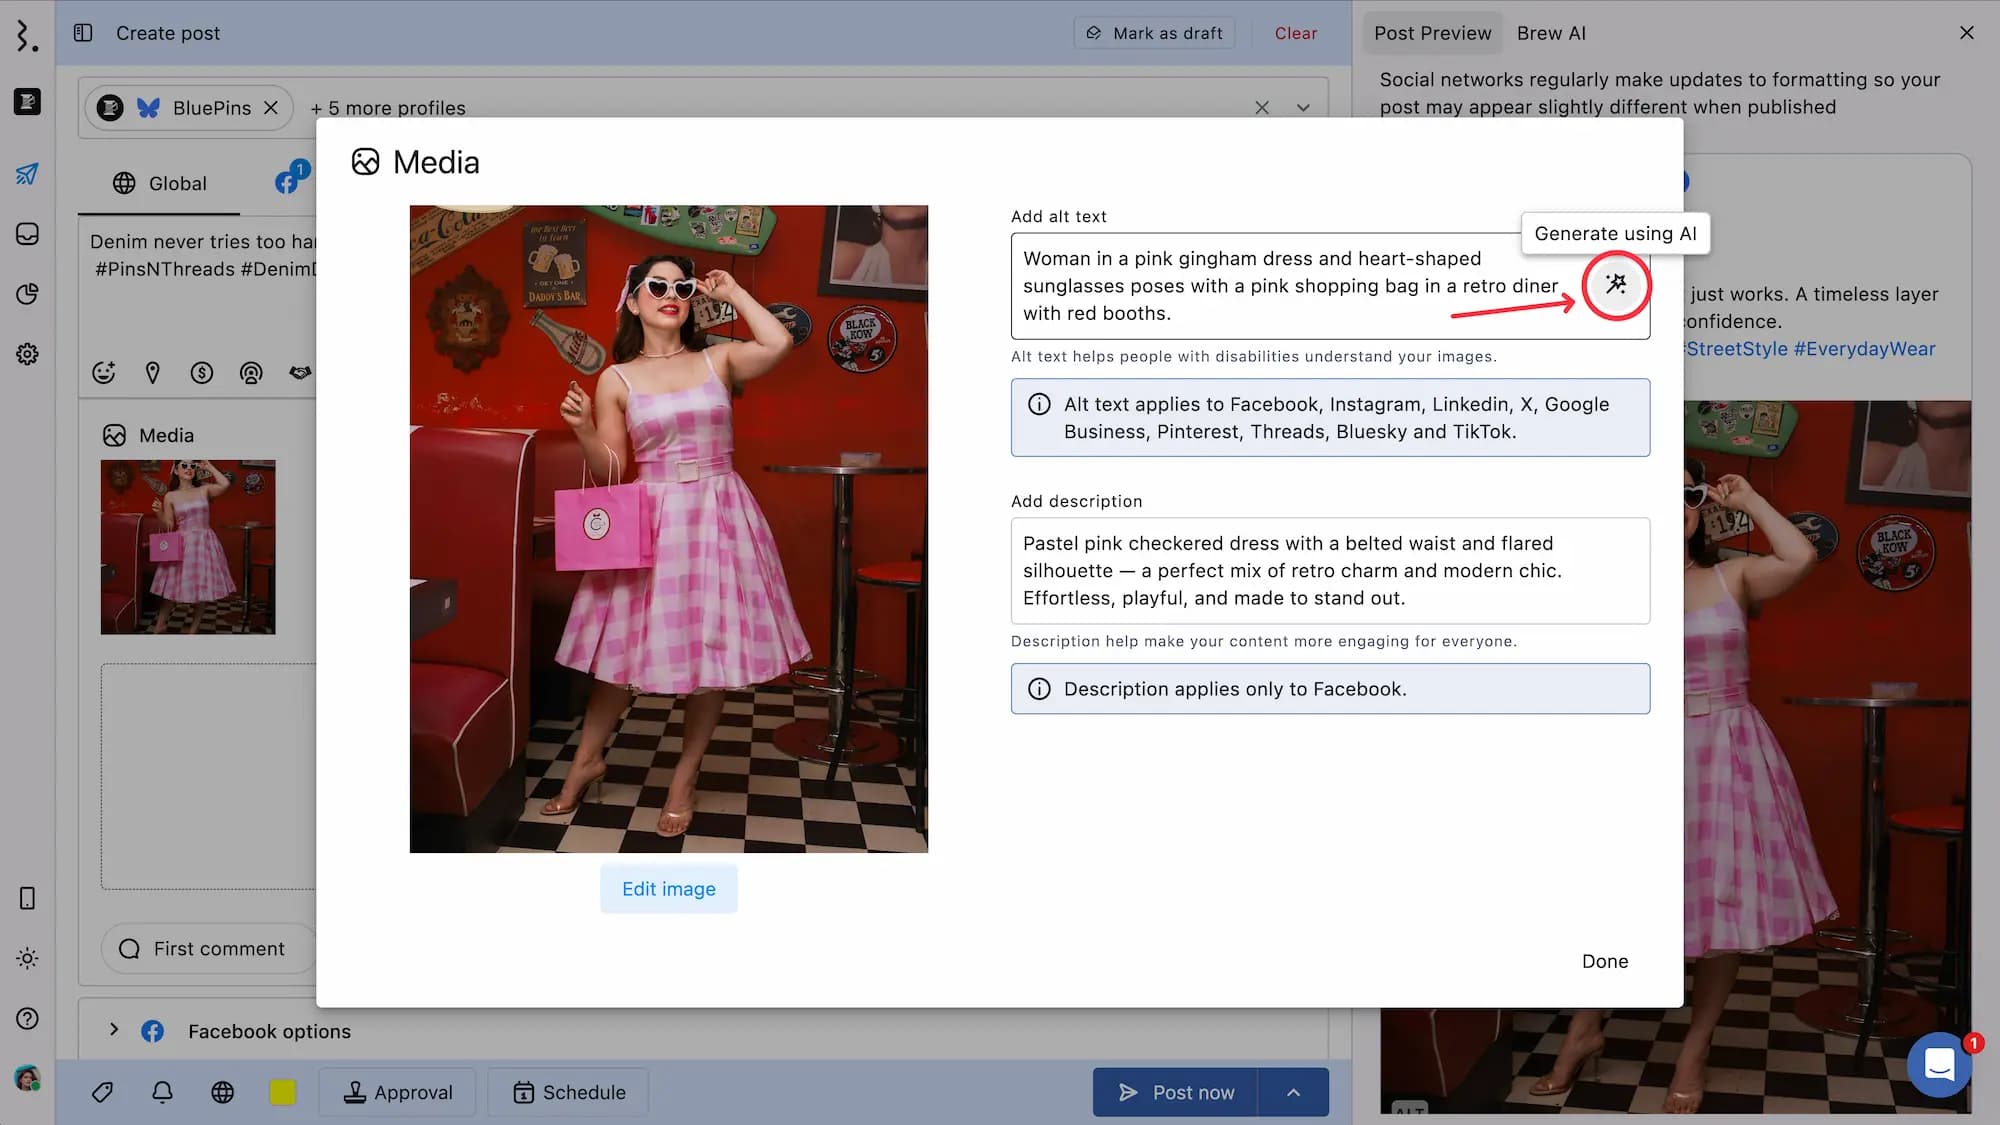
Hover over the image and click Edit options.
Click Generate using AI.
Wait a few seconds. The generated text appears in the text box on its own.
Edit it if you want, or click Generate using AI again for a different version.
Updates save automatically.
Smart Crop
Every network wants a different image shape. Smart crop resizes an image to the aspect ratio preferred by each network, using AI to keep your subject in frame, so you do not have to crop the same image by hand several times.
Smart crop works only on images, in both image posts and Stories. It is not available for GIFs or videos.
How To Use Smart Crop

Go to Compose and select the profiles you want to post to.
Upload an image in Media.
Hover over the image and click Smart crop. The Smart crop for networks dialog will open.
Under Cropping for, review the networks. Statusbrew pre-selects them based on the profiles on your post. Uncheck any you do not need.
Click Generate crops.
Smart crop is available in all plans.
What Happens After You Generate Crops
Each network you selected gets its own cropped version of the image, placed in that network's tab in Compose.
Your Global tab keeps the original image at its original aspect ratio. Smart crop only changes the network tabs, so nothing you uploaded is lost.
To see a crop, switch to that network's tab at the top of the caption box. To check how it will look when published, open the post preview.
Smart crop changes the framing only. It does not add filters, text, or any other edit. For those, use Edit options > Edit image.
Editing Video Assets
Once a video is uploaded, the Media area gives you a few fields depending on the network tab you are in:
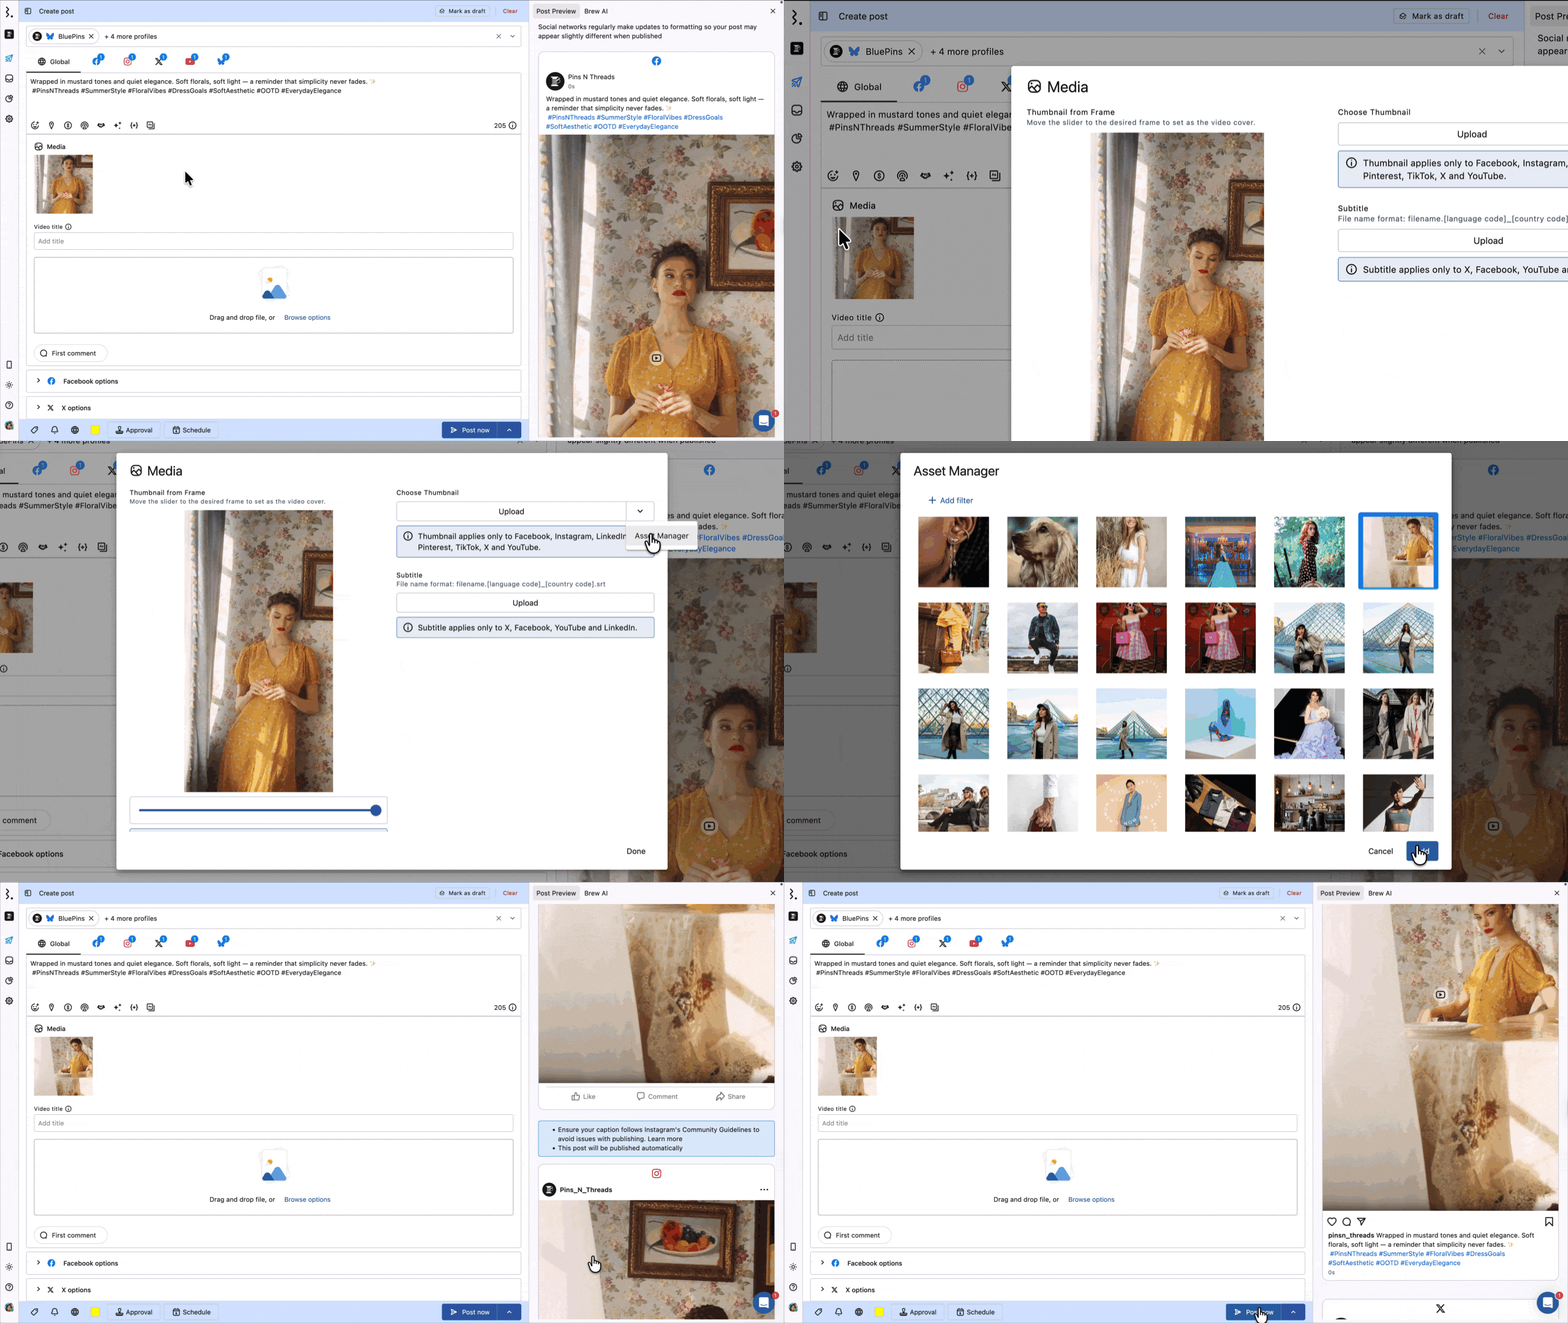
Video title: Global, Facebook, LinkedIn, and YouTube.
Video description: Bluesky.
Subtitle: X, Facebook, LinkedIn, and YouTube.
Hover over the video for these options:
Edit options: Opens the media editor.
Remove: Deletes the video from your post draft, along with its thumbnail and subtitle file.
Thumbnail from Frame
Move the slider to the frame you want as the video cover. The selected timestamp is shown, for example 0:04. Video cover applies to Instagram and TikTok only.
Choose Thumbnail
Add a custom thumbnail by clicking Upload to add an image from your device, or Asset Manager to pick one from your saved assets. Thumbnail applies to Facebook, Instagram, LinkedIn, Pinterest, TikTok, X, and YouTube only. Once a thumbnail is set, use the edit icon to replace it or the delete icon to clear it.
Subtitle
Upload a subtitle file in .srt format. Name the file filename.[language code]_[country code].srt, for example promo.en_us.srt for English (US). Subtitle applies to X, Facebook, LinkedIn, and YouTube only.
Click Done to save your changes.
To swap the video out, click Remove and upload a new one. Removing the video also clears its thumbnail and subtitle file.
FAQs
Can I Add Media To A Post I Already Scheduled?
Yes. Open the post in Project, click Edit post, and the same Compose screen opens. Add or change the media, then save the post.
Can I Use A Different Image For Each Network?
Yes. Add your media in the Global tab first, then open a network tab and change the media there. What you change in a network tab applies only to that network.
Why Can't I Add Another Image To My Post?
You have hit that network's limit. Check the limit shown in the Media area of the network tab, or see How many files can I add per network above.
If your post goes to several networks at once, the strictest limit wins. A post shared on both X and Facebook can include four images, not ten, unless you give each network its own media tab.
Why Won't My YouTube Or Vimeo Link Upload?
Upload by URL needs a link to the raw media file, not to a webpage that plays it. YouTube and Vimeo links point to a page, so they fail.
Paste a direct file link instead, such as one ending in .jpg, .png, .mp4, or .gif, or a Google Drive share link.
Can I Add A GIF To Instagram?
No. GIFs are published to Facebook, X, and LinkedIn only. For Instagram, upload the animation as a video instead.
Can I Publish A PDF Or A Document?
Yes, to LinkedIn only, where it publishes as a carousel. Use Document upload in Browse options and upload a PDF with the pages in the order you want them read.
Does Smart Crop Change My Original Image?
No. Smart crop writes a cropped copy into each network tab and leaves the original in your Global tab untouched.
Can I Change The Order Of My Images?
Yes. Drag and drop the thumbnails in the Media area. They publish in the order shown, left to right.