What Are Shared Inboxes In Engage
Shared Inboxes in Engage collect specific conversations in one place, so the right team members can see, reply to and close them.
Who Can Do This?
Plan: Shared Inboxes are part of the Premium and above plans.
Create a Shared Inbox and manage access: Space owners and admins.
Work in a Shared Inbox: The users and user groups added as collaborators, with Can reply or Can view permission.
Shared Inbox limits: You can create up to 500 Shared Inboxes per organization.
What Is A Shared Inbox?
A Shared Inbox is a dedicated inbox for one type of conversation. It keeps related conversations in one place, so your team always knows where a conversation should go and who is responsible for replying.
For example, you can set up a Support Escalations Inbox and move escalations from all your social profiles into it. Or you can set up a rule that routes price-related questions to a Pricing Inbox.
You can move conversations into a Shared Inbox manually or automatically with rules. Shared Inboxes help you with:
Triaging: Sort conversations by type and urgency, and route them to the right inbox manually or automatically using rules.
Granular access: Set up shared inboxes for teams or private inboxes for individual members.
Notifications: Get alerts for all open conversations in your inbox, so nothing slips through the cracks.
Analytics: Track the volume of incoming conversations and how your team handles them.
Accountability: Each team or member knows which conversations they own, and you can follow the team's progress.
How Is A Shared Inbox Different From A Filtered View?
Create a Shared Inbox when specific team members need a shared space to manage and collaborate on the same set of conversations. For example, customer support queries, messages for one client, or conversations shared across departments.
Create a Filtered View when you only want to filter conversations. A Filtered View shows the conversations that matter to you right now, for example the conversations that contain specific keywords.
Use Case: An Escalation Inbox
As your support team grows, agents start to specialize. Some handle basic questions and others handle complex technical issues, so frontline agents need a reliable way to escalate.
Create an empty Tier 2 Support inbox managed by senior agents. Empty means no rule sends conversations to it, so new conversations first arrive in your main Support inbox. When a frontline agent needs help, they manually move the conversation into Tier 2 Support, and a senior agent replies to the customer.
Who Can See Conversations In A Shared Inbox?
Team members with access to a Shared Inbox can take every action on its conversations, just like a user with full access, but only inside that Shared Inbox. Whether they can reply depends on their Can reply or Can view permission.
Access to a Shared Inbox covers all conversations in it, regardless of a member's access to the social profiles. Even without access to a social profile in Statusbrew, a member can manage that profile's conversations if they are in a Shared Inbox the member can access.
This way, you can share social media conversations with your team without giving them full access to a social profile.
How To Create A Shared Inbox?
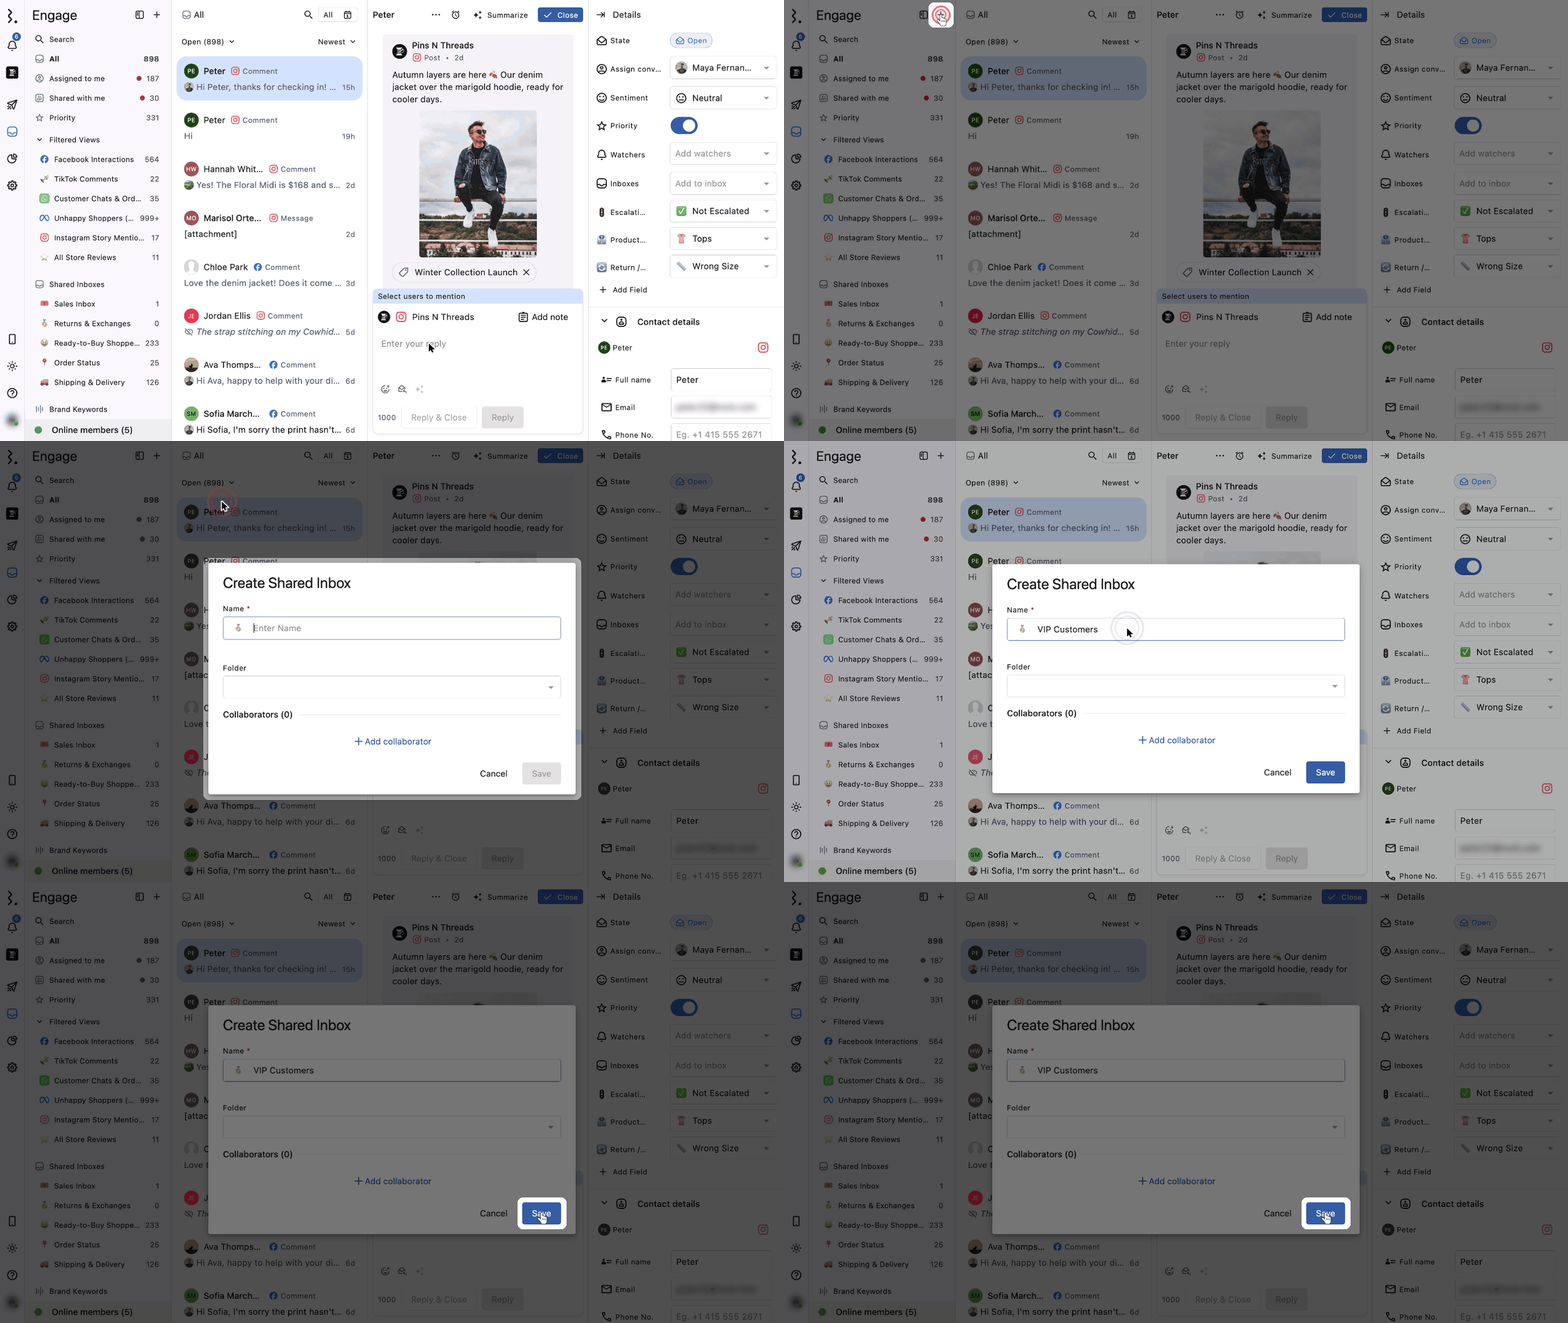
Go to Engage.
From the sidebar, click Create Shared Inbox (+) in front of the default Shared Inboxes folder. You can also click Create options (+) → Shared Inboxes in the top right corner of the sidebar.
Add a Name. You can also customize the icon.
To keep the inbox in a custom folder, select it under Folder. Leave Folder empty to keep it in the default Shared Inboxes folder.
Click Add collaborator and select the users or user groups to share the inbox with. Set each one's permission:
Can reply: Can view conversations and reply to them in the inbox.
Can view: Can only view conversations, and cannot reply or react to them.
Click Save.
The Shared Inbox opens in Engage.
To create a Shared Inbox inside a custom folder, click More (three dots) beside the folder and select Shared Inbox. The Create Shared Inbox dialog opens with that folder already filled in.
How To Move A Conversation To A Shared Inbox?
You can move conversations manually, one by one or in bulk, or set up rules to route them to a Shared Inbox automatically.
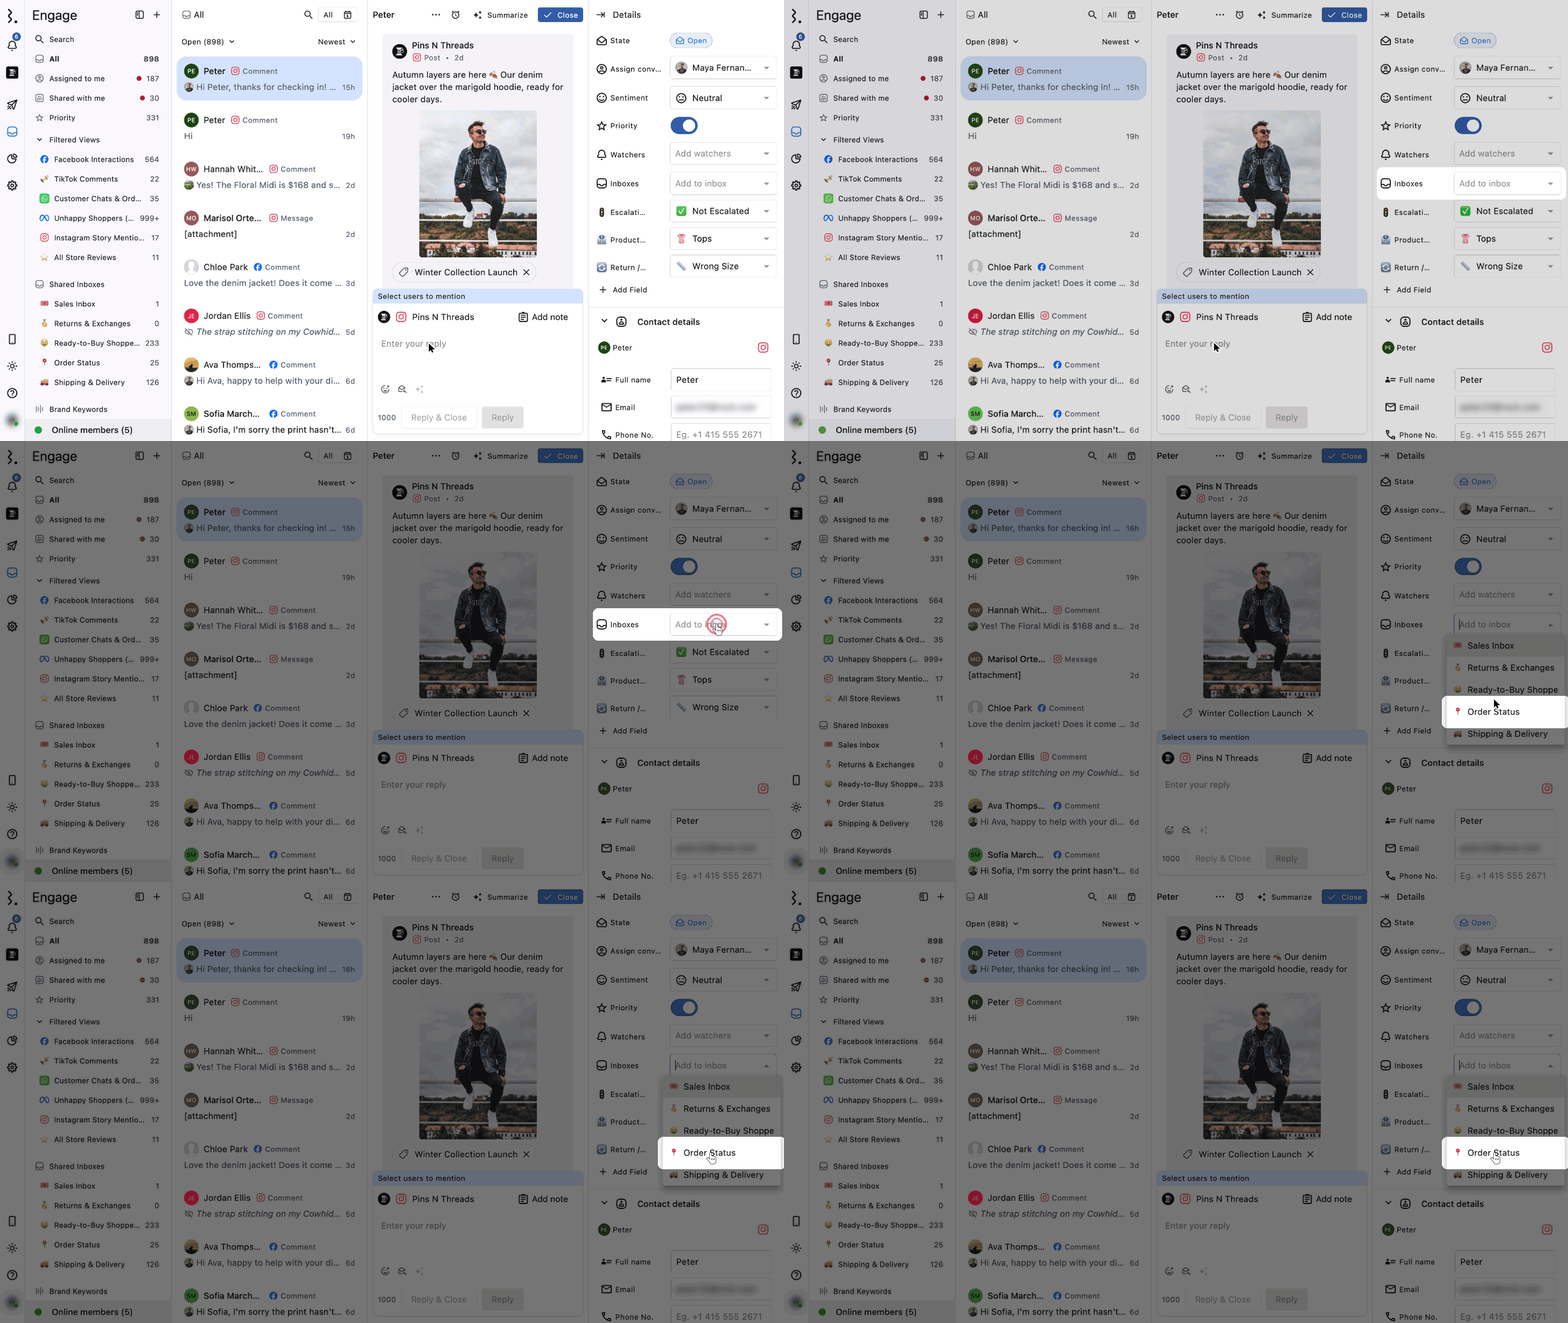
Go to Engage.
Open the conversation you want to move.
In the conversation details panel, select Add to inbox, or press i on your keyboard.
Select the Shared Inbox.
The conversation moves to that Shared Inbox. The inbox's conversation count in the sidebar goes up, and the inbox name appears in the conversation details panel.
To move the conversation to a different Shared Inbox, click the inbox name in the conversation details panel. The Add to inbox dialog opens with the current inbox highlighted. Select the new inbox.
To remove a conversation from its Shared Inbox, hover over the inbox name and click (Remove).
How To Move Conversations In Bulk To A Shared Inbox?
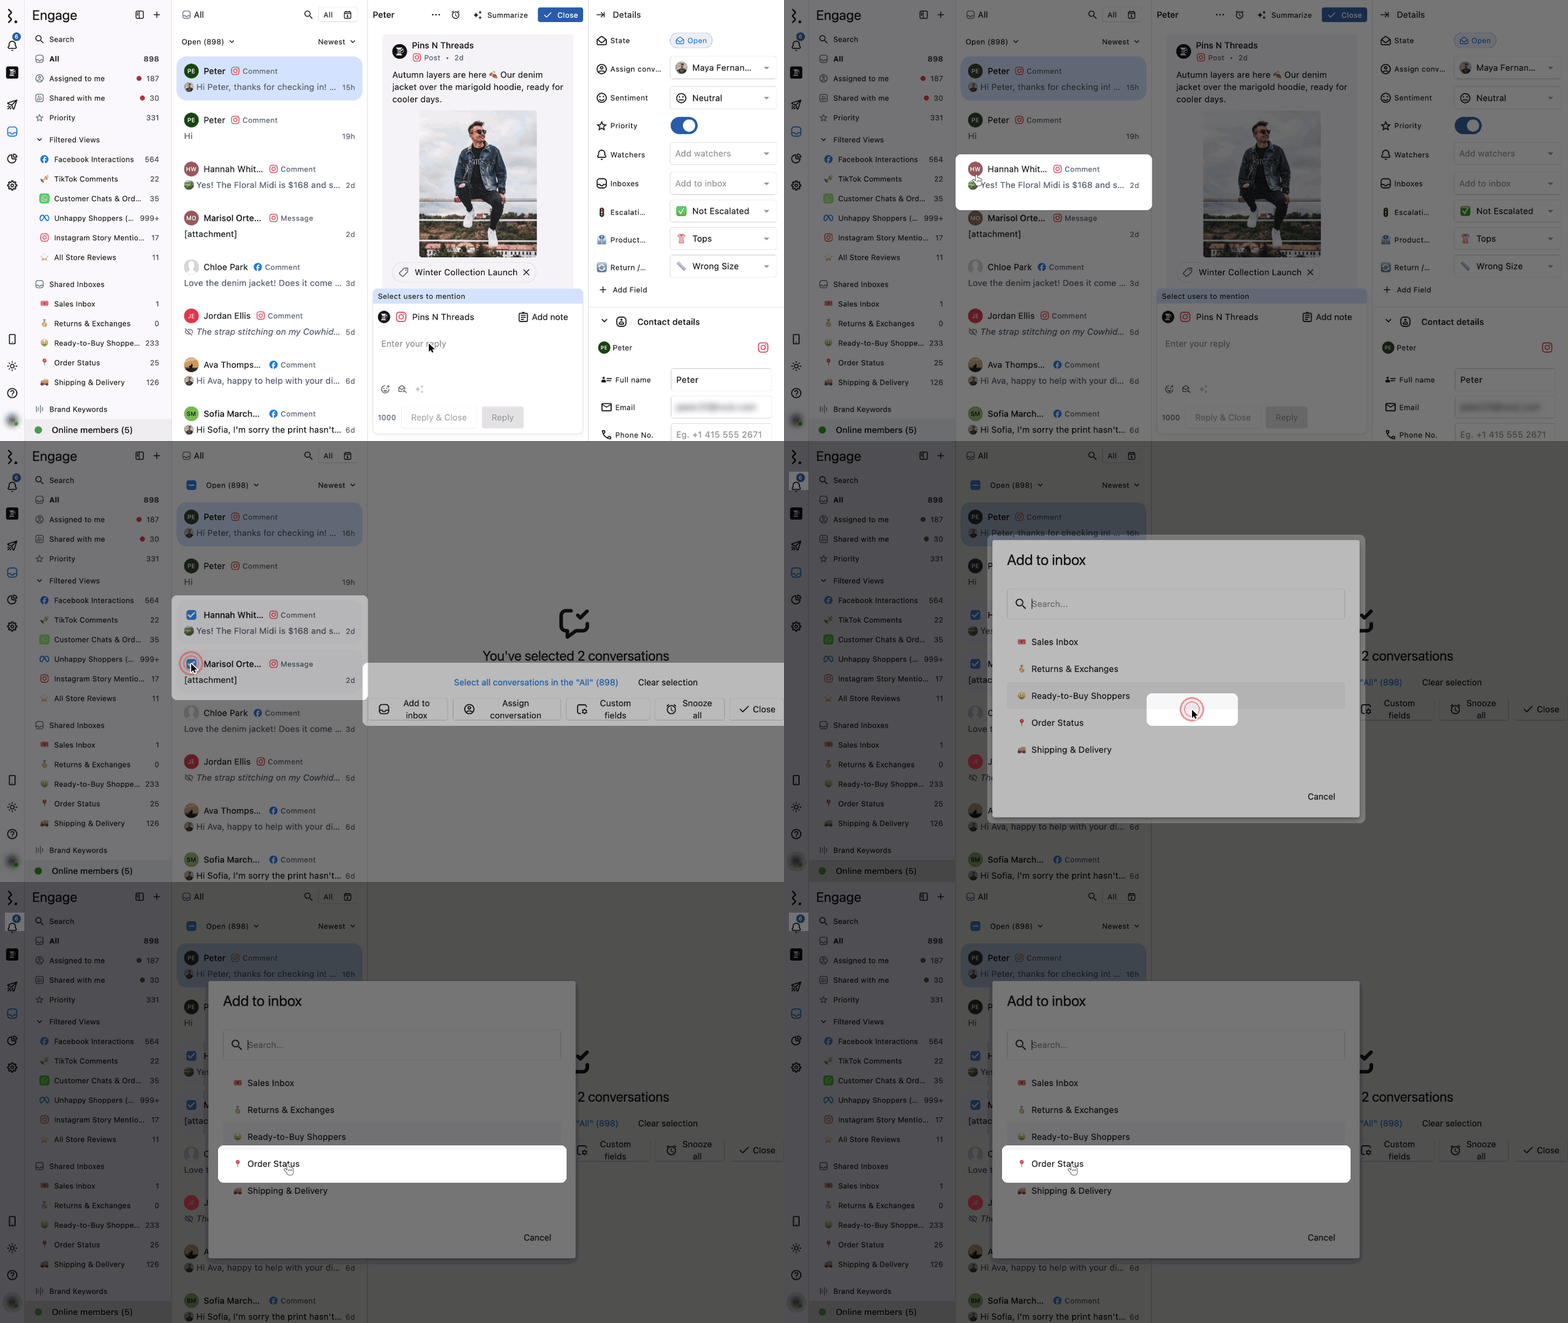
Go to Engage.
In the sidebar, select the Filtered View that holds the conversations you want to move.
Hover over a conversation in the list and select the checkbox beside it.
To select every conversation in the view, click the checkbox above the list, or click Select all conversations in the "<view name>" (<count>) in the center of the screen.
In the center of the screen, select Add to inbox, or press i, and select the Shared Inbox.
If some of the selected conversations are already in a different Shared Inbox, they are removed from it and moved to the new one.
How To Automatically Move Conversations To A Shared Inbox?
Engage Rules automate actions on incoming social conversations. Create a rule to move every conversation that matches your criteria into a Shared Inbox.
Here's how to create a rule that moves flagged Instagram and Facebook comments into a Flagged Comments Shared Inbox:
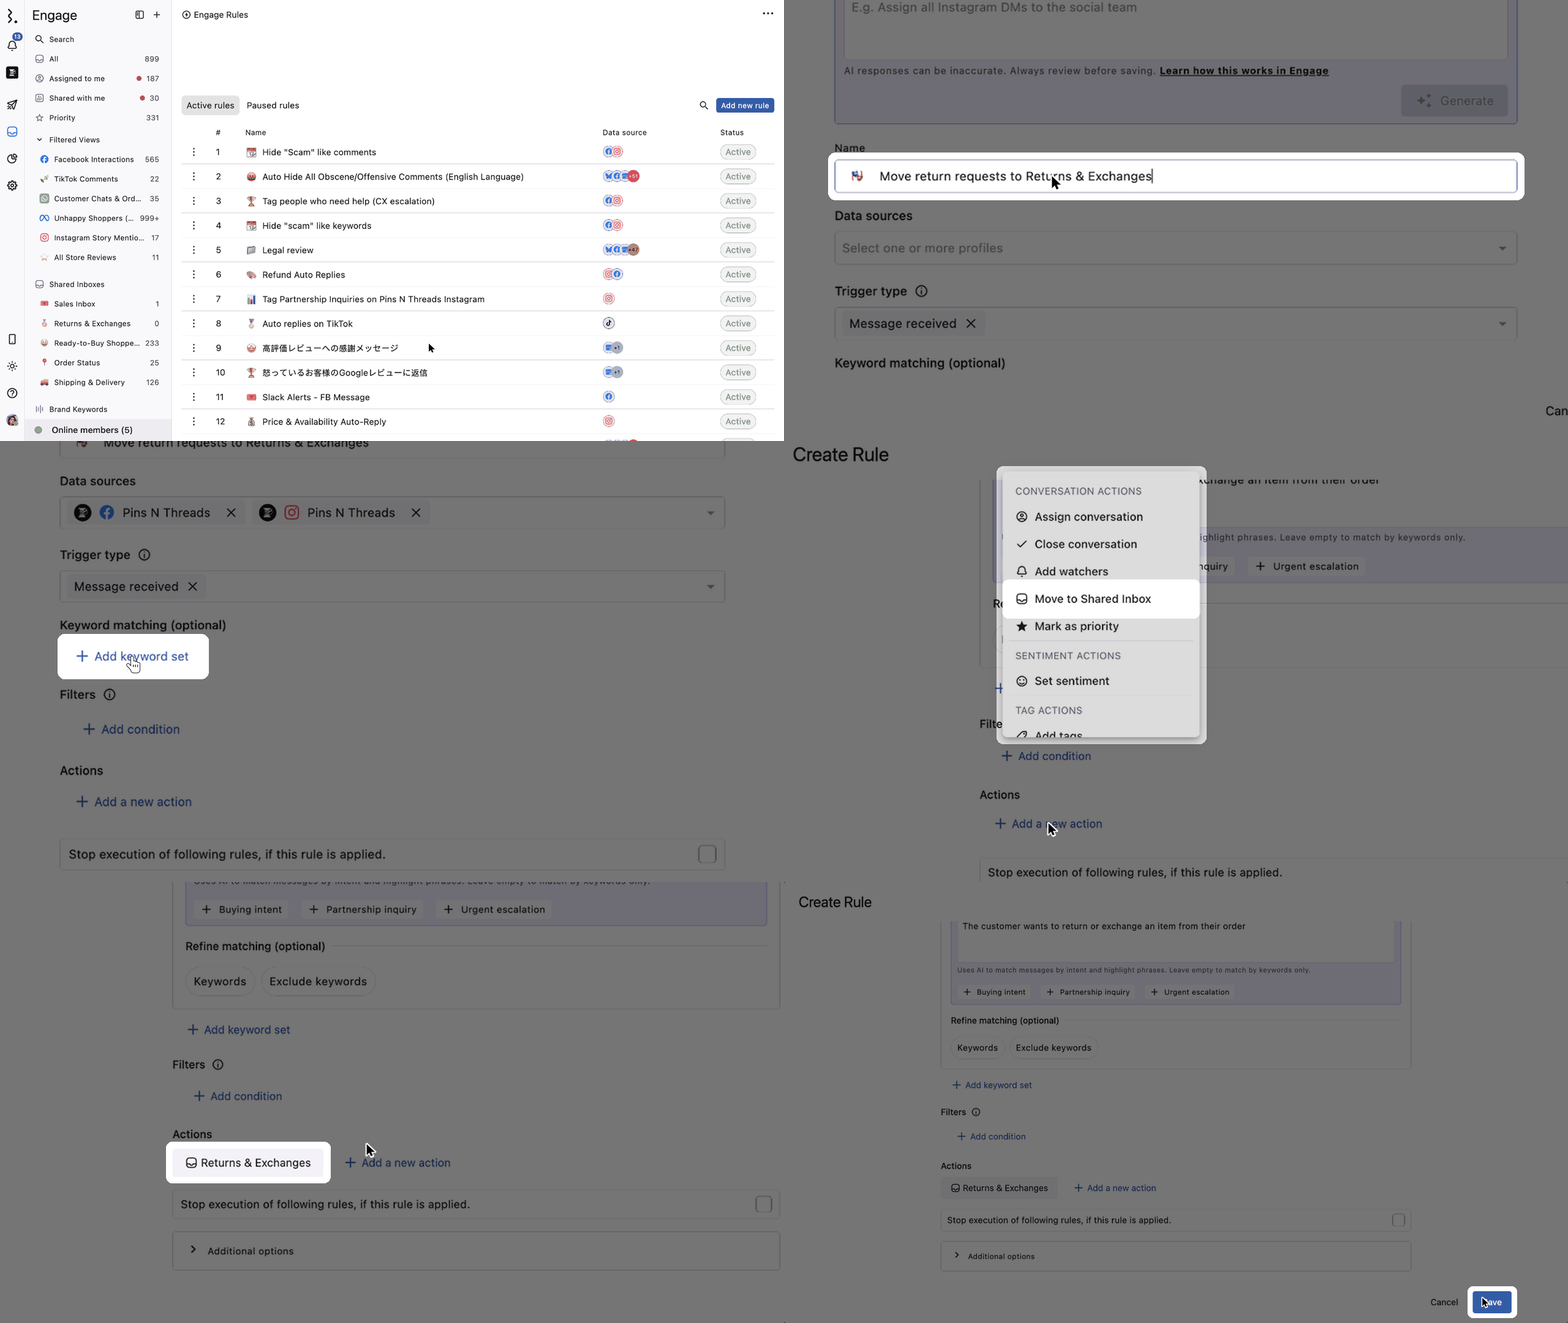
Go to Engage → Rules and click Add new rule.
Click Create Manually.
Name the rule, for example "Move Flagged Comments to Inbox".
Select the relevant Data sources.
Define a Trigger type, for example Message received.
Select keyword matching and add all relevant keywords.
Add Filters:
Add condition → Instagram Comment
Add condition → Facebook Comment
Under Actions, click Add a new action → CONVERSATION ACTIONS → Move to Shared Inbox. In the Move to Shared Inbox select, choose Flagged Comments. The checkbox "Don't apply this action if the message is already in a Shared Inbox." is checked by default. Click Add.
Click Save to save and activate the rule.
If the Shared Inbox doesn't exist yet, type its name in the Move to Shared Inbox select and click + <the name you typed>. This creates a Shared Inbox with that name right from the rule.
How To Manage Shared Inboxes?
Rearrange inboxes: Drag and drop Shared Inboxes to reorder them within a folder or move them across folders.
Edit or delete inboxes: You can edit or delete any Shared Inbox. Deleted inboxes cannot be recovered.
How To Edit A Shared Inbox?
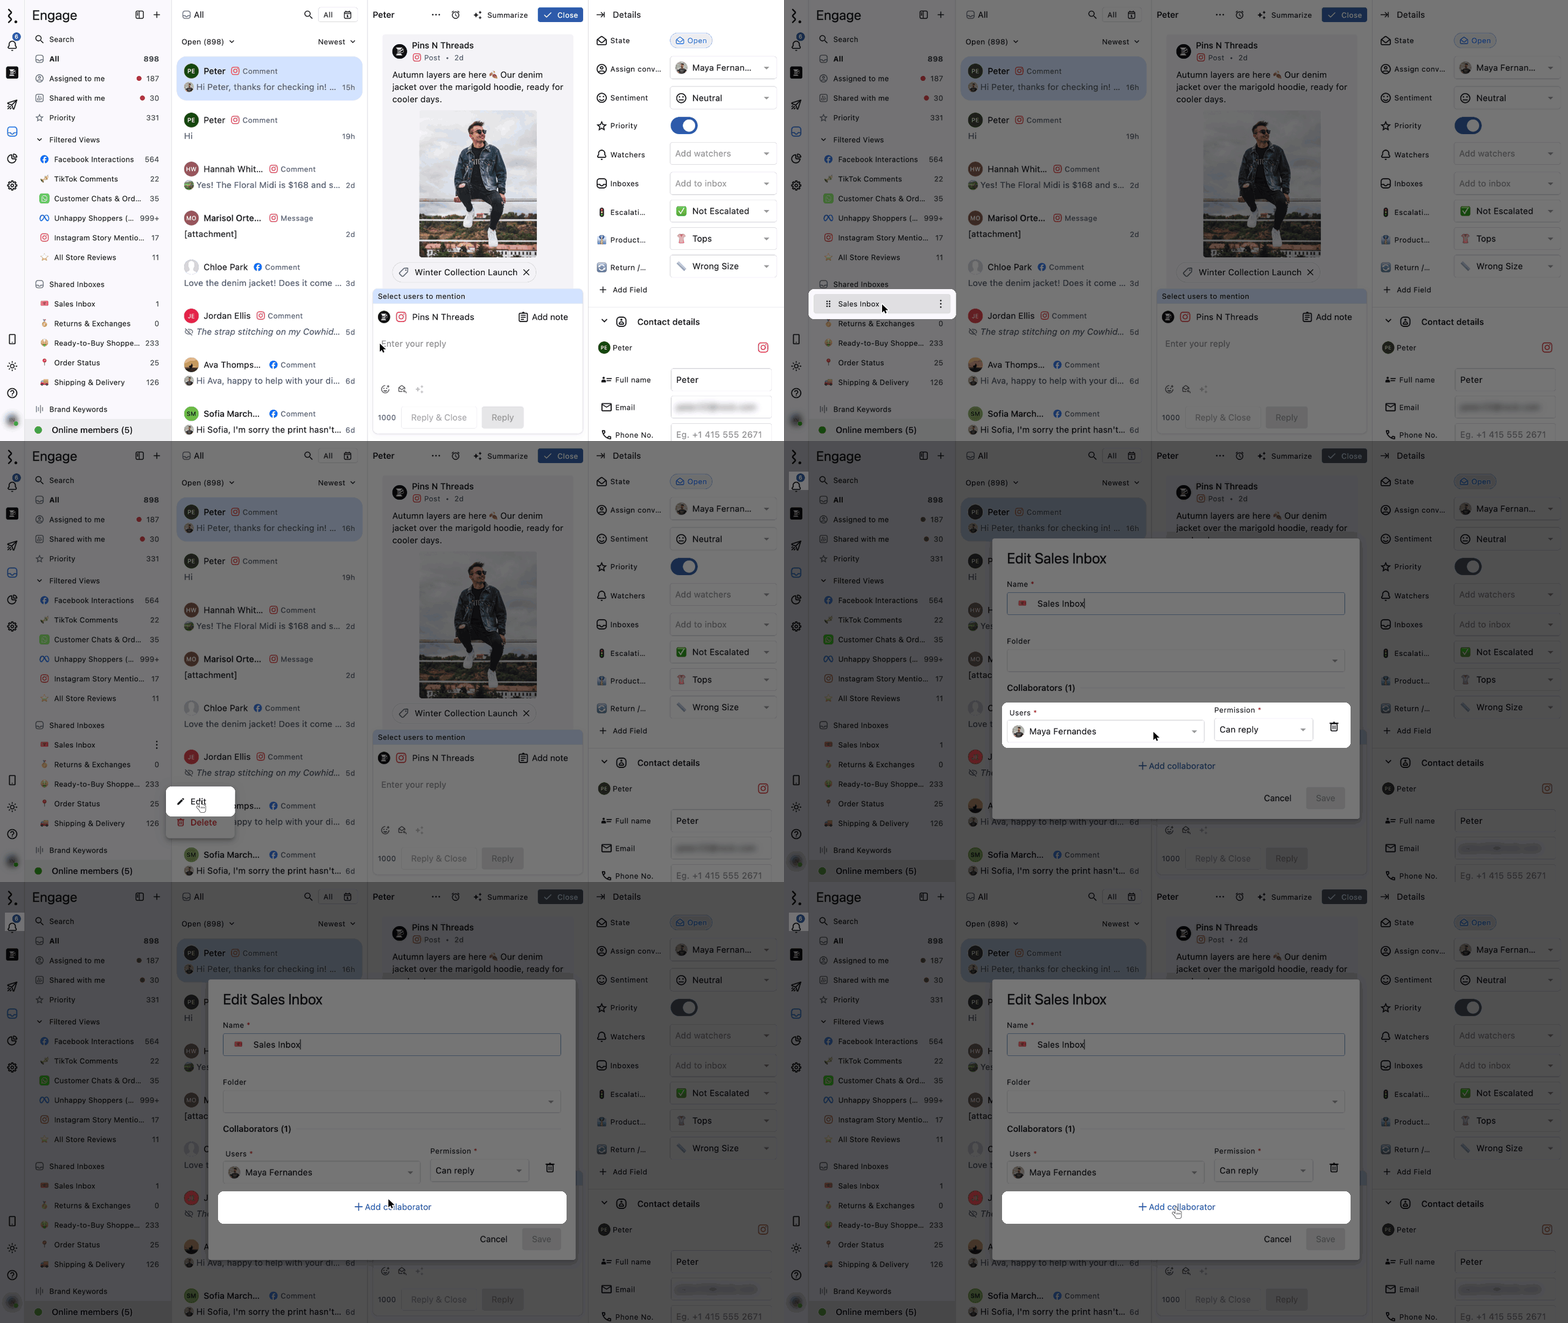
In the sidebar, hover over the inbox and click More (three dots).
Select Edit. The Edit dialog opens with the inbox name in its title (for example, Edit Pricing).
Change the Name (and its icon) or the Folder.
Under Collaborators, pick a user or user group in Users and set Permission to Can reply or Can view. Click Add collaborator to add another, or click beside a collaborator to remove their access.
Click Save.
How To Delete A Shared Inbox?
In the sidebar, hover over the inbox and click More (three dots).
Select Delete.
Confirm that you want to delete the inbox.
How To Show A Shared Inbox In A Project?
You can bring a Shared Inbox into a project as its own section, so clients and stakeholders who work in the project can follow the conversations behind it. Project viewers can read the conversations without Engage access.
Go to Publish and open the project.
Click Section in the section bar and select Shared Inbox. The Create section dialog opens.
Enter a Section name, then pick the inbox under Shared Inbox. The list shows only the Shared Inboxes you have access to in Engage.
Click Save.
Viewers can reply only if they can already reply to that inbox in Engage; everyone else reads the threads. Learn more about the Shared Inbox section and the other section types, such as Report, Updates and Assets, in Projects.
FAQs
If I Delete A Shared Inbox, What Will Happen To Its Conversations?
The Shared Inbox is deleted, but its conversations stay on the platform. A deleted Shared Inbox cannot be recovered.
Can A Conversation Be In More Than One Shared Inbox?
No. A conversation belongs to only one Shared Inbox at a time. Moving it to another Shared Inbox removes it from the current one.
Can Team Members Reply In A Shared Inbox Without Access To The Social Profile?
Yes. Access to a Shared Inbox covers all its conversations, even for profiles the member can't otherwise access in Statusbrew. Their Can reply or Can view permission on the inbox decides whether they can reply.
Can I Create A Separate Inbox For Specific Contacts?
Yes. Use contact tags with a Shared Inbox:
Create a tag and make it available for "contact".
Add that tag to the contacts you want to track. This is a one-time manual step for each contact.
Create an Engage rule with that contact tag as the condition, and move the conversations to a Shared Inbox in the rule action.
From then on, conversations from those contacts move to that Shared Inbox automatically.
You cannot build a Filtered View from contact tags. The Tags filter in a Filtered View only filters conversation and message tags, not contact tags, so use a Shared Inbox for this.
Can I Create A New Shared Inbox From A Rule?
Yes. When you add the Move to Shared Inbox action in Engage Rules, type a name that doesn't match any existing Shared Inbox and click + <the name you typed>. Statusbrew creates a Shared Inbox with that name and uses it in the rule.
What Happened To The "Move To Engage Inboxes" Rule Action?
It was renamed, first to Move to Team Inbox and now to Move to Shared Inbox. Find it under Add a new action → CONVERSATION ACTIONS in Engage Rules.
Can I Use A Shared Inbox As A Rule Condition?
Yes. In Engage Rules, click Add condition and select Shared Inbox under Conversation to filter by the inbox a conversation is in.
How Can I Show Clients Or Guest Users The Conversations We Receive?
Put those conversations in a Shared Inbox (by hand, or automatically with a rule), then add that inbox to a project as a Shared Inbox section and share the project link with your client. They can switch between Open, Close and Snoozed, sort the list and read each thread, without a Statusbrew account or Engage access. They can't reply, add notes or take any action. To stop showing the conversations, uncheck the section under Sections in Edit shared link.
How Many Shared Inboxes Can I Create?
You can create up to 500 Shared Inboxes per organization. When you reach the maximum, you'll see a message asking you to contact support. Anything you already have above a limit is kept, but you can't add more until you are under it.