Overview Of Statusbrew Rule Engine
Statusbrew's Rule Engine helps you automatically manage incoming conversations across your social profiles. It allows you to define custom rules that take action based on specific conditions.
Rules are customizable and can be set up to trigger in real time as conversations come in, helping you maintain a clean and professional social presence.
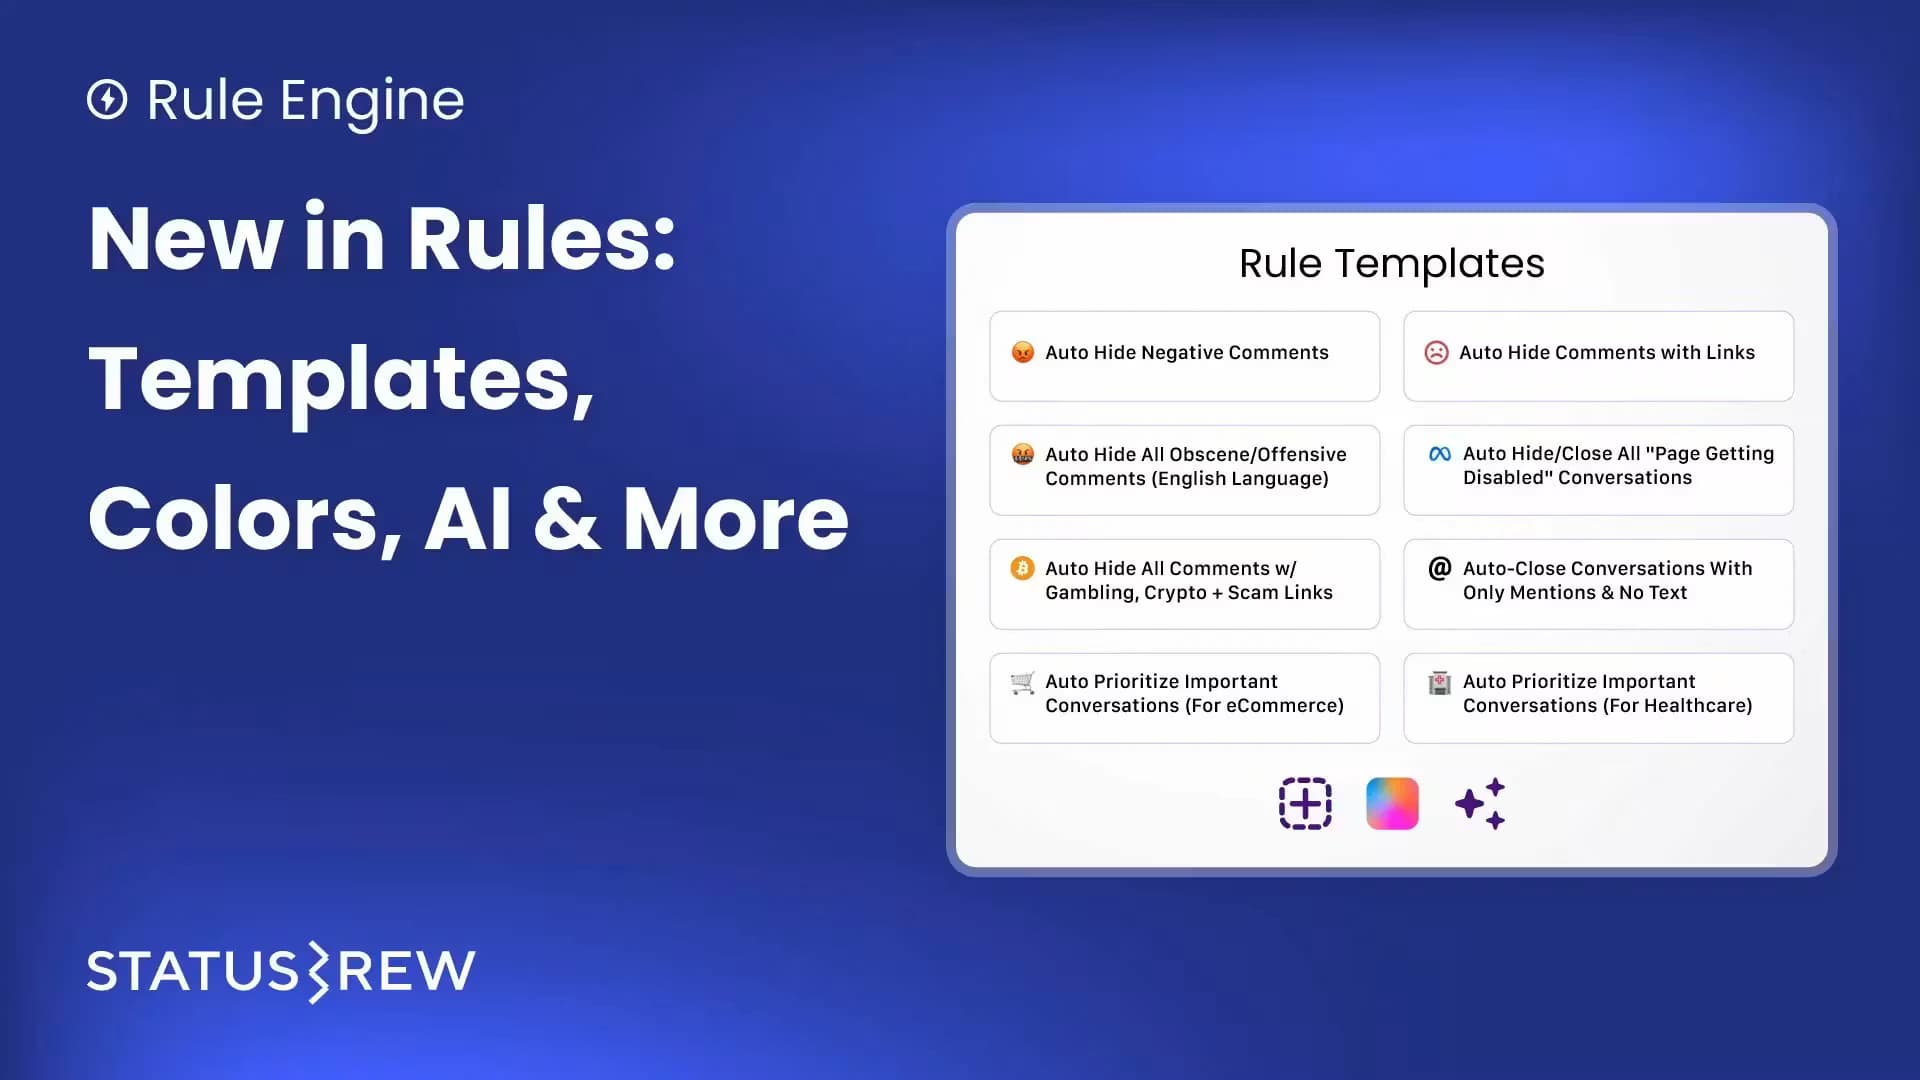
To make setting up automation faster and easier, Statusbrew provides a variety of ready-to-use rule templates. These templates are designed around the most common moderation and workflow needs, so you don’t have to start from scratch.
You can select any template, review the pre-filled conditions and actions, and then customize it — add your own keywords, tweak filters, or adjust actions — to suit your unique workflow.
The Rule Engine is available on Standard and above plans. See full pricing details.
What Can Rules Do In Statusbrew?
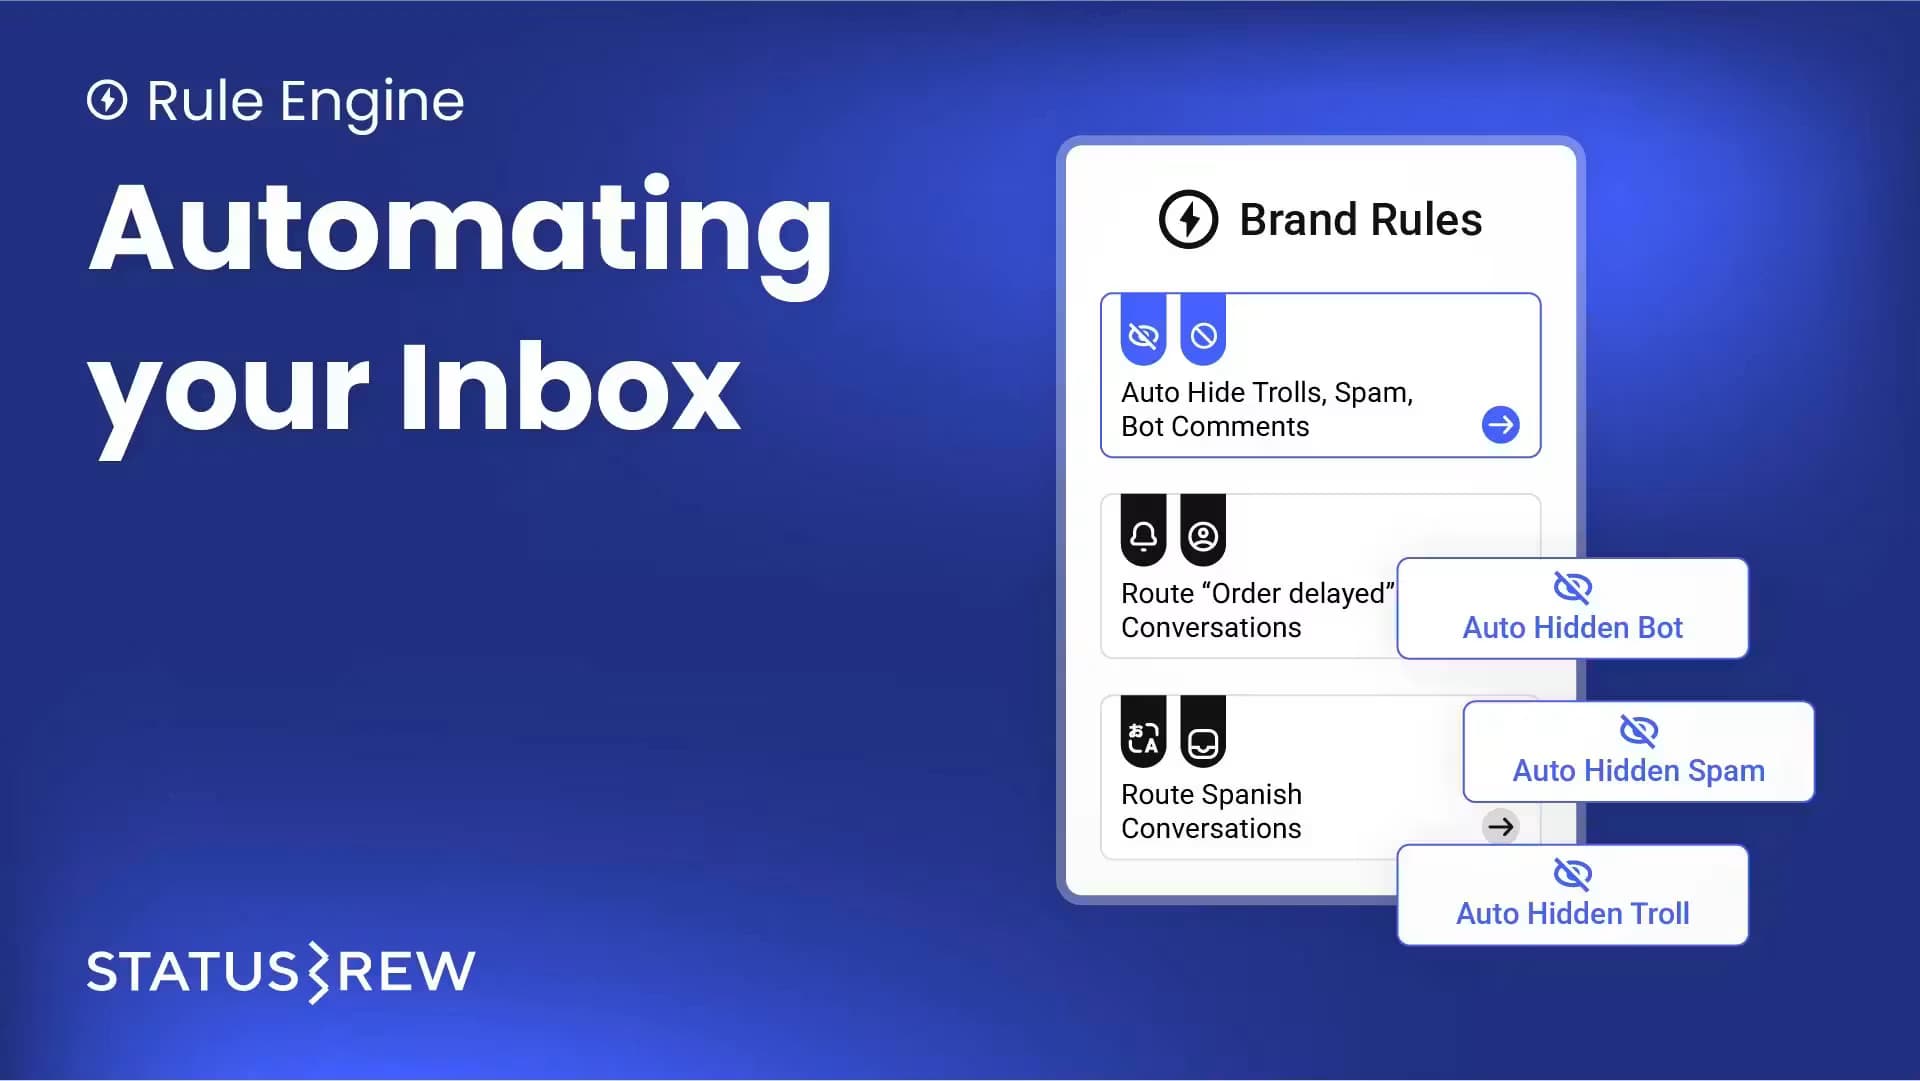
Using Rule Engine in Statusbrew, you can automate the following actions:
Send a private message (This works for Facebook & Instagram only) to follow up
Hide, unhide, or delete comments automatically based on conditions such as keywords or sentiment
Assign conversations to the right team member or agent
Close conversations automatically after resolving inquiries
Add watchers to keep stakeholders informed
Move conversations to specific Engage inboxes to better organize and manage conversations.
Mark conversations as priority to flag urgent cases
Add or remove tags to categorize conversations dynamically
Trigger internal Slack or Microsoft Teams alerts
Send notifications within Statusbrew
Send emails to teammates or external users when conditions are met
Update custom fields based on rule logic
If you set up a rule with an action to send a private message with a filter of message or comment, the rule only applies when a user sends a message or comment from their personal profile. Comments received through the Facebook page will not trigger a private reply.
How to find the Rule Engine feature in Statusbrew?
Rule Engine Templates
Before creating a rule from scratch, check if one of these ready-to-use templates covers your use case. They come pre-filled with filters and actions, so you can get started in seconds and customize as needed.
Moderation
Auto Hide Negative Comments: Automatically hides negative audience comments to keep your comment section free from spam, hate, and troll comments.
Auto Hide Comments with Links: Automatically hides comments that contain any kind of external links to reduce spam or phishing.
Auto Hide All Obscene/Offensive Comments (English Language): Hides comments containing obscene or offensive English words.
Auto Hide All Obscene/Offensive Comments (Spanish Language): Hides comments containing obscene or offensive Spanish words.
Auto Hide All Obscene/Offensive Comments (French Language): Hides comments containing obscene or offensive French words.
Auto Hide All Obscene/Offensive Comments (Hindi Language): Hides comments containing obscene or offensive Hindi words.
Auto Hide/Close All "Page Getting Disabled" Conversations: Protects against the widespread "Page Disabled" phishing scams.
Auto Hide All Comments w/ Gambling, Crypto Scam + Porn Links: Removes comments containing links to gambling, crypto scam, or porn sites.
Auto Hide All Comments w/ Bad/Dirty Emojis: Hides comments with sexual, violent, or inappropriate emojis.
Auto-Hide Negative Comments on Weekends: Hides negative audience comments during weekends to keep profiles clean while your team is offline.
Auto-Close Conversations With Only Mentions & No Text: Automatically closes conversations that contain only mentions (tags) without any text.
Auto-Close Conversations With Attachments: Automatically closes conversations containing attachments. Clears the inbox of low-value or non-actionable items.
Auto Prioritize Negative Reviews: Flags customer reviews with ratings 3 stars and below so your team can act quickly.
Categorization
Auto Prioritize Important Conversations (For eCommerce): Flags conversations with e-commerce buying or service intent (orders, shipping, refunds, returns, payments) and marks them as priority.
Auto Prioritize Important Conversations (For Healthcare): Flags healthcare-related conversations (side effects, reports, insurance, emergencies) as priority so your team can respond immediately.
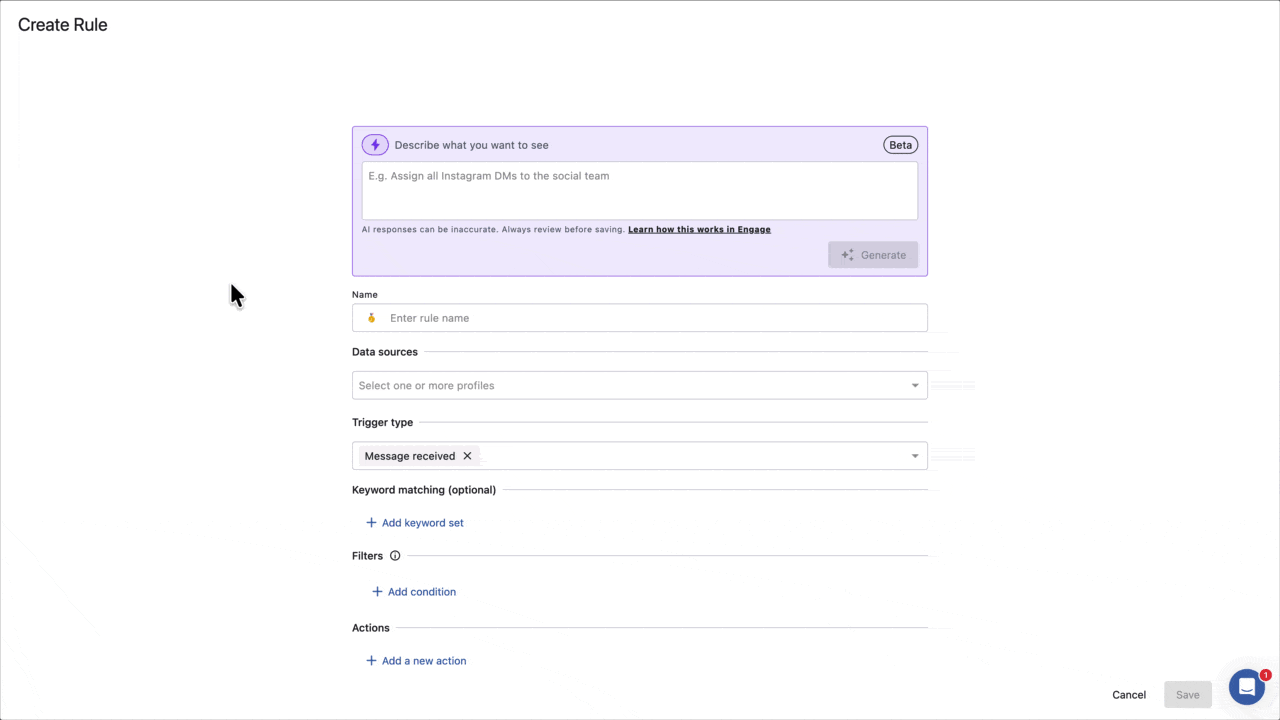
Understanding A Rule In Statusbrew
Before creating your first rule in Statusbrew, it’s important to understand the four key components that define how a rule functions:
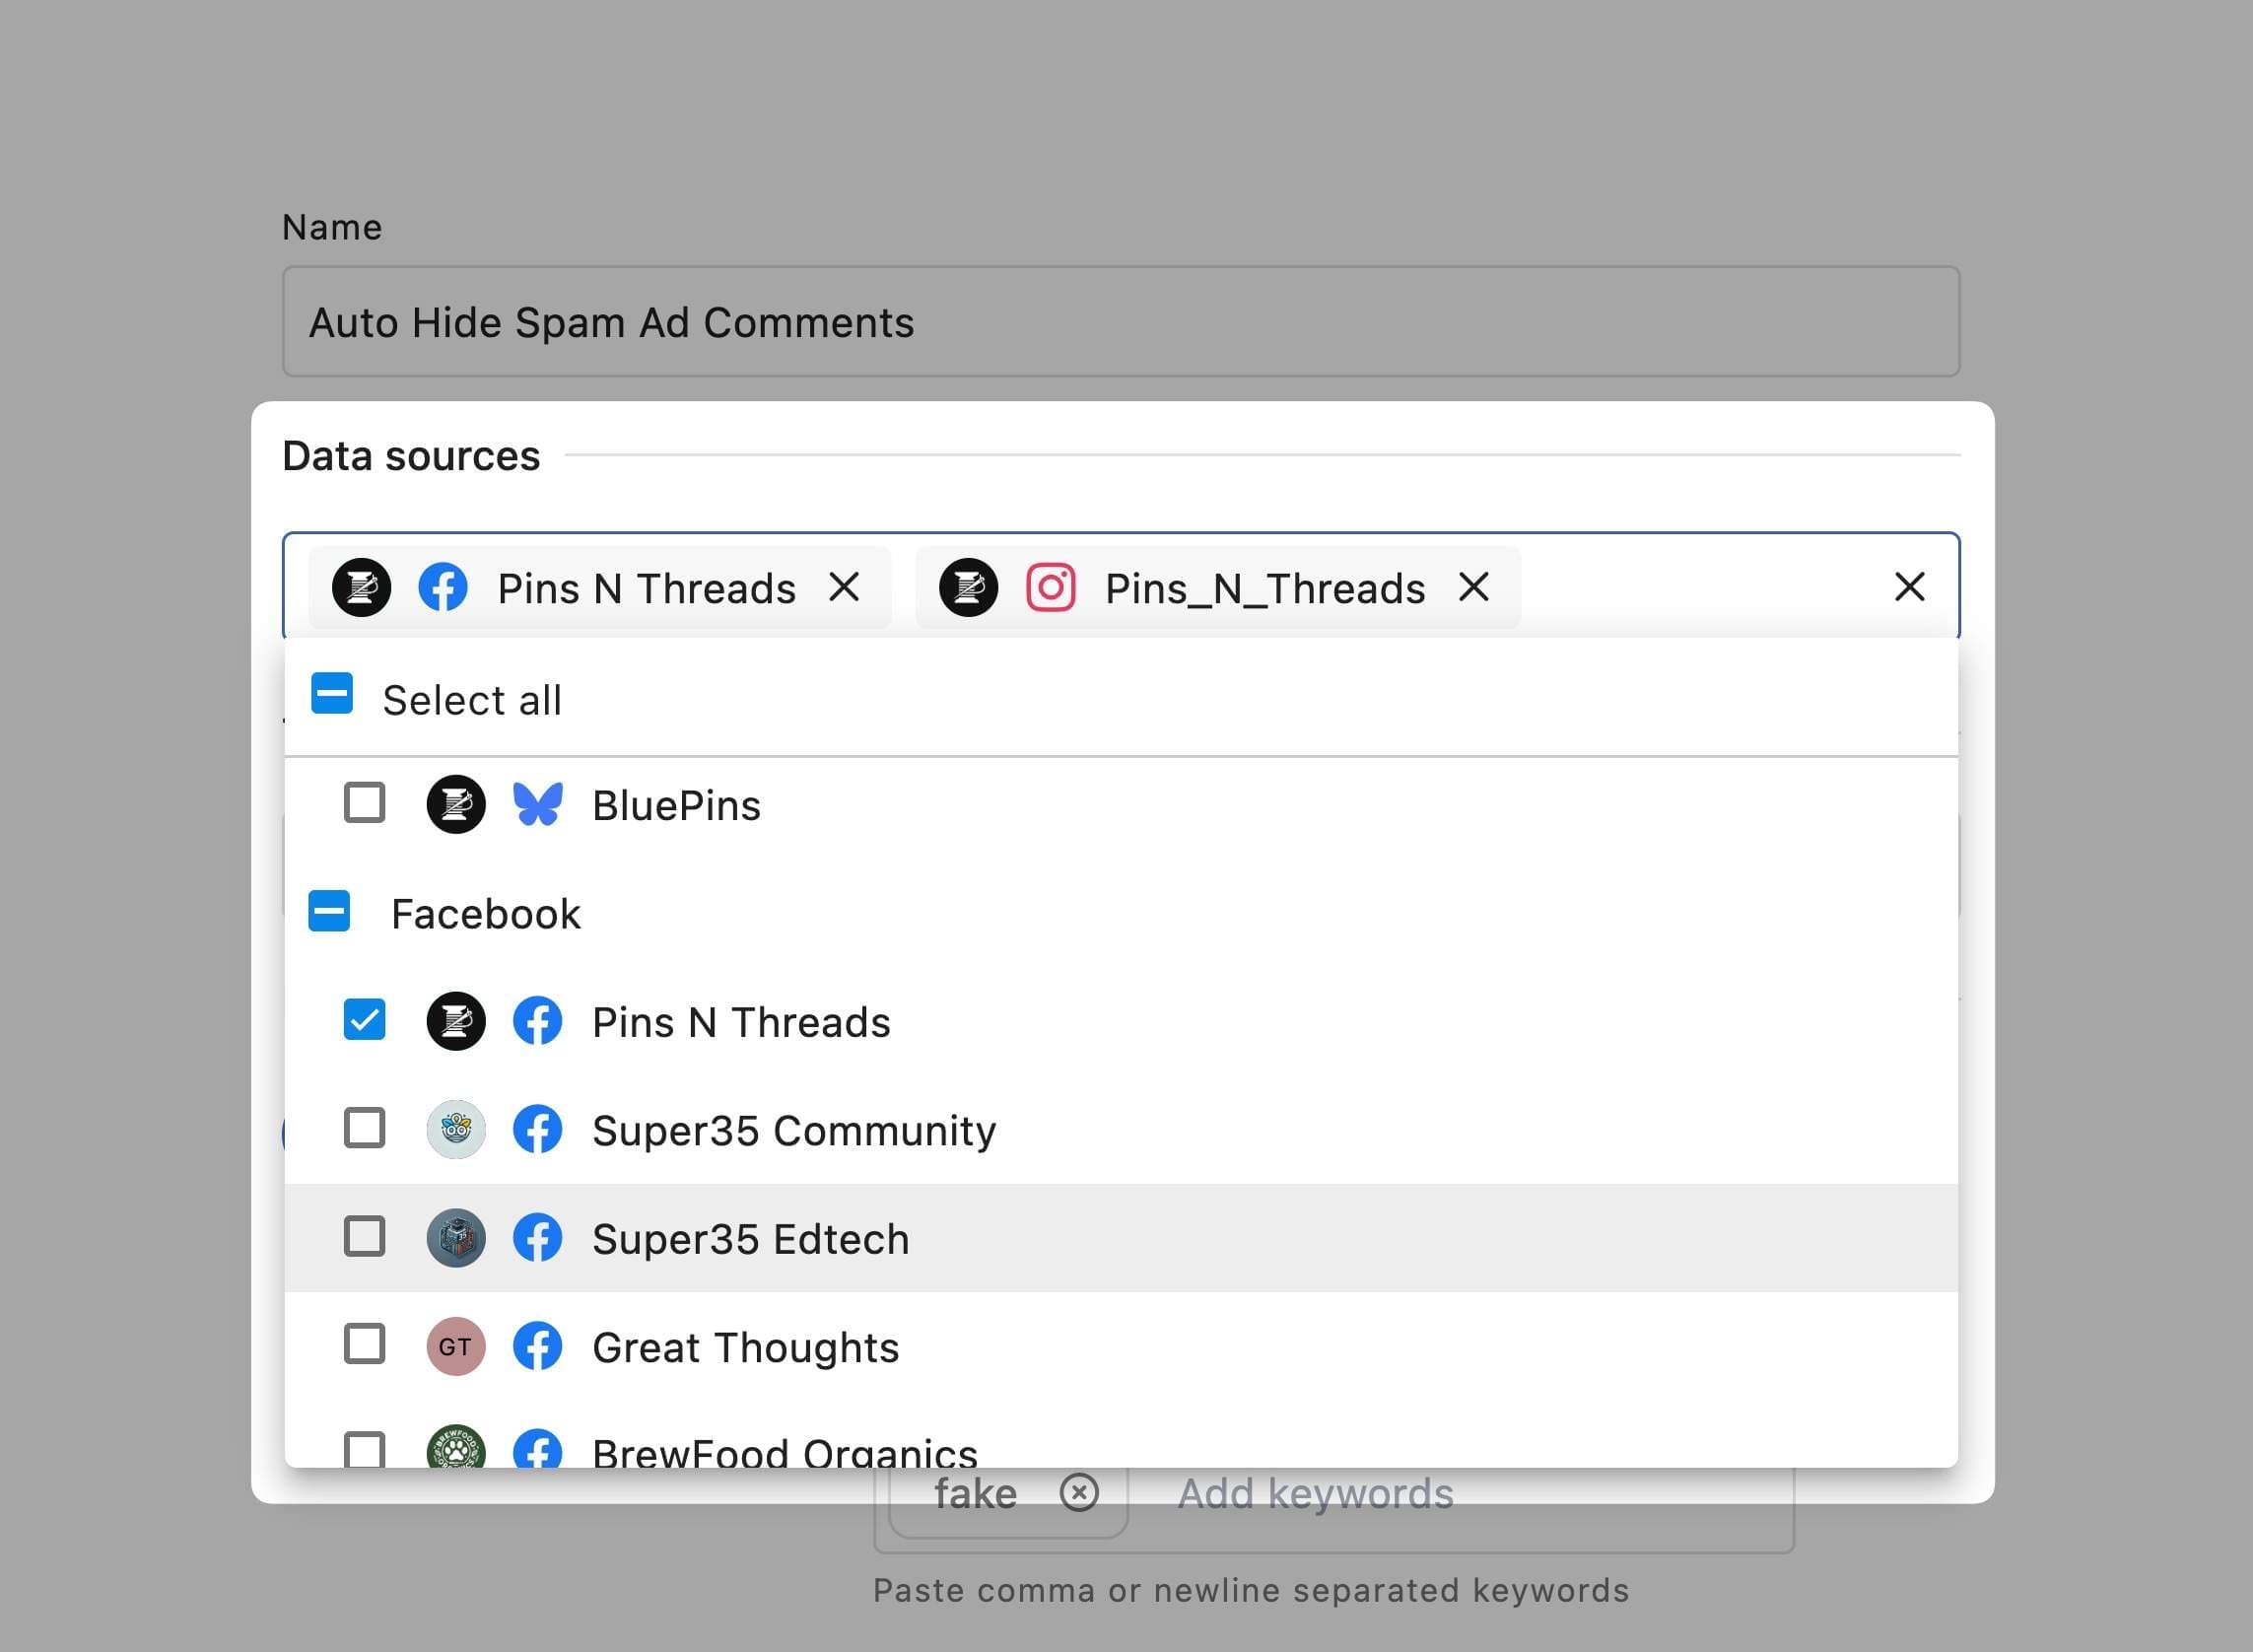
Data Sources
The data source determines where the rule will be applied. You must select at least one social profile — a rule cannot be created without this.
You can choose from:
Individual social profiles
Using profile groups is especially useful for teams managing multiple brands, regions, or clients, as it simplifies both rule management and profile organization.
Trigger Type
Every rule begins with a trigger — the condition that activates it.
For Engage conversations, the only available trigger type is:
Message received
This means the rule will run every time a new incoming message is received on the selected profile(s).
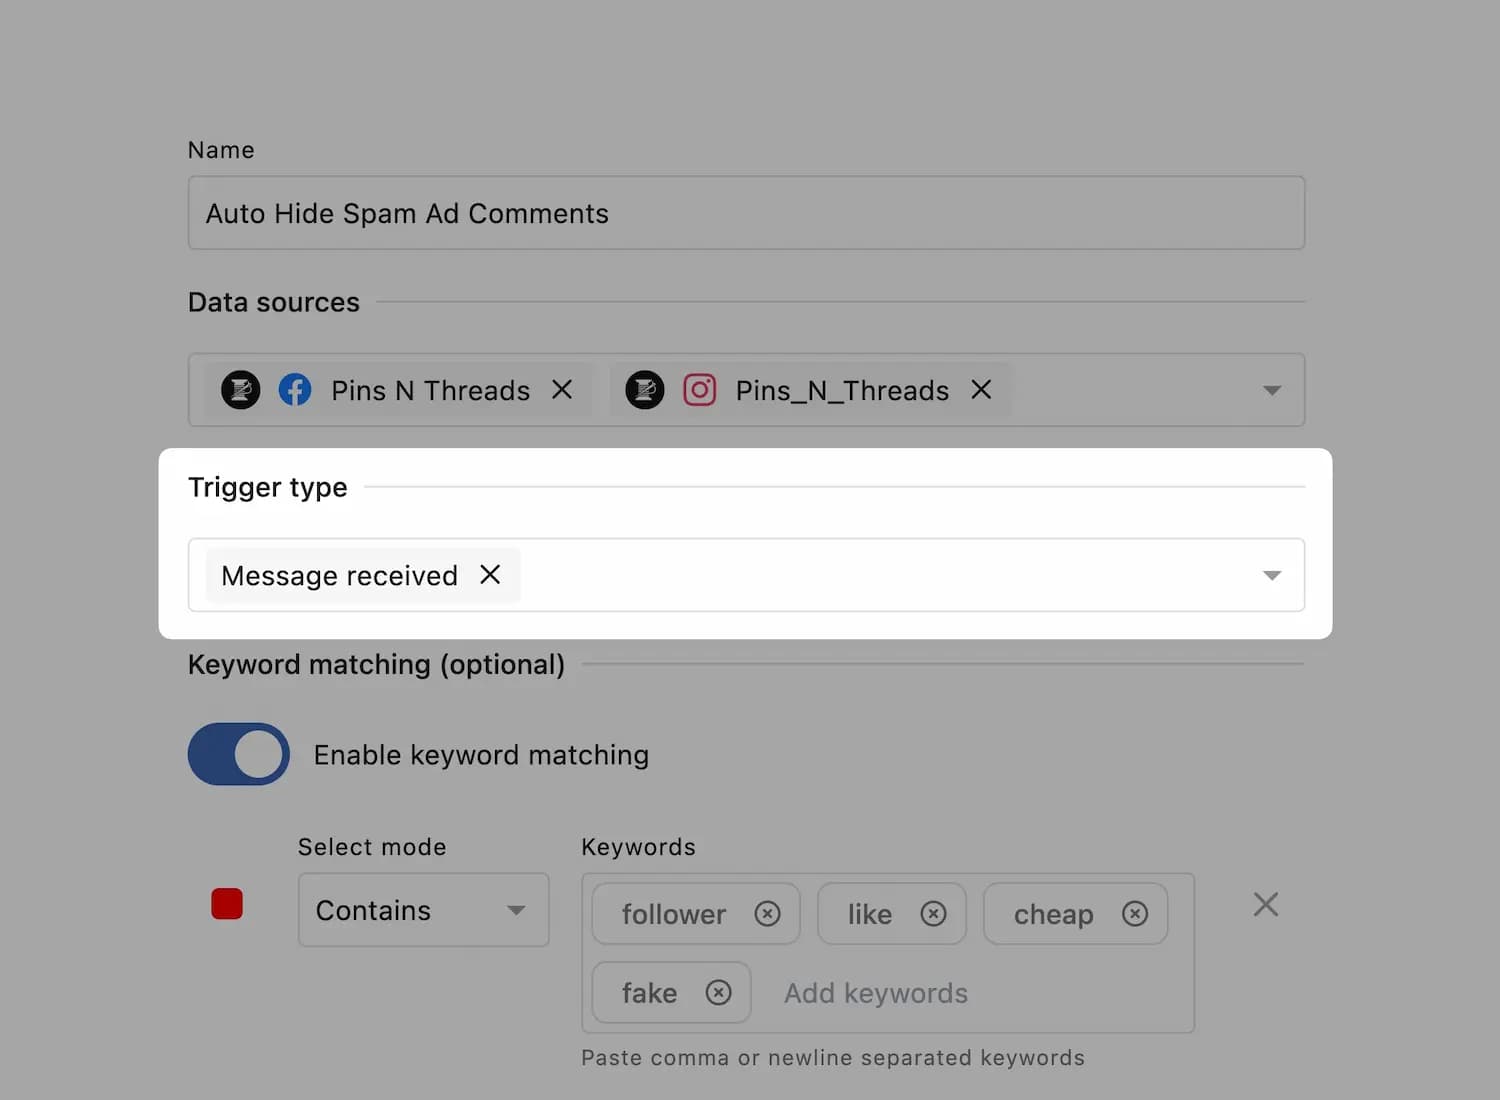
Keyword matching (optional)
Keyword highlighting in Engage’s conversations for faster review of flagged content. You can enable keyword matching if you want to visually highlight keywords from applied rule filters in incoming messages, comments, or replies when they match rule keywords.
Click Add keyword set to include a group of keywords. Give a name to the set.
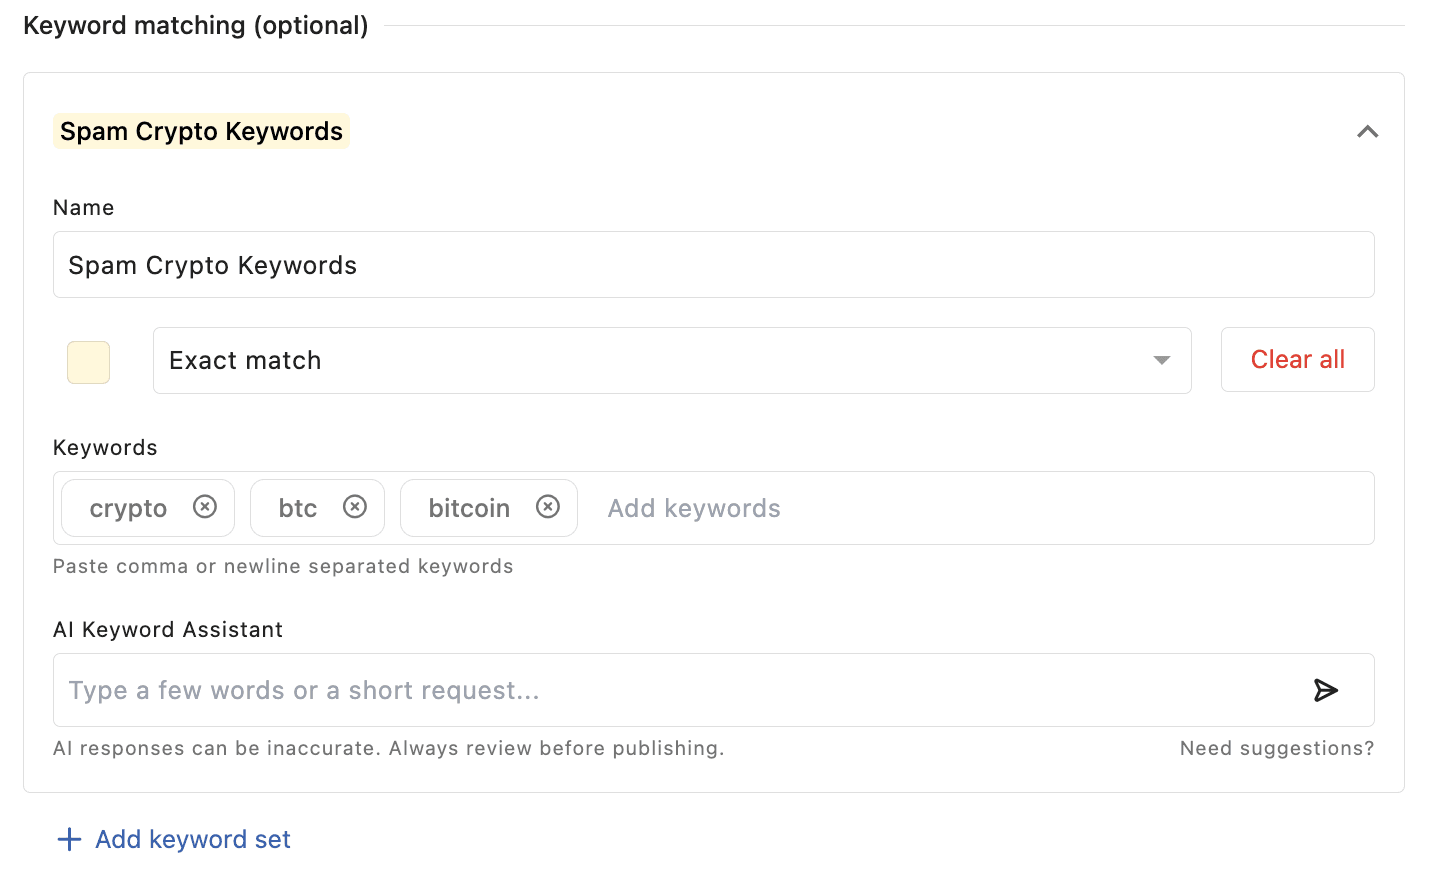
Choose the color you want to highlight keywords in conversations with.
You can configure Keyword matching in two ways in a set:
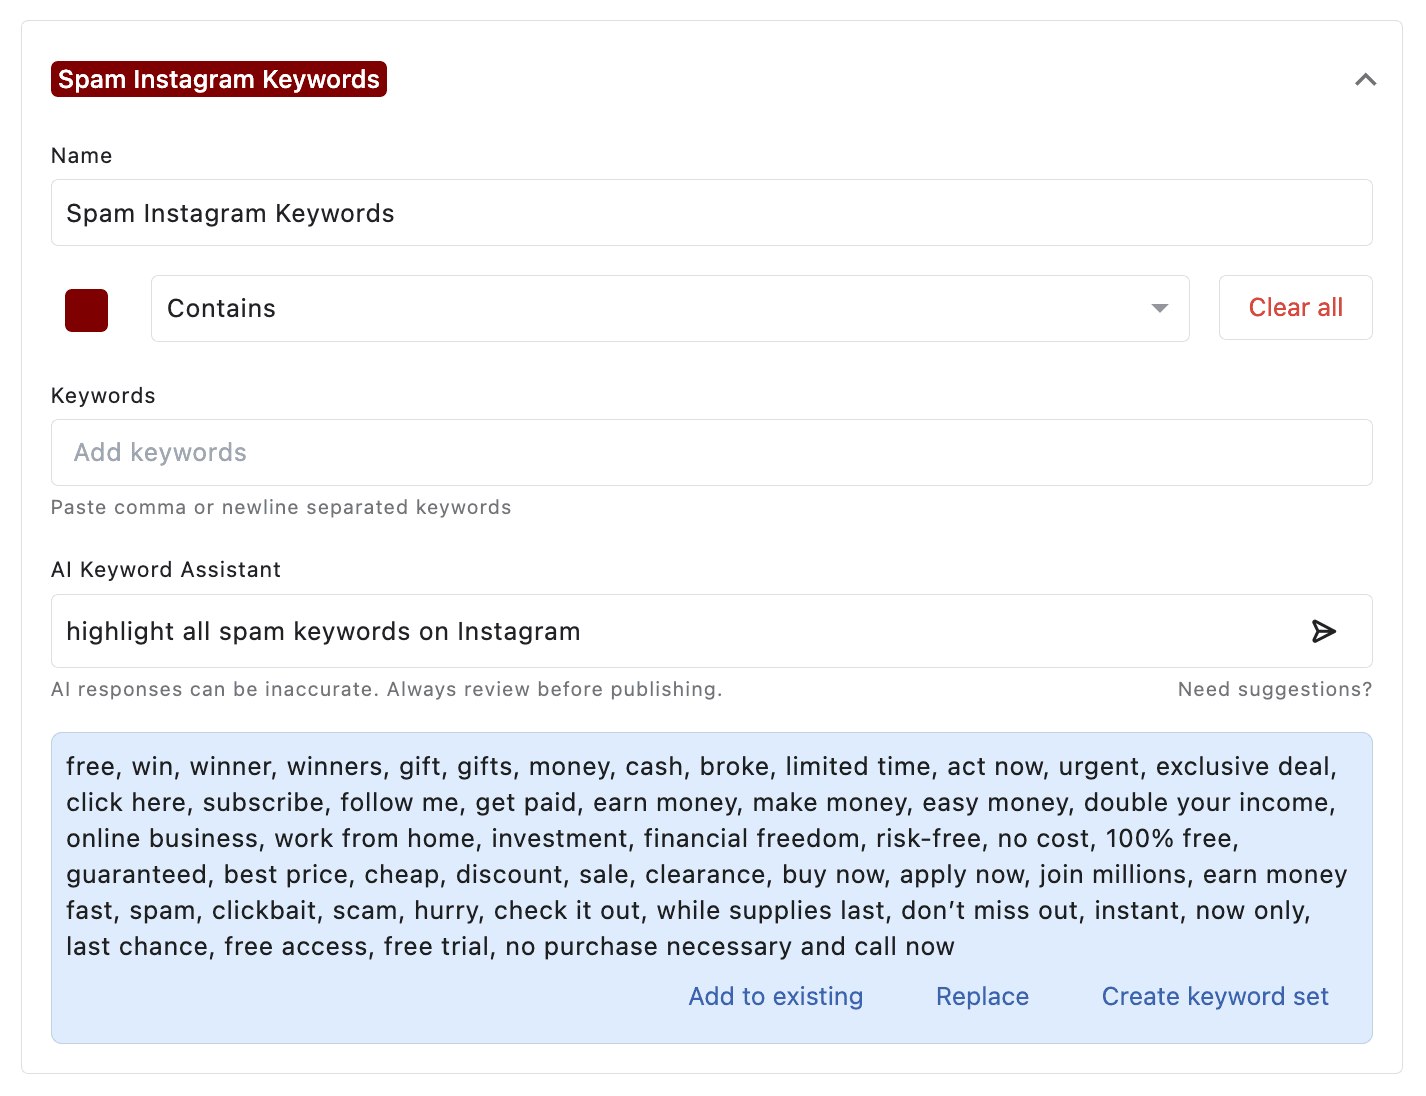
Contains: The incoming message contains the keyword anywhere within the text. For example, "bot" would cover any conversation that includes any word containing "bot," such as "robot," "chatbot," "bots," and "robots."
Exact Match: Only if the message exactly matches the keyword you’ve entered. For example, "bot" would only cover any conversation that includes the "bot" keyword exactly, not its variations.
You can add multiple keywords in a set (separated by commas or line breaks) to cover more variations.
Keyword Tips
Keyword fields support phrases, emoji, and non-Latin languages.
Keywords are not case-sensitive.
AI Keyword Assistant
Not sure which keywords to add? The AI Keyword Assistant can help you generate a ready-to-use list of relevant keywords based on a few words or a short request.
Just type in a few words or a quick prompt (e.g., “highlight all spam keywords on Instagram”), and the AI will suggest a comprehensive list of matching terms you can use.
You can then:
Add to existing → Append the new keywords to your current keyword set
Replace → Swap out your existing keywords with the AI suggestions
Create keyword set → Create a brand-new keyword set from the suggestions
Examples of Keyword Matching in Action
Spam Filtering: Add keywords like “win,” “prize,” “free money,” “crypto,” “click here,” and highlight them in red to help your team instantly spot spam comments or scam DMs that slip.
Competitor Mentions: Highlight conversations that mention your competitors (e.g., “Hootsuite,” “Sprout,” “Agorapulse”).
Product Feedback: Highlight keywords like “bug,” “issue,” “crash,” “error” in blue so your customer support team can identify conversations about product feedback and prioritize them.
Filters
Filters define the specific conditions under which your rule should be triggered. They help you fine-tune how and when a rule is applied based on message content, type, source, sentiment, and more.
Filter Logic: AND vs. OR
AND logic: All filter conditions must be met for the rule to execute.
OR logic: If any one condition is met, the rule will execute.
You can switch between AND and OR logic when adding multiple filters and even when applying filters within a group.
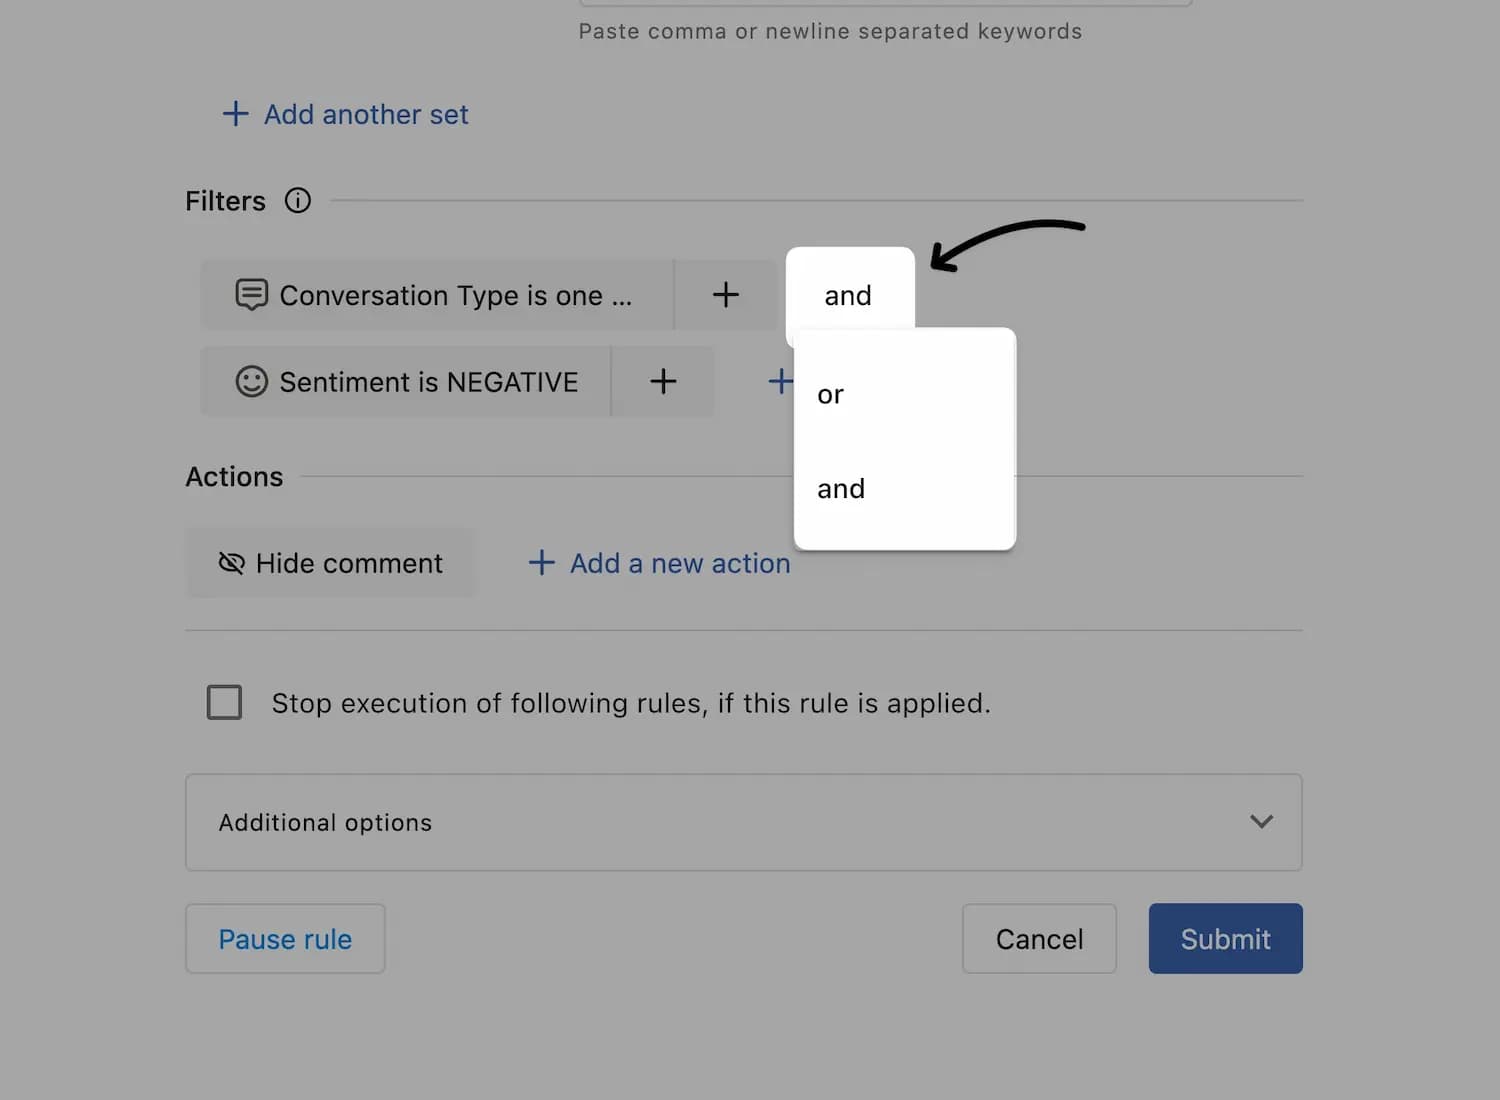
After adding your first filter group, click Add condition to include another. By default, the AND logic is applied, but you can change it as needed.
Important Behavior Note:
When you select multiple values within a single filter, for example, multiple conversation types (e.g., Instagram Message, Instagram Mention, Instagram Media Tagged), these are treated with OR logic.
Example:
If you set up a rule with:
Conversation type: Instagram Message, mention, media tagged
Sentiment: Positive
The rule will trigger if the message is any of the listed conversation types AND the sentiment is positive.
Nested Filters (Filters within a Filter)
Statusbrew also allows you to nest filters within a single condition group, giving you more advanced logic control. This is helpful when you need grouped conditions to be evaluated together.
For example, you can create a filter group like:
If (Message Content is "offer" OR Message Links Count is 1)
AND (Conversation Type is Instagram DM)
Then perform the action(s)
This group ensures that either of the first two conditions must be true, along with the third, for the rule to trigger.
To add a nested filter:
Click (Add filter to this group) beside the filter
Add the filter
Set the logic (AND/OR)
This level of flexibility allows you to build both simple and complex rules tailored to your moderation or workflow needs.
To learn about all available filters, refer to our article on Filters in Rule Engine.
Actions
The Actions define what happens when a rule is triggered, i.e., when all the selected conditions are met.
You can choose one or multiple actions to be executed simultaneously.

To learn about all available actions, refer to our article on Actions in Rule Engine.
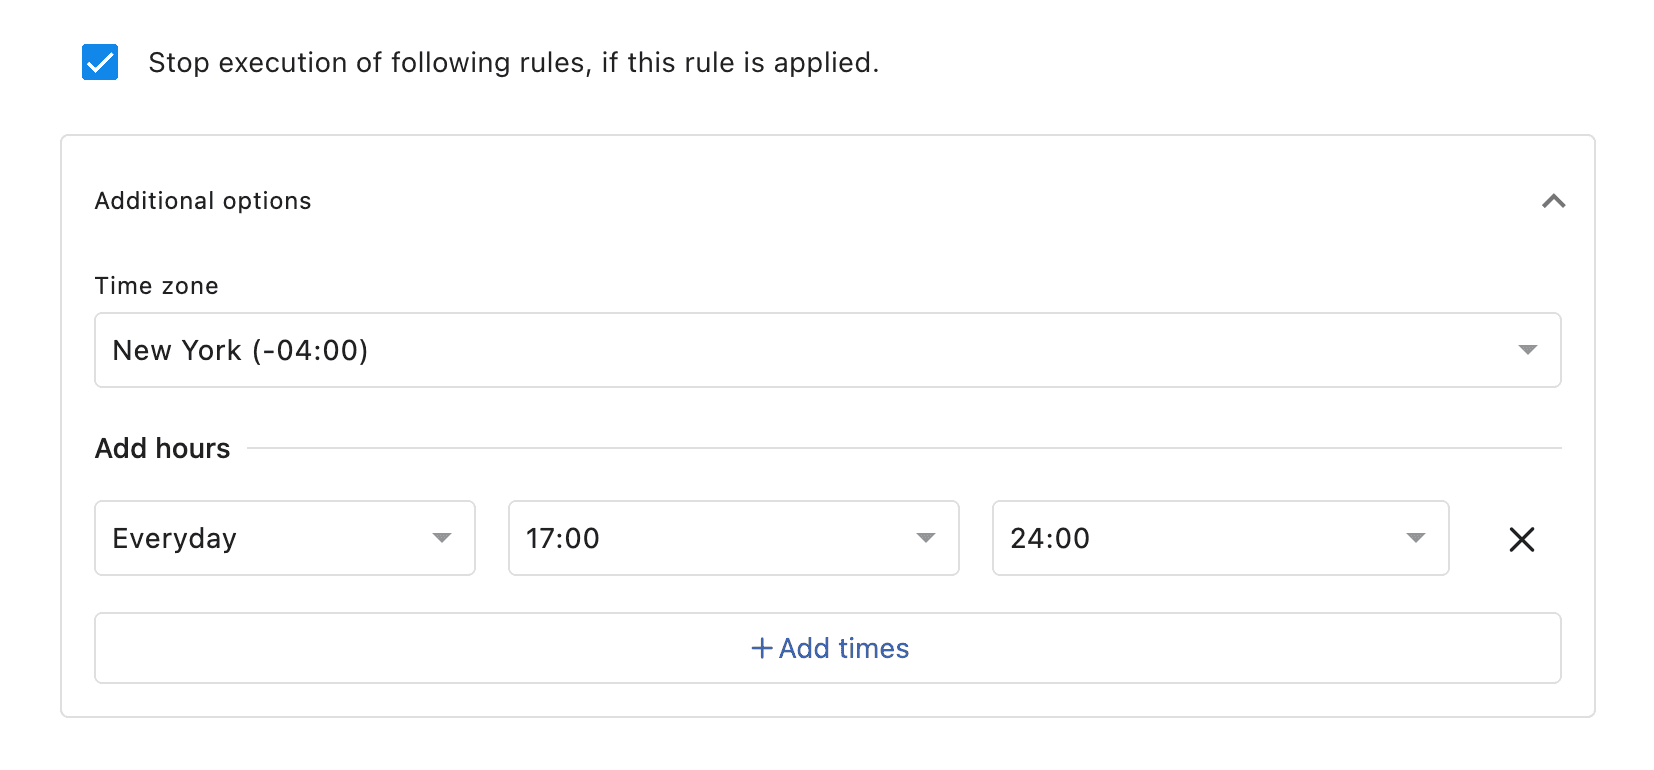
Additional Options
You can choose to Stop execution of following rules, if this rule is applied.
You can also schedule your rule to run only during specific time periods.
Under Add hours, choose the day and define the time range during which the rule should be active, for example, Monday from 09:00 to 17:00. You can specify multiple days and time blocks by clicking Add times.
You can also specify the time zone to ensure the rule runs based on your local business hours or regional team workflows.
If no time is specified, the rule will run continuously, 24/7 by default.
FAQs
Do Rules Apply To Comments And Messages That Were Posted Before The Rule Was Created?
No. Rules apply only to incoming conversations from the moment the rule is created and becomes active. They do not retroactively process historical posts, comments, or messages that existed before the rule was set up.
Why Did My New Rule Show Results From Several Days Ago?
This is normal behavior. When a rule is first created, there may be a short delay of up to 24-48 hours while the system processes recently synced conversations. During this window, some older conversations that were synced around the time the rule became active may appear in results. This is not a lookback or backfill feature. It reflects the system catching up on recently synced data, not retroactively applying the rule to historical content. This behavior is not related to your plan or trial status.
My Rule Is Not Working. What Should I Do?
Make sure you have selected the correct combination of Data sources and Filters. For example, if you have chosen the data source as Facebook and the filter as Conversation Type = X Messages, the rule will never trigger. Also, check that no earlier rule has the Stop execution of following rules option enabled, as this would prevent your rule from running.
Rules in Statusbrew's Rule Engine fire automatically on new incoming messages, but a few common issues can silently prevent them from triggering. Work through this list to find the cause.
The rule is paused or inactive: Go to Rule Engine and check whether the rule shows as Active. If it's paused, click (More options) → Edit rule → Activate rule.
The profile is disconnected: Rules tied to a disconnected profile stop working without any visible error on the rule itself. Go to Settings → Profiles and look for red error indicators. Re-authenticate any profile that needs it.
The filters are not configured correctly: This is the most common cause. Some things to check: the Conversation Type filter is required for hide and delete actions to work. If multiple filters are set to AND logic, every condition must be true at the same time for the rule to fire; if the conditions are too restrictive, the rule will never match.
A higher-priority rule is blocking this one: Rules execute top to bottom. If a rule above yours has Stop execution of following rules enabled and it matches first, the rules below it won't run. Review your rule order and check whether that option is enabled on any preceding rule.
The rule has a scheduled time: If a schedule is configured, the rule only runs during that window. Open the rule and check the Add hours section under Additional Options.
The action isn't supported for that conversation type: Not every action works on every network. LinkedIn Comments can be deleted but not hidden. TikTok Comments can be hidden but not deleted. Private replies only work on Facebook and Instagram.
The rule only applies to new messages: Engage rules fire on incoming messages only. They don't retroactively process conversations that were already in your inbox before the rule was created.
There is a temporary issue with the social network's API: Occasionally, delays or outages on Facebook, Instagram, or other networks can cause rules to execute unexpectedly. If everything in your rule setup looks correct, wait a short while and check again. If the issue persists, reach out to Statusbrew support.
What does “Message received” mean in Rule Engine?
In Rule Engine, Message received means a new conversation has entered Statusbrew Engage. It is not limited to direct messages only.
This trigger can apply to any supported conversation type that lands in Engage. If you want the rule to run only for a specific type of conversation, such as a comment, review, or DM, add a condition under Filters → Conversation Type.
How can I automatically tag comments from specific users or contacts?
To do this, first create a tag and apply it to the contact, then create a rule that uses that tag to tag future comments from the same person.
For example, you can create a contact tag (e.g., Spammer or Repeat Buyer) as you see fit, then apply that tag to the user from their conversation window.
After that, create a rule to automatically add a tag whenever that tagged contact comments again.
You can use AI in the Rule engine and explain your requirement in plain language.
For example
For the Instagram profile Pins N Threads, when a new Instagram comment is received from a user tagged Spammer, hide that Instagram comment and add the tag Spam.
or create it from scratch.
Here is how:
Go to Rule Engine → Add new rule → Create Manually
Enter a name for the rule and select the relevant data source
Set Trigger type to Message received
Under Filters, add:
Conversation Type = Comment
the relevant Contact Tag
Under Actions, choose Add tags and select the tag you want to apply to those comments
Click Submit to activate the rule
Now, if the tag is applied to the contact, their future comments will be auto-tagged.