Projects in Statusbrew
Organize and visualize your content in customizable calendar views using Projects that fit your workflow.
A Project is a customizable calendar view designed to help you organize and visualize your content in a way that fits your workflow. It's useful for teams that want to segment and manage content by goals, clients, or content stages.
Inside each Project, you can add multiple Sections. A Section is a sub-view within a project that organizes content based on calendars, filters, or views.
This two-level structure, Project plus Section, lets teams build flexible visual content calendars, reports, and a space for team updates across a wide range of workflows: network-specific, client-specific, campaign-based, or status-based content tracking.
Planner Boards are now called Projects. It's the same feature, renamed as Statusbrew, heading towards project-management-style planning together with full social media management in one platform. Anything you set up before still works.
Who Can Do This
Every user can create and manage Projects, from regular users up to Owners. Creating Projects is available on all plans.
How Do I Create A Project?
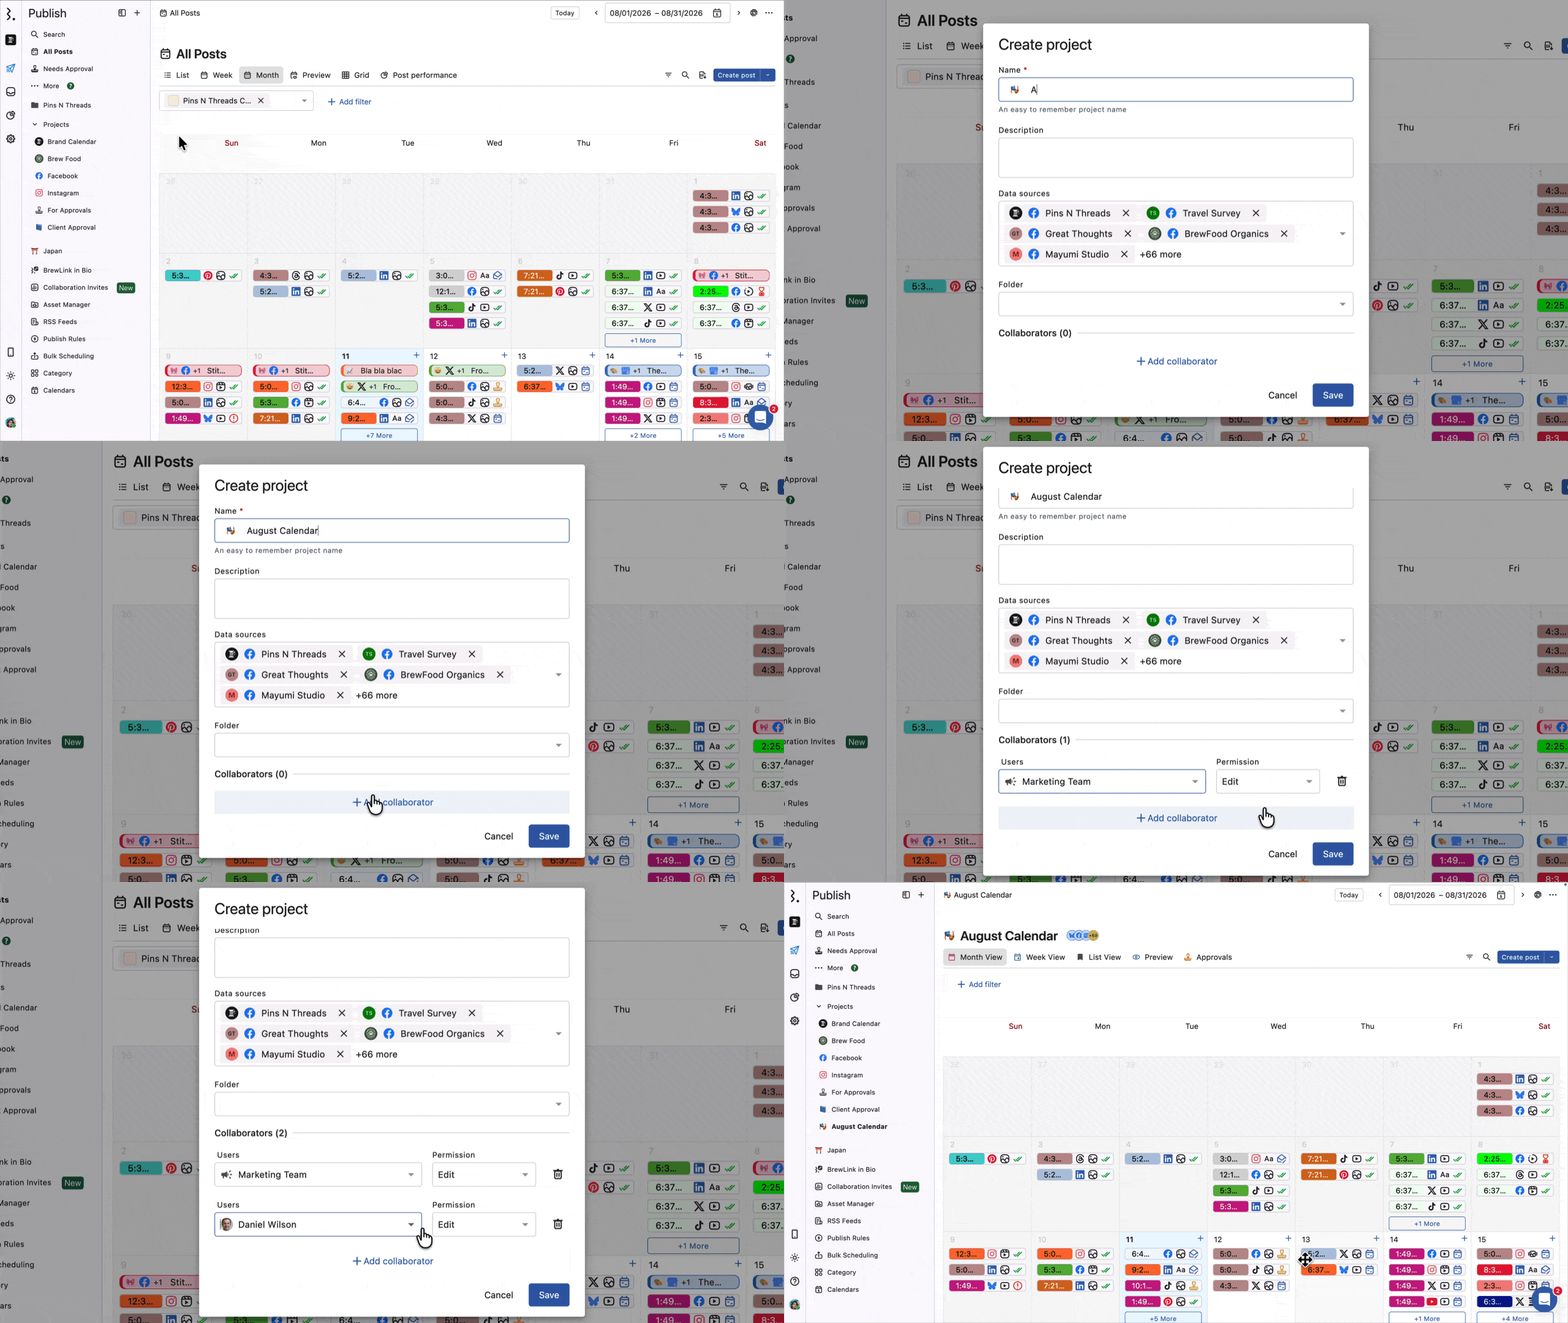
Go to Publish.
In the sidebar, click Create at the top and select Create project. The Create project dialog opens.
Enter a Name for the project. To give it a custom icon, click the icon in the Name field.
Add a Description (optional).
Select the Data sources the project should cover.
Choose a Folder to place it in (optional), and add Collaborators, setting each user or user group's permission to Edit or View (optional).
Click Save.
To create a project inside a folder, click More beside the folder and select Create project. The folder is filled in automatically. (The same Create menu also has Create folder if you want to group projects first.)
When you save, the project is created with these default sections:
Month View: posts in a monthly calendar layout for a broad timeline overview.
Week View: posts within a week.
List View: a linear, date-wise breakdown of all posts.
Preview: how your posts will look once published, for a real-time visual check before they go live.
Approvals: posts waiting on your approval. Whoever opens this section sees the posts pending their own approval.
Learn more about Content Editorial Calendar - List, Week, and Month View.
How Do I Manage Projects?
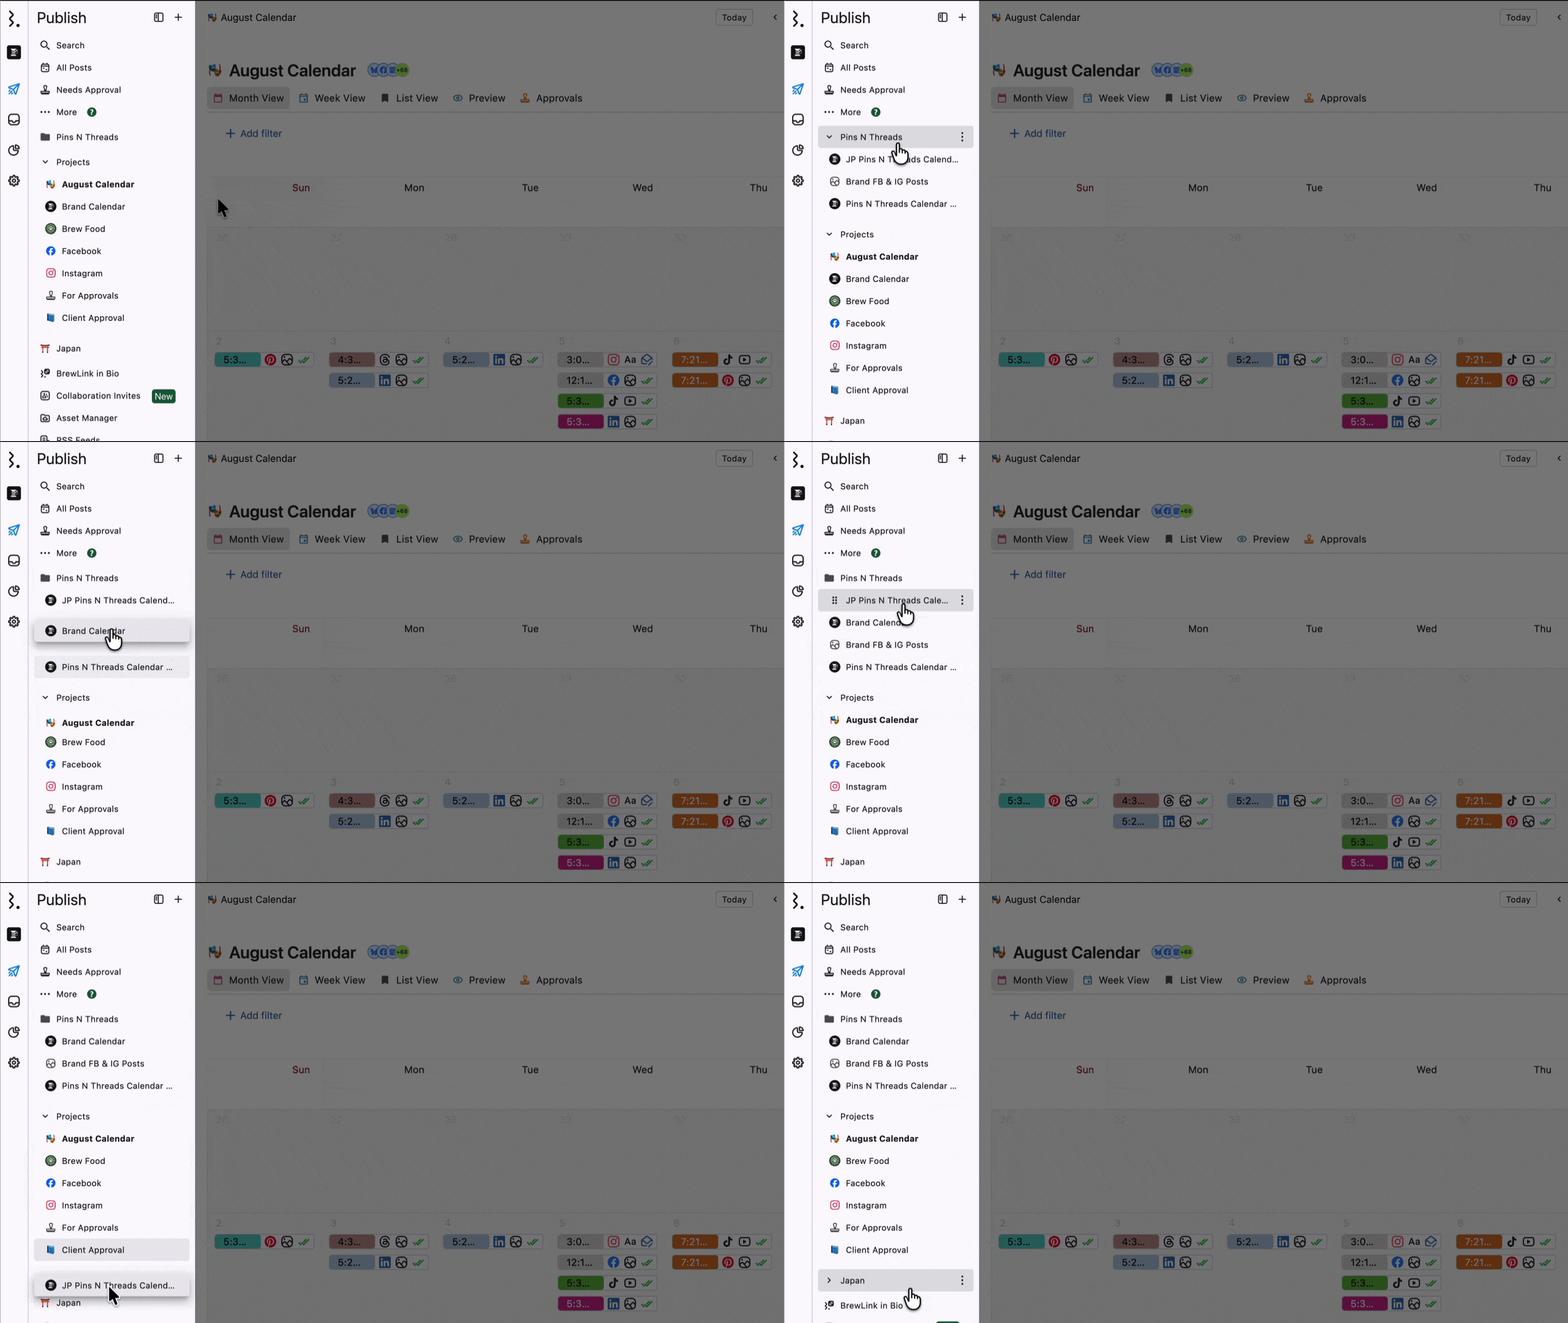
Rearrange Projects in Folders
Drag and drop projects across folders, or reorder them within a folder.
Edit a project
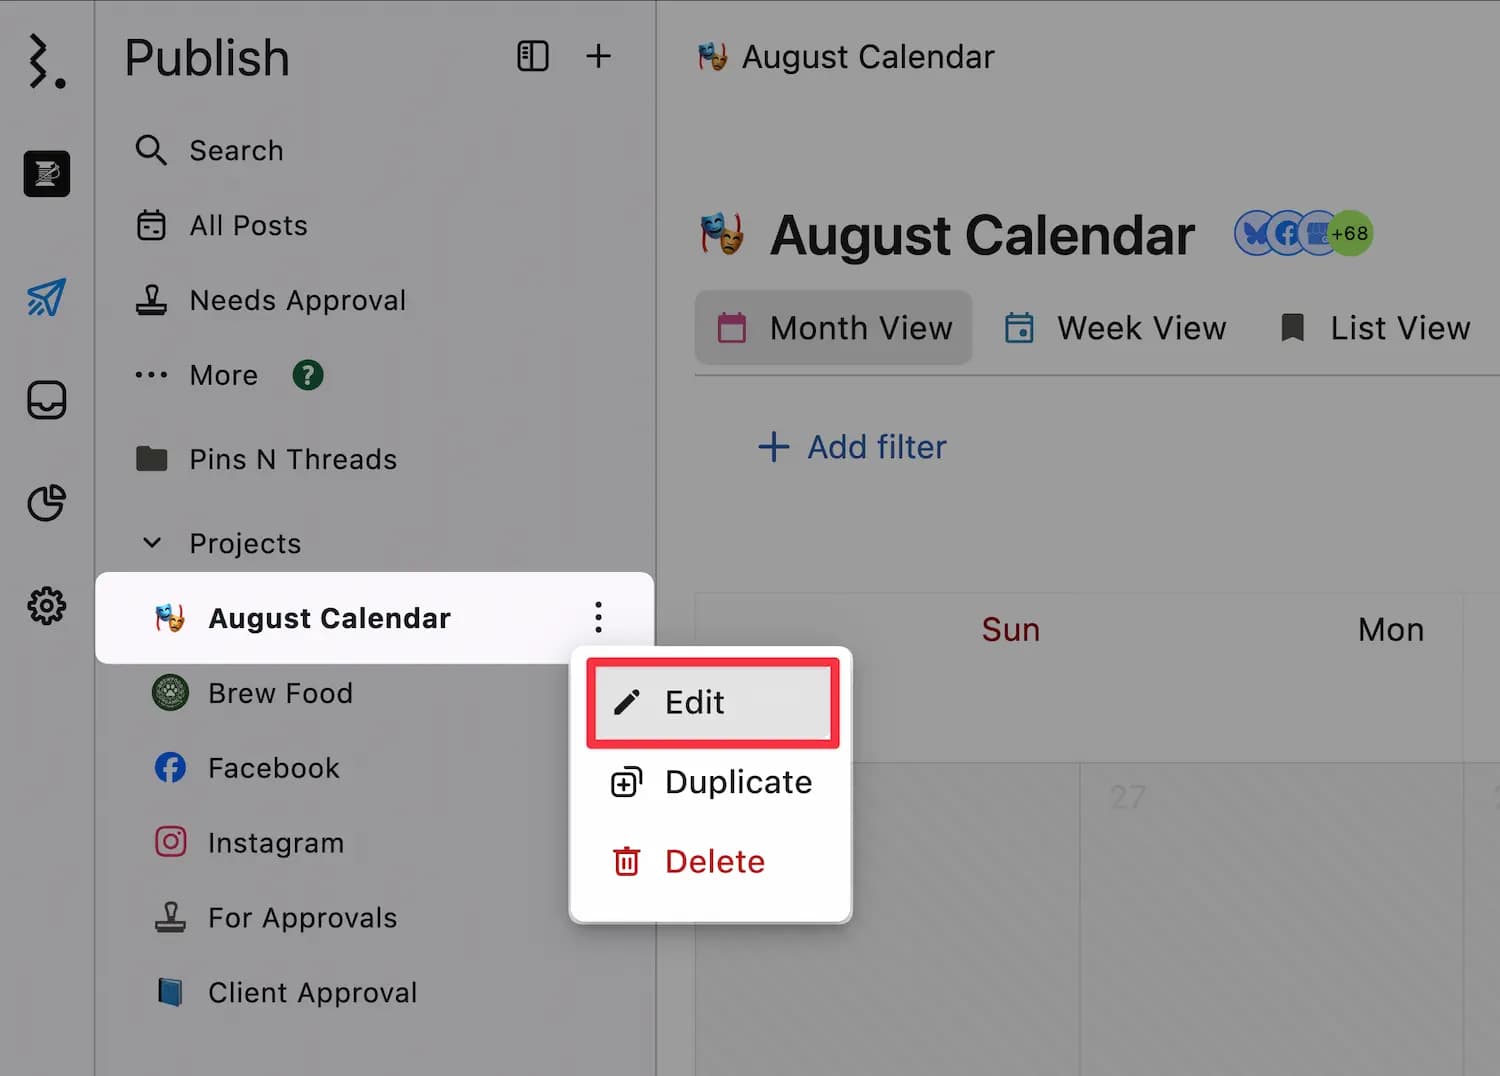
Go to Publish.
In the sidebar, hover over the project you want to edit and click More.
Select Edit. The Edit project dialog opens.
Make your changes.
Click Save.
Duplicate a Project
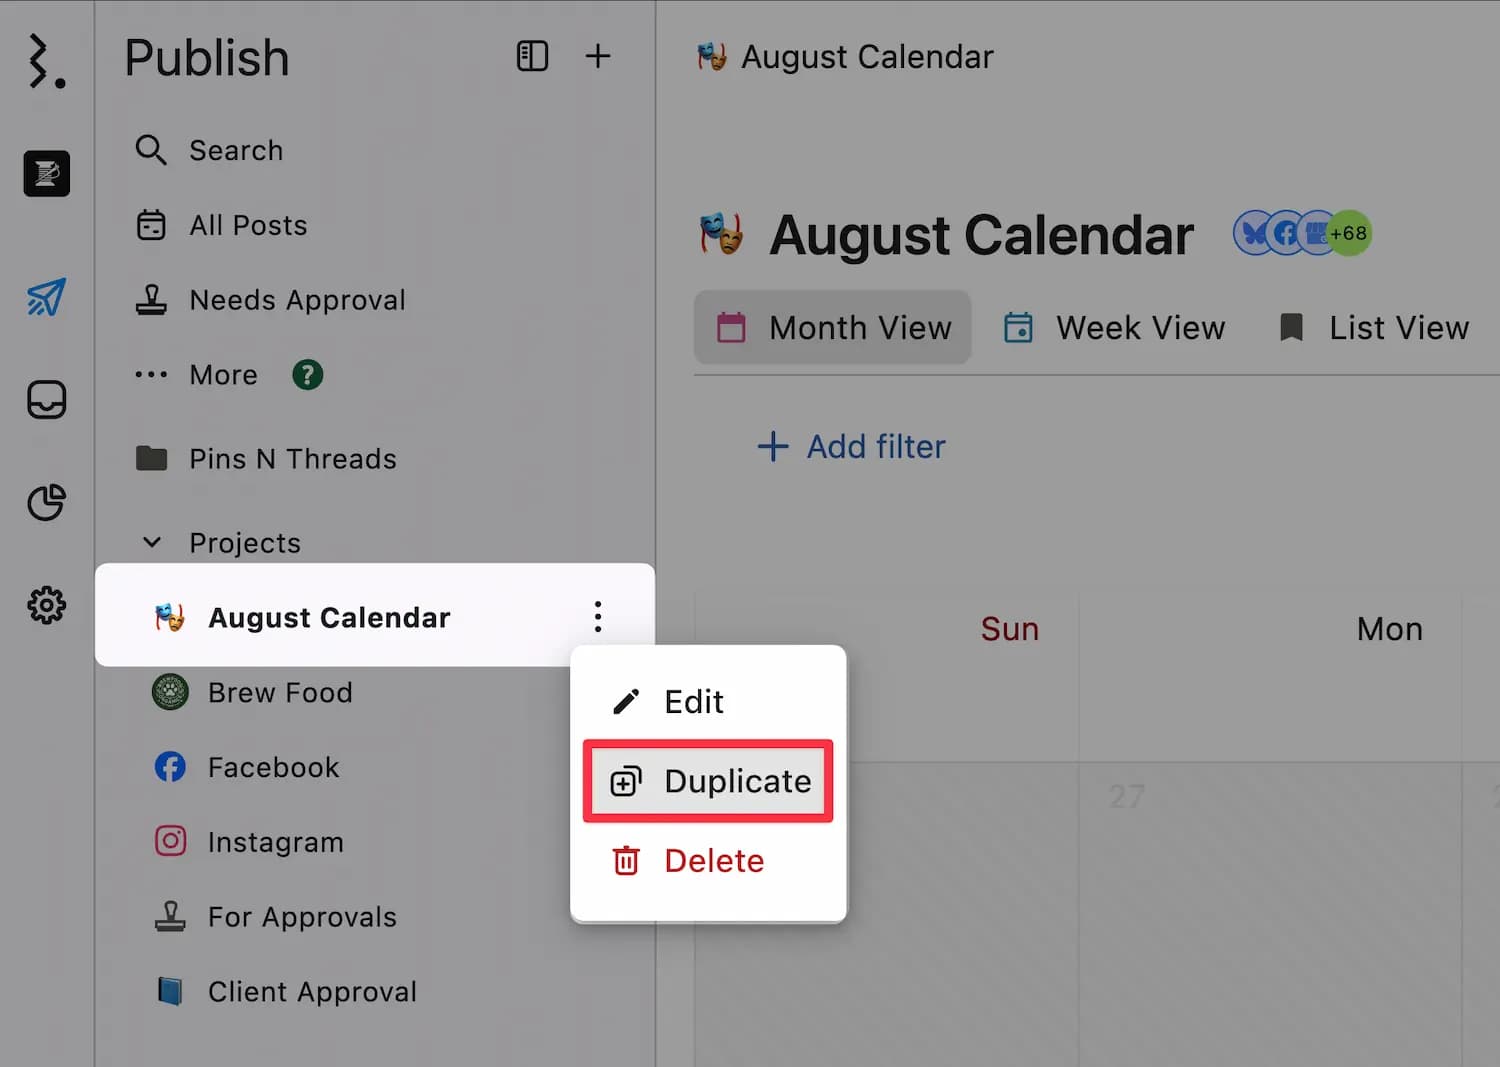
Go to Publish.
In the sidebar, hover over the project you want to duplicate and click More.
Select Duplicate. The dialog opens with the same settings, and the name appears with [Cloned].
Make any changes.
Click Save.
Delete a Project
Go to Publish.
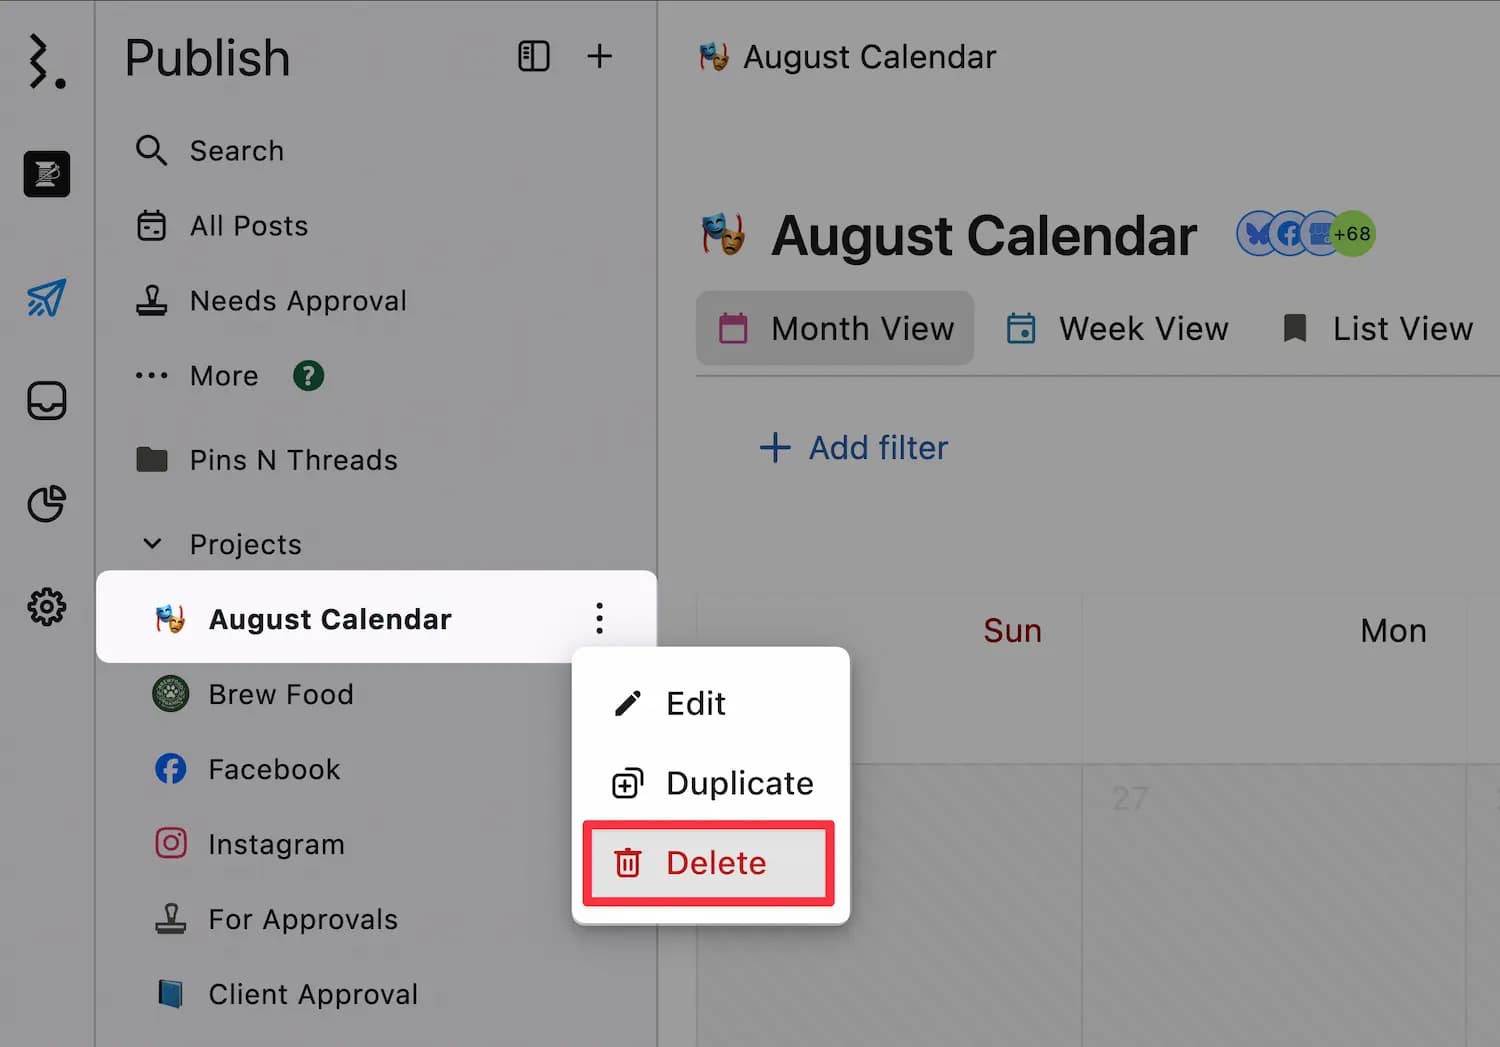
In the sidebar, hover over the project you want to delete and click More.
Select Delete.
Confirm the deletion.
Deleted projects cannot be recovered.
How Do I Create A Section?
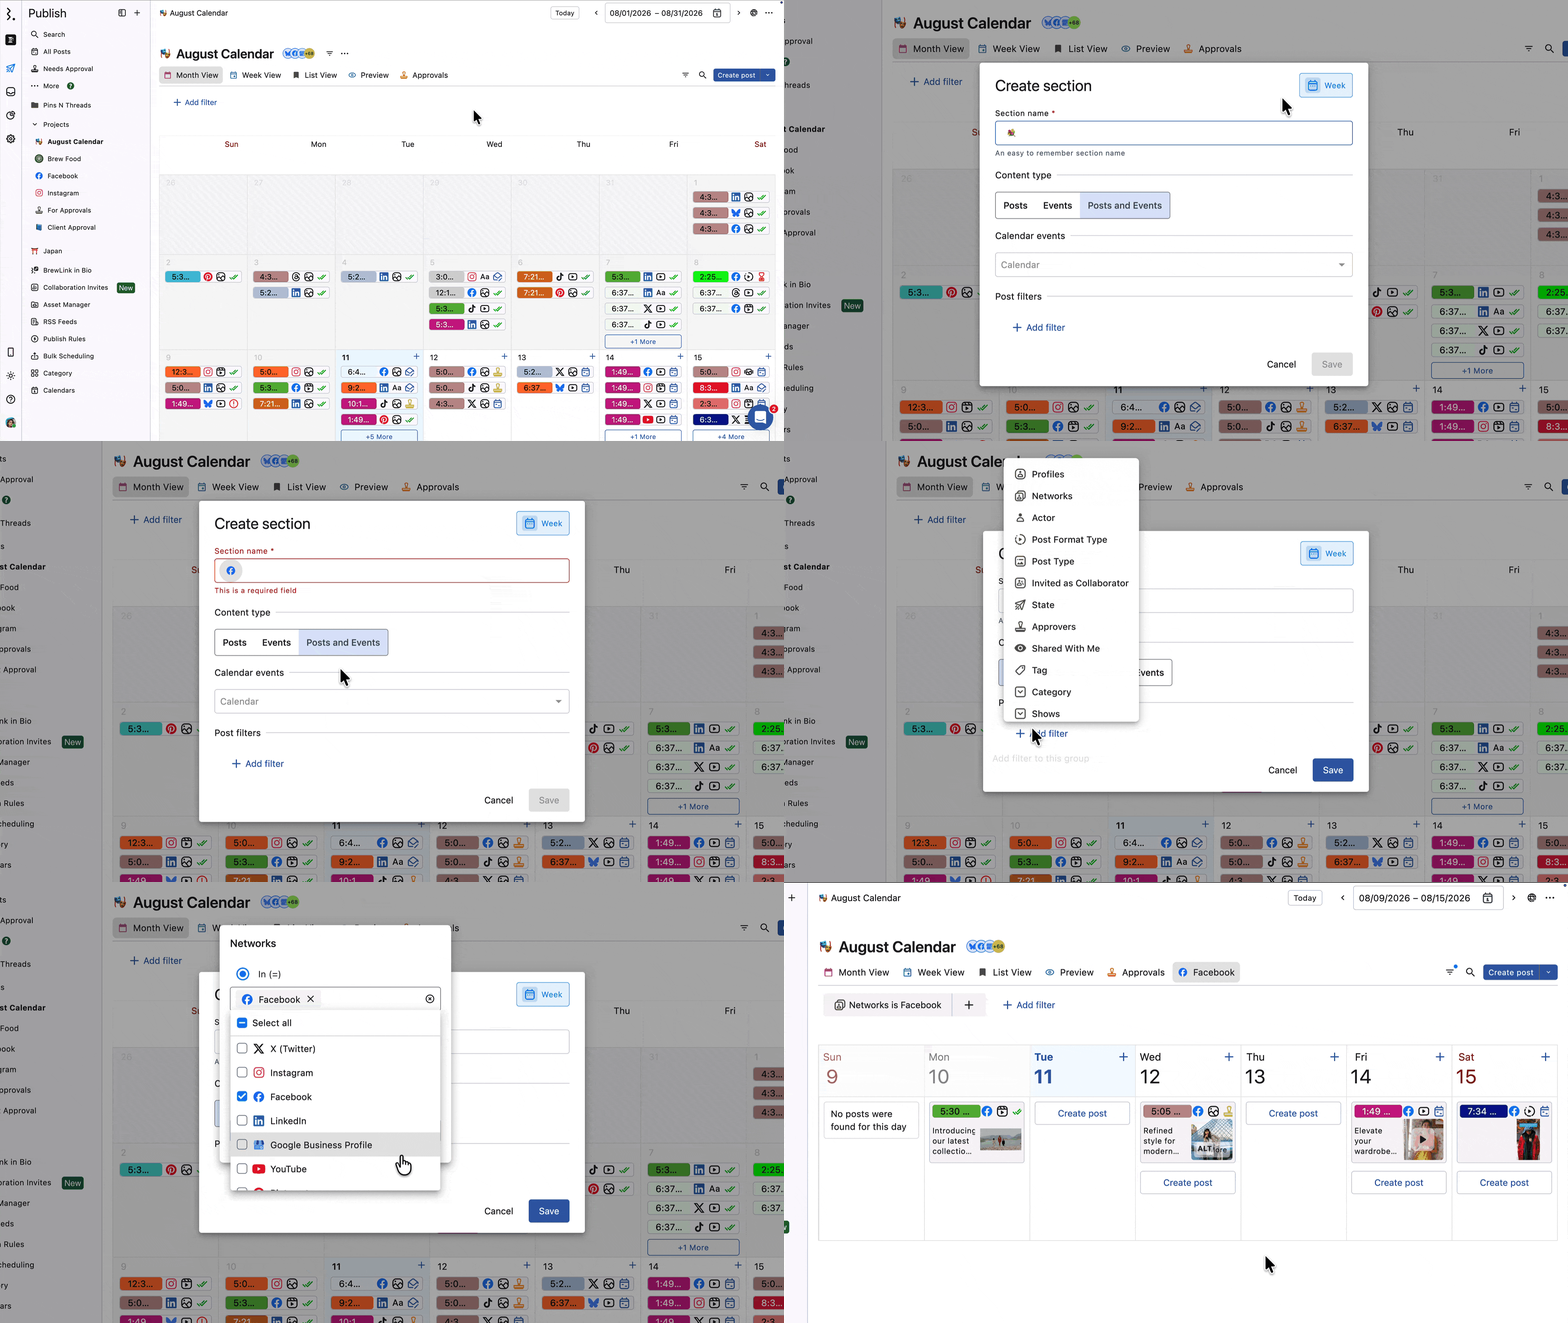
Open the project you want to add a section to.
Click Section. The Create section dialog opens.
Select a View type:
List (default)
Week
Month
Preview
Approvals
Grid (Instagram profiles only)
Report (build a report alongside your content calendar in the same project)
Updates (where your team posts updates for each other, with no calendar). A project can have only one Updates section.
Assets (browse your Asset Manager library inside the project). You can add more than one, each pointing at a different folder.
Give the section a name. You can also customize the icon.
Choose the Section type:
Posts: a section of only posts. Add filters to narrow which posts are shown.
Events: a section of only events. Select a calendar to show events from.
Posts & Events: a section of both. Apply post filters and select calendars, so filtered posts and events appear together.
Select the calendar(s) and/or add filters.
Click Save.
How Do I Manage Sections In A Project?
Click a section to get these options:
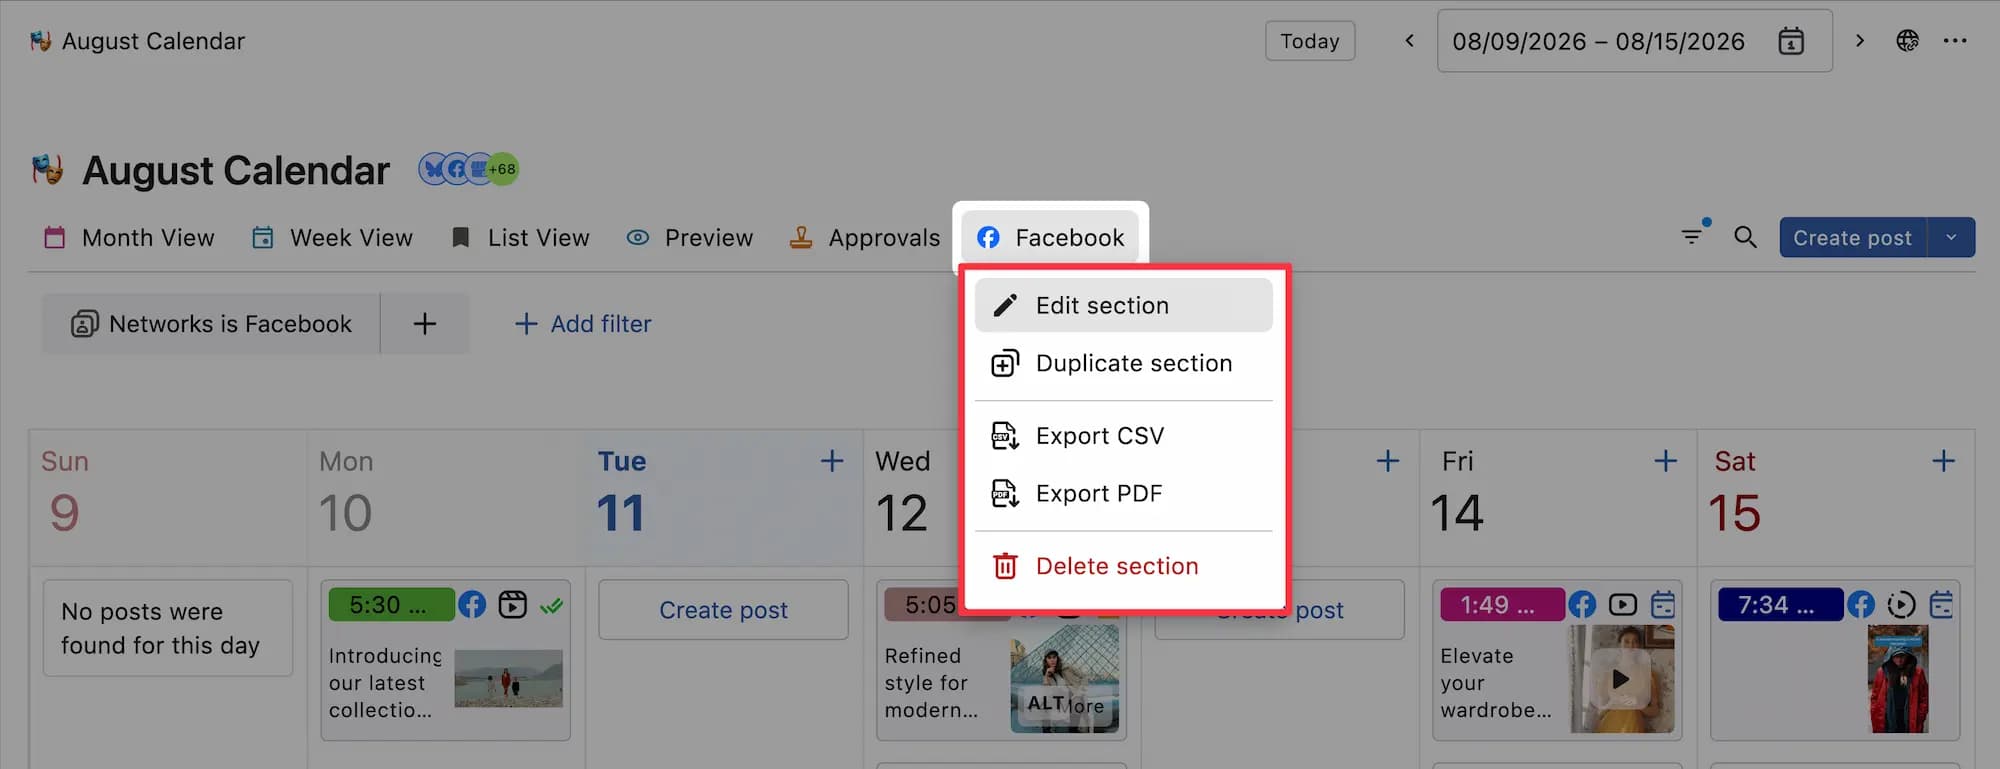
Edit section
Opens the Edit section dialog. Make your changes and click Save.
Duplicate section
Creates a copy of the section, including its icon, view type, calendars, and filters. The copy appears next to the original, prefixed with "(Copy)" (for example, (Copy) Approved & Scheduled). Handy when you want to reuse a layout but change the filters for a different view.
Export CSV
Exports the section as a CSV. Any filters you set are included. Not available for Grid view.
Export PDF
Exports the section as a PDF. A new tab opens, and the PDF downloads automatically. Any filters you set are included. The PDF includes a cover page with the project icon, project name, section name, and date range.
How each view exports:
List View: the day-wise list exactly as shown in the section. Useful for sharing a chronological record of scheduled content.
Preview View: posts exactly as they'll appear on their networks. Best for sharing content with clients or approvers for review before publishing.
Week View: week blocks, one per page.
Month View: the month broken into weekly pages, one week per page.
For published posts, the PDF includes clickable links that open the post in the native network preview in Week and Month View. Export PDF is not available for Grid view.
Delete section
Click Delete section to remove it. A confirmation prompt warns that this can't be undone. Click Delete to proceed, or Cancel to keep it.
Every project must have at least one section, so you can't delete the last remaining section.
Rearranging Sections
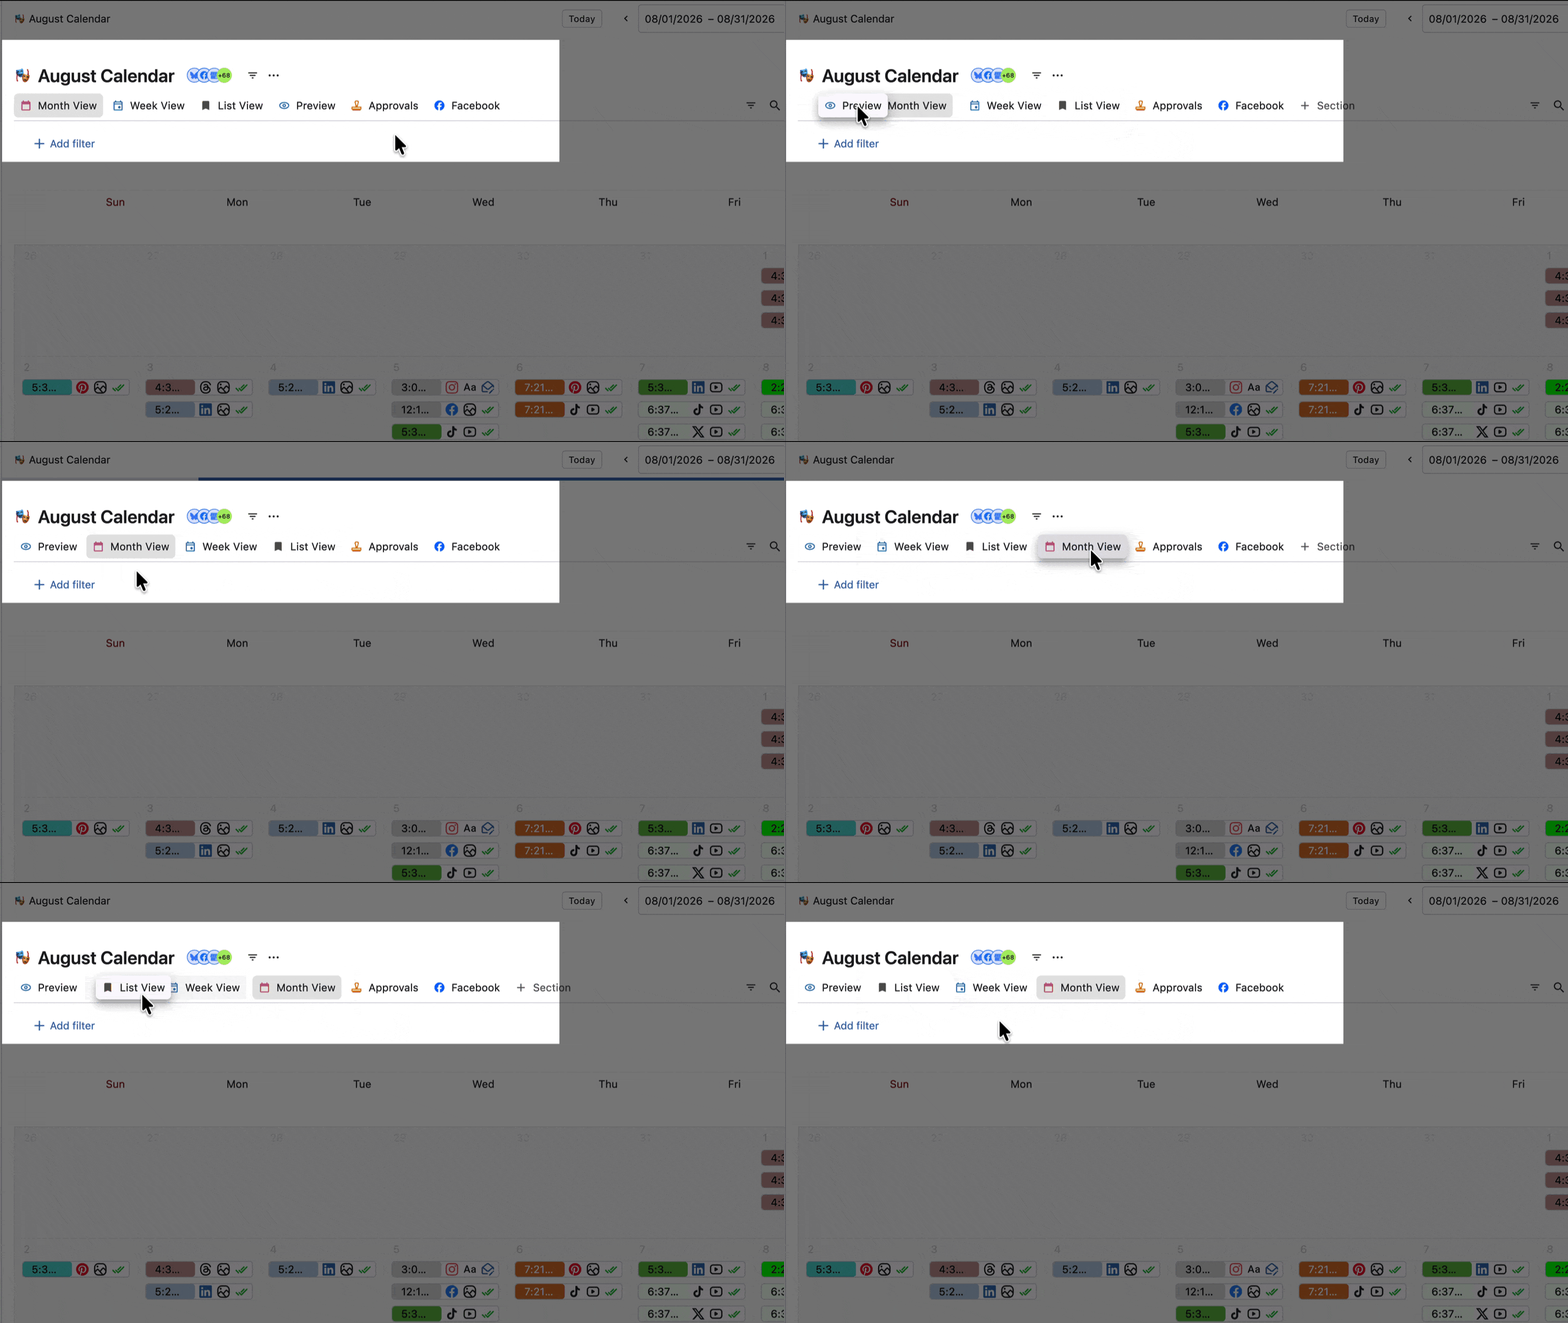
Click and hold the section you want to move.
Drag it to the new position and release.
The new order saves automatically. When there are more sections than fit in the section bar, Statusbrew shows an "n more…" label at the end (for example, "7 more…"). Click it to reveal the rest, where you can drag and drop to reorder.
Filters
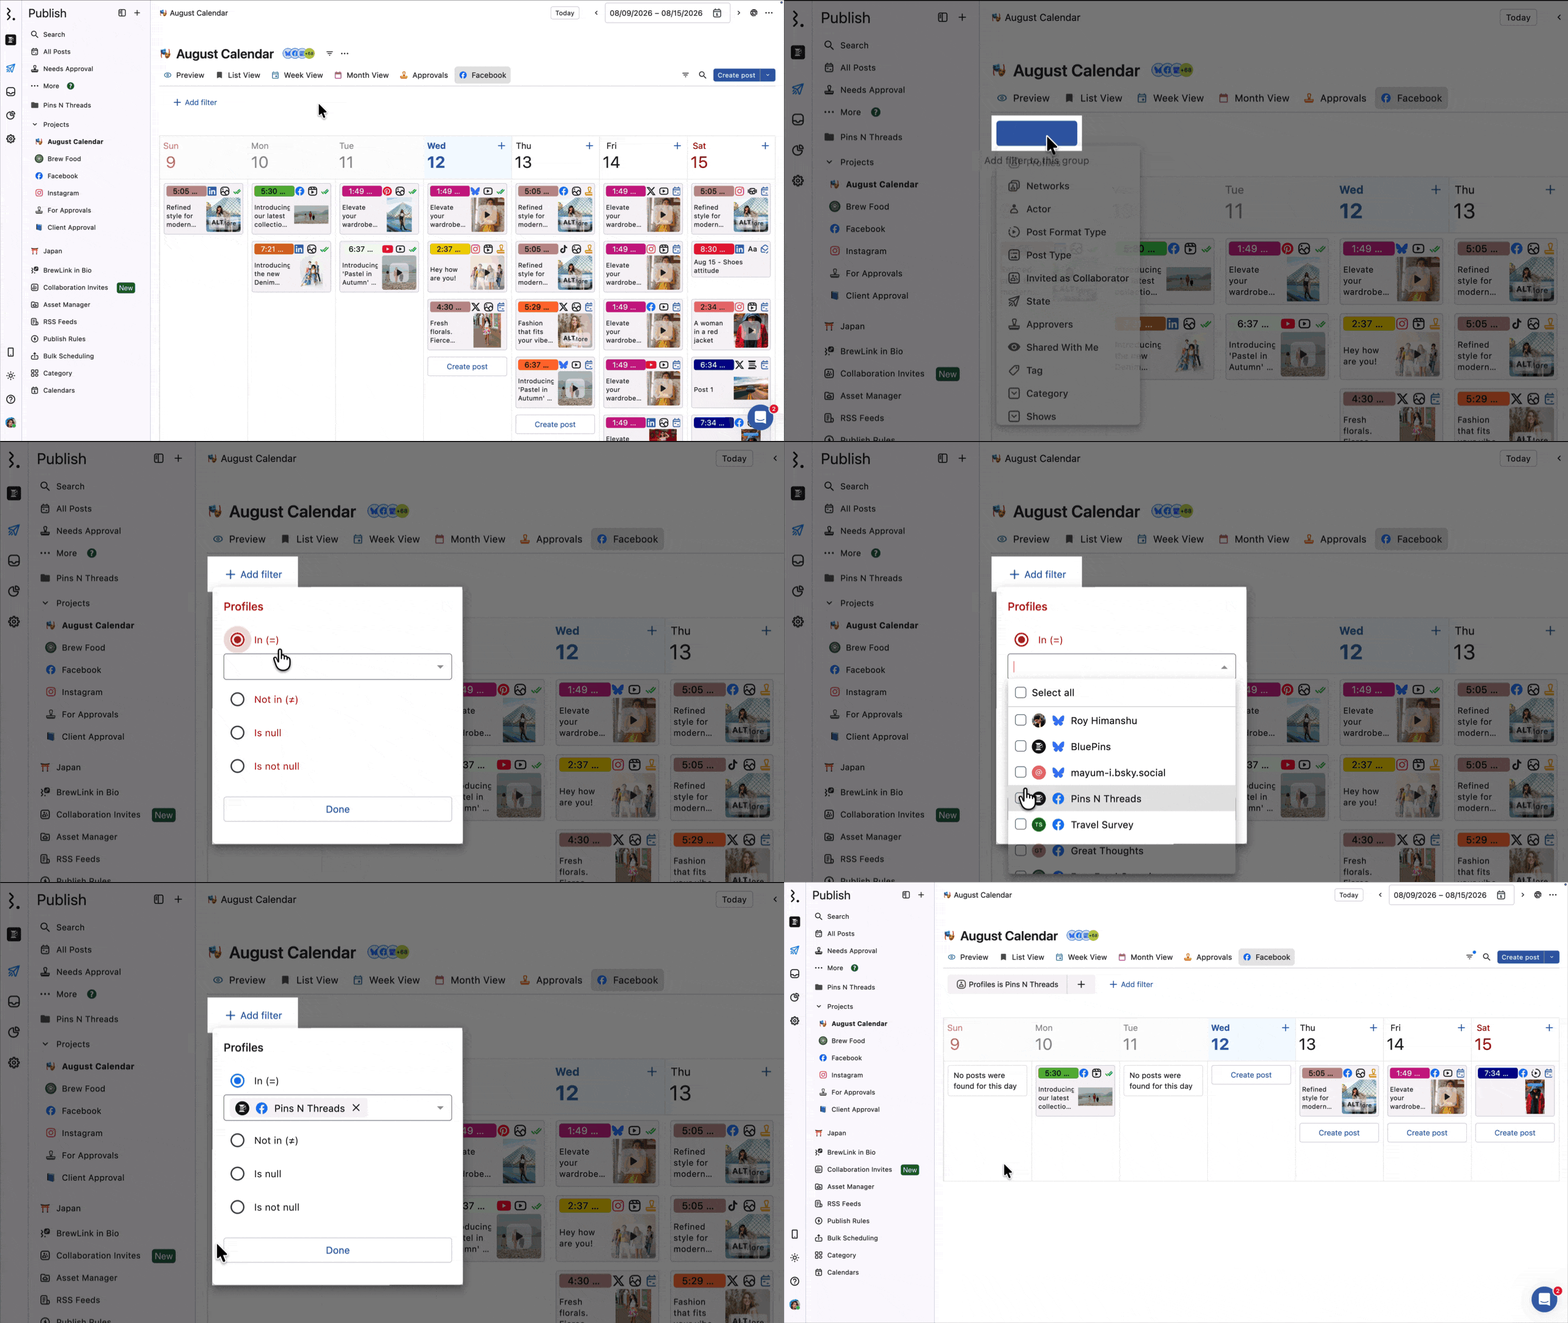
Click the icon in the section bar to open the filter bar below it. There you can view the section's current filters, edit them, and click Add filter to apply new ones. To change the view type, use the dropdown to the right of the section bar. The filter bar isn’t available for Updates sections.
Report Sections
Add a Report section to build a report alongside your content calendar in the same project, so planning and reporting live in one place.
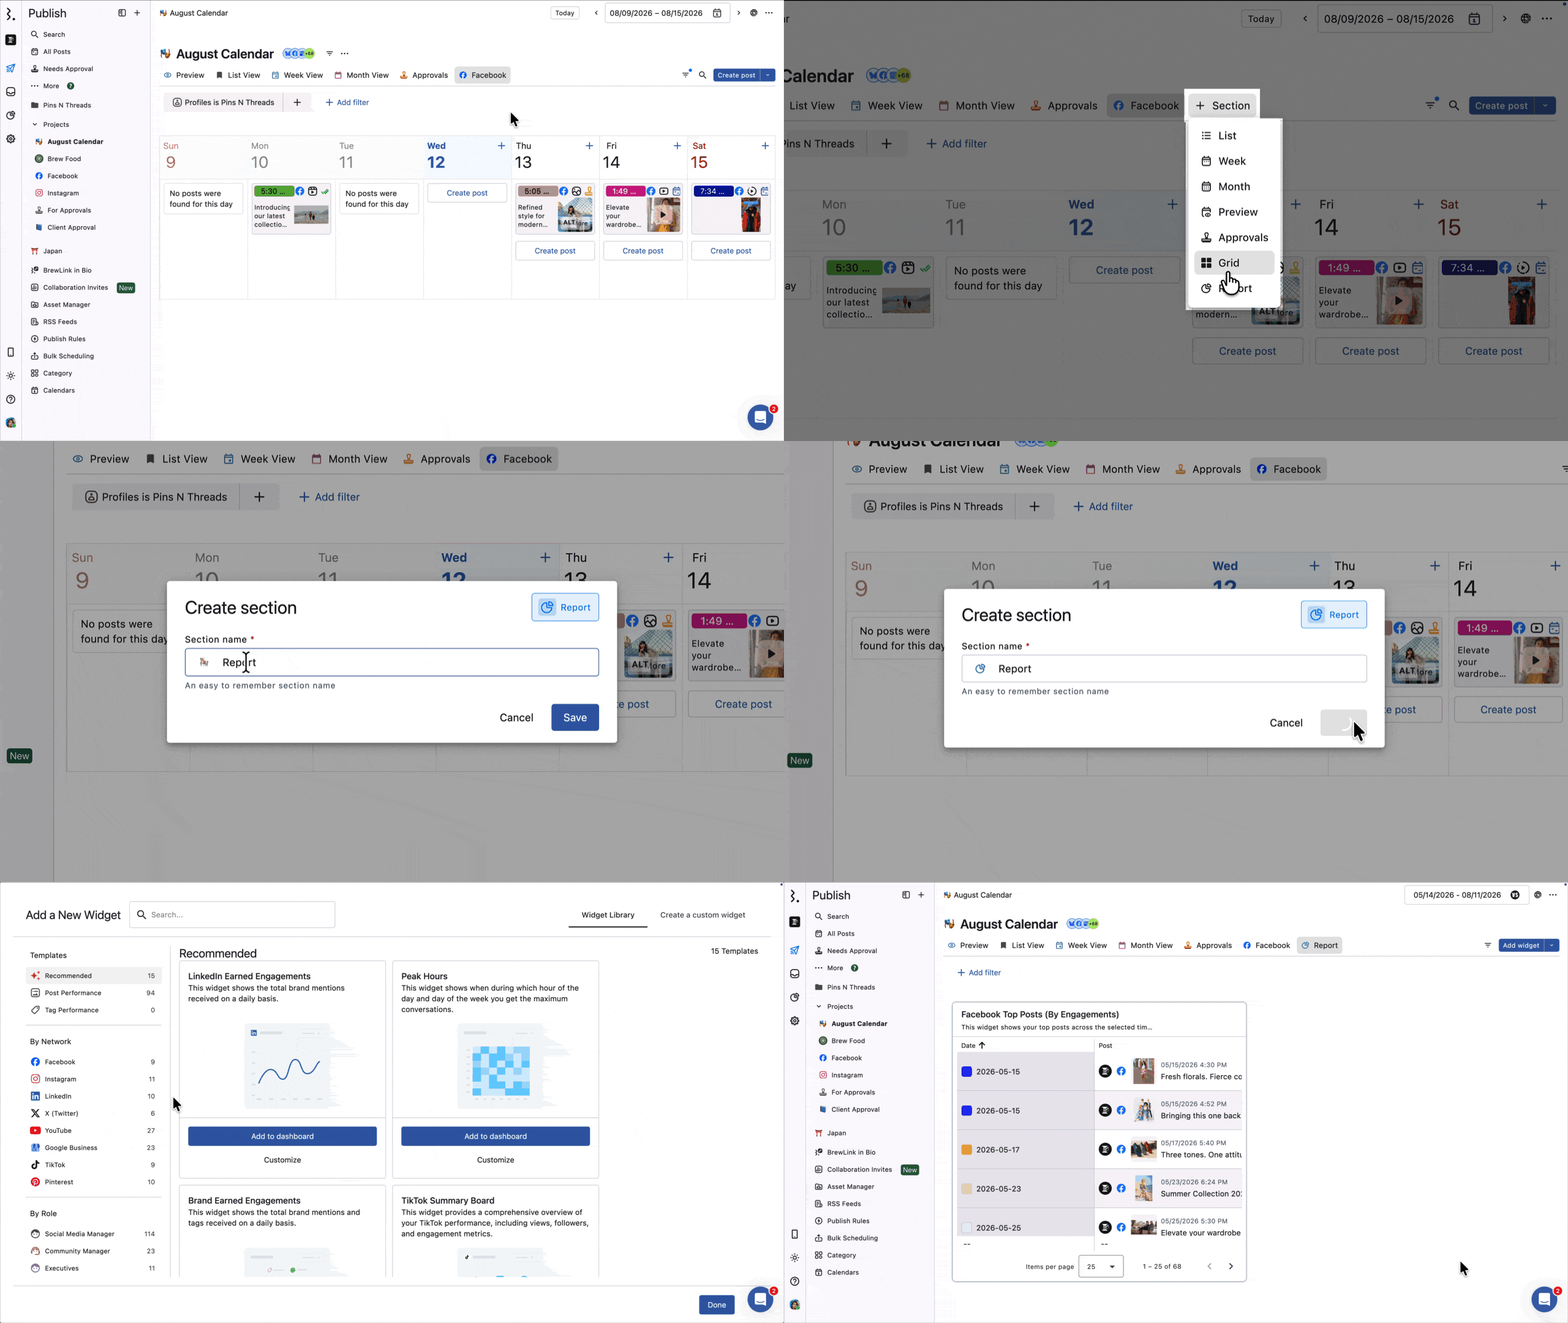
You can build the report from scratch or choose from one of the ready-made templates. You can also reuse part of a report you've already created in Statusbrew Reports by bringing a section or a single widget into the project's Report section. The filter bar isn't available for Updates sections.
Updates
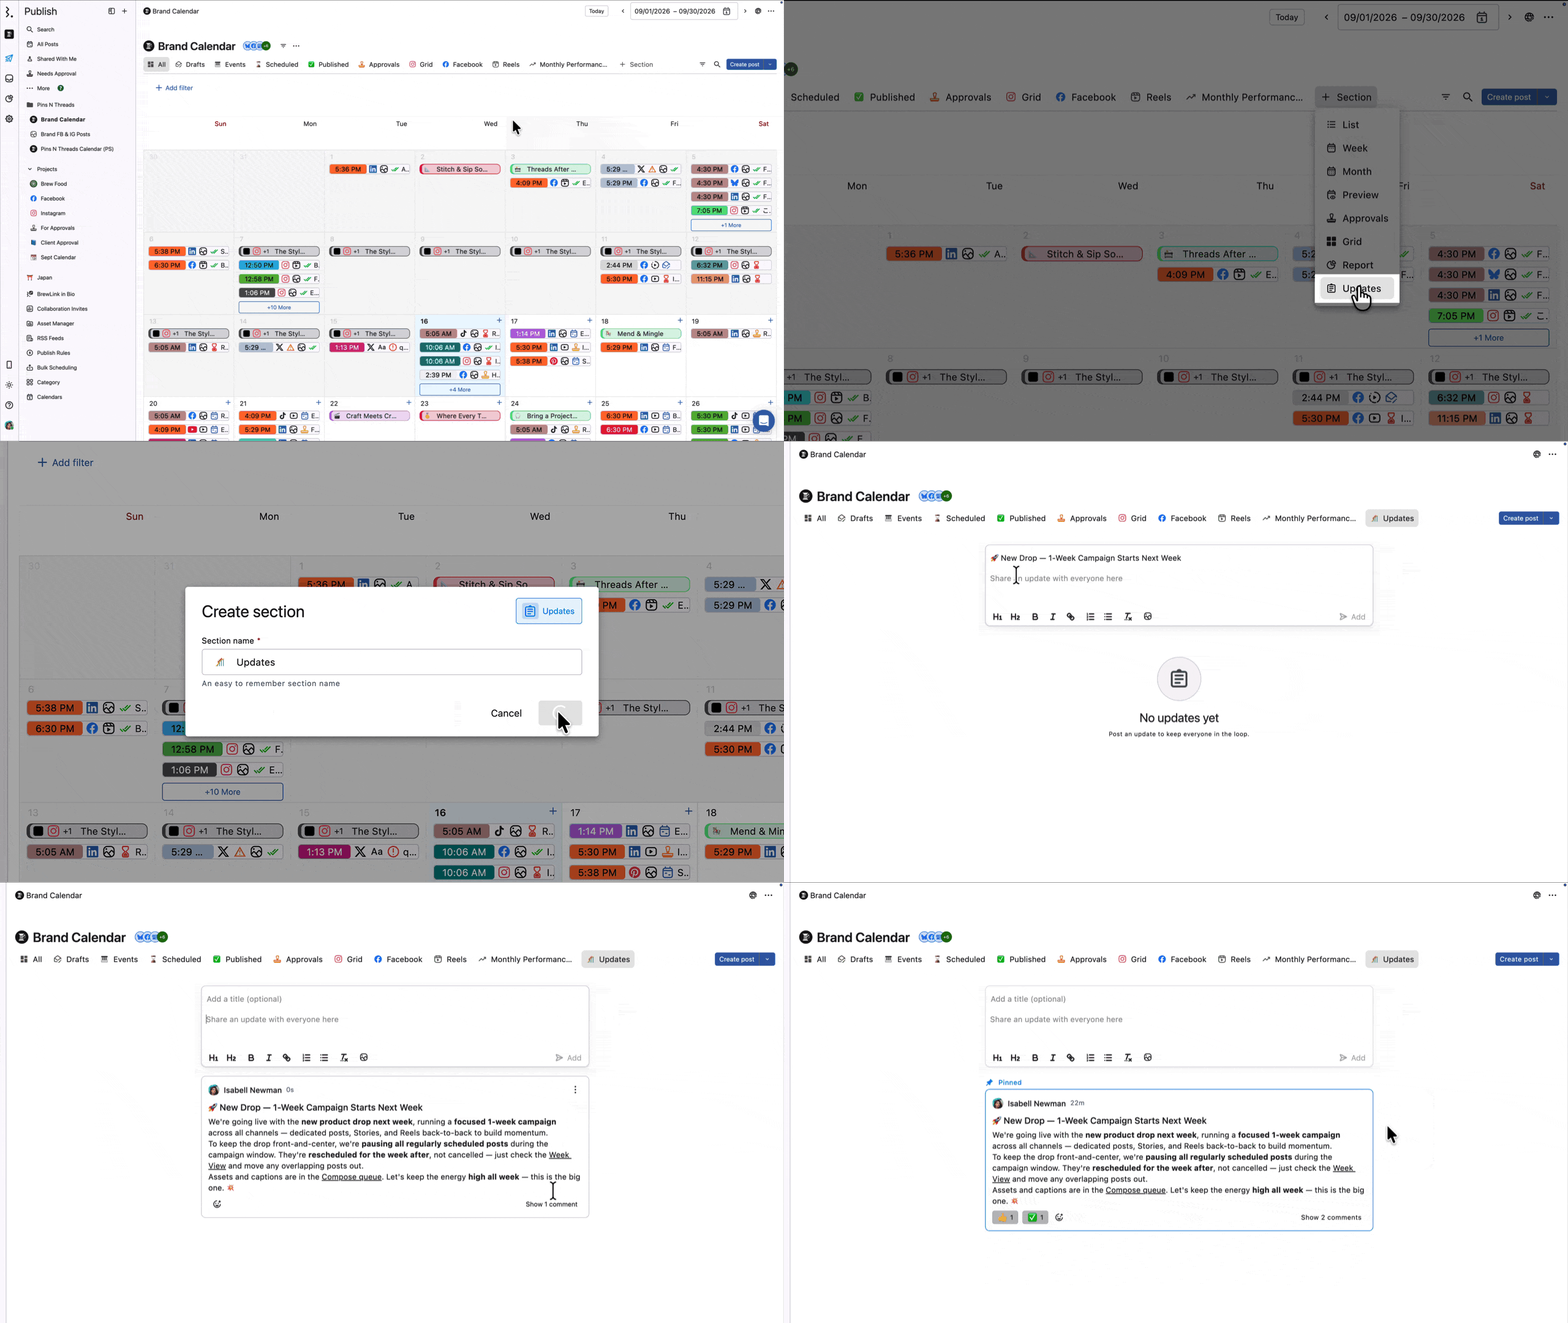
An Updates section is where your team posts updates to each other within the project. It holds no posts, no events, and no calendar. Use it for campaign notes, status updates, or a heads-up on why a post was moved. A project can have only one Updates section.
What can you do in an Update section?
Post an update: Click the Share an update with everyone here box to open the composer. Add a Title (optional), write the body, and click Add. Format the body with H1, H2, Bold, Italic, link, numbered list, bulleted list, and clear formatting.
Attach media: Click image icon to add an image to your update.
Link a post: Paste the URL of a Statusbrew post into your update. Statusbrew turns it into a link that shows the post's internal title, so the discussion about that post stays in one place instead of being spread across individual post comment threads.
Mention a teammate: Type @ in an update or a comment to pull the right person into the discussion.
Comment: Click Add a comment to reply. Once an update has comments, they collapse behind a Show n comment toggle.
React: Click the emoji icon to react to an update, or to a comment on one.
Comment with an image: Click the image icon in the comment box to attach an image, so you can suggest a visual or share a reference instead of describing it. Anyone reading the comment can download it. Recipients on a shared link can do this too.
Share a single update: Hover the update, click More (three dots) and select Share update. The link is copied to your clipboard. Opening it takes the person straight to that update in its own view, with its comments, rather than to the section. They need access to the project first, otherwise the link lands them on the space picker with the message You dont have sufficient permission to make this request.
Pin an update: Hover the update, click More (three dots), and select Pin update. It moves to the top of the feed under a Pinned label and stays above newer updates. The same menu reads Unpin update once it is pinned.
Edit or delete an update: Same More (three dots) menu, then Edit update or Delete.
Updates sections have no filter bar, no date range, no Duplicate, and no CSV or PDF export.
Viewers can see this section but cannot contribute. Add someone as a recipient and they can. Learn more about shared links.
Assets
Add an Assets section to browse your Asset Manager library inside the project, so the media and captions your team publishes from sit next to the calendar they're planned on. You can add more than one, each pointing at a different folder, so a project can surface several asset sets side by side.
What you can do in an Assets section?
Pick the folder: Click Folder to open Choose folder, then drill in with the chevrons and click Choose [folder name]. You can pick a folder at any depth. Leave it on All assets for the whole library.
Choose the layout: Folders and assets browses folder by folder, the same as Asset Manager. All assets, flat puts every asset in that folder and its subfolders into one grid.
Open a folder: Double-click it. Use the breadcrumb at the top to go back up.
Add assets: Click Add asset to add one, or the arrow beside it for Bulk upload.
Filter: Click Add filter to narrow what the section shows. You can filter by Post Type (Status, Photo, Gif, Link, Retweeted Tweet, Audio, Video, Carousel, Document, Poll, Reels), Asset Source (upload, Canva, AI, post import, shared link), Folder, Users, or Tag. Each filter takes In, Not in, Is null, or Is not null.
Sort: Use the two dropdowns on the right. Sort by Name, Creation date, File size, Usage, or Created by, then pick the direction.
Open an asset: Click it to open the detail panel, which shows who created it and when, a preview, and its Tags. Click Add tags to tag it from there.
Follow an asset: Click Add watchers in the detail panel to have people notified about it.
Share a single asset: The detail panel has its own share link, the same idea as sharing one update: the link opens that asset on its own rather than the whole section.
Send it to a post: Click Copy to Compose in the detail panel to drop the asset straight into the composer.
Comment on an asset: The detail panel has All activity and Comments tabs. All activity shows the asset's history, starting with who created it. Comment with @ to mention team members, and attach a link or an image.
Assets sections have no date range and no CSV or PDF export. The section menu offers Edit section, Duplicate section, and Delete section.
Viewers can see this section but cannot contribute. Add someone as a recipient and they can. Learn more about shared links.
How Do I Set A Date Range For A Section?
Set a custom Date Range for each section to control the time period of posts and events shown.
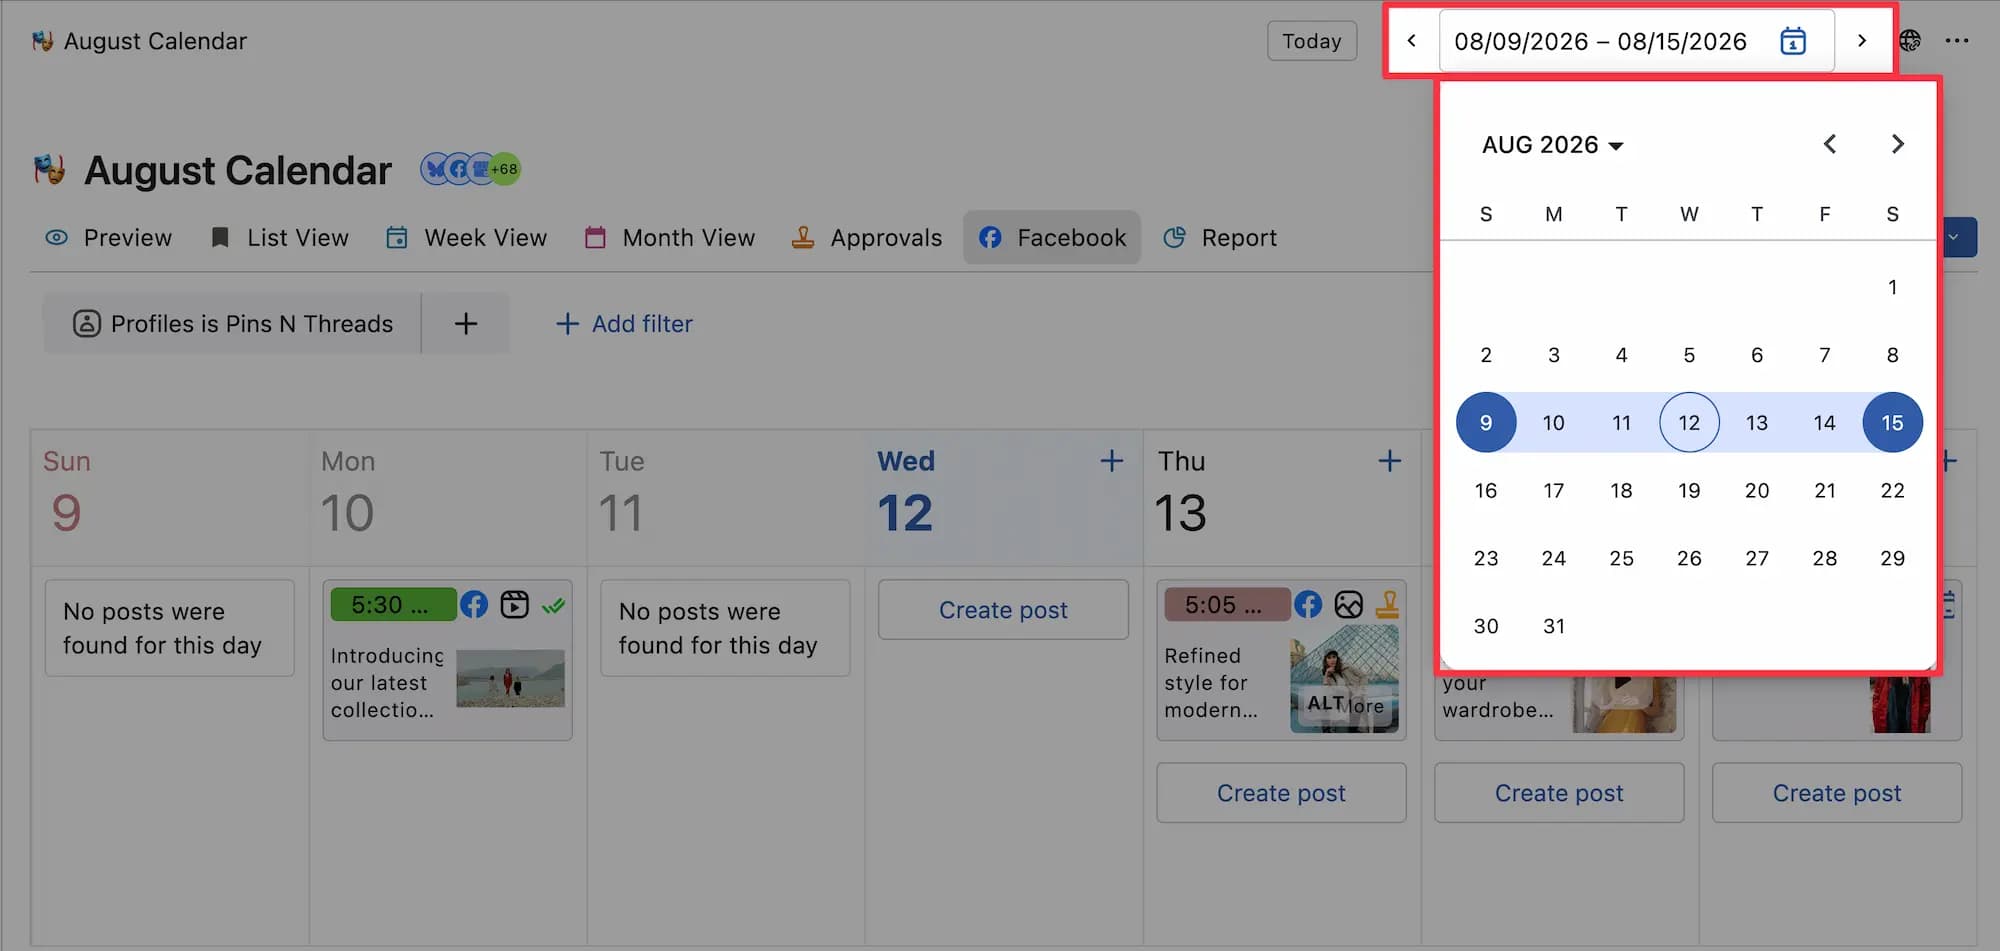
Click the date range selector to open a calendar and pick start and end dates. The selected range is highlighted in blue. Each section remembers its last selected range.
Click Today to set the range from the current day through the next 15 days.
The two arrows beside the selector move you through dates one interval at a time:
Left arrow (Previous): shifts the range backward by one interval (a 15-day window in List view, a week in Week view, a month in Month view).
Right arrow (Next): shifts the range forward by one interval.
The date range selector isn't available for Grid, Updates, or Assets views.
How Do I Share A Project Externally?
Create a shared link for any project to collaborate with people outside your organization, such as clients, freelancers, or external approvers, without giving them access to your Statusbrew account.
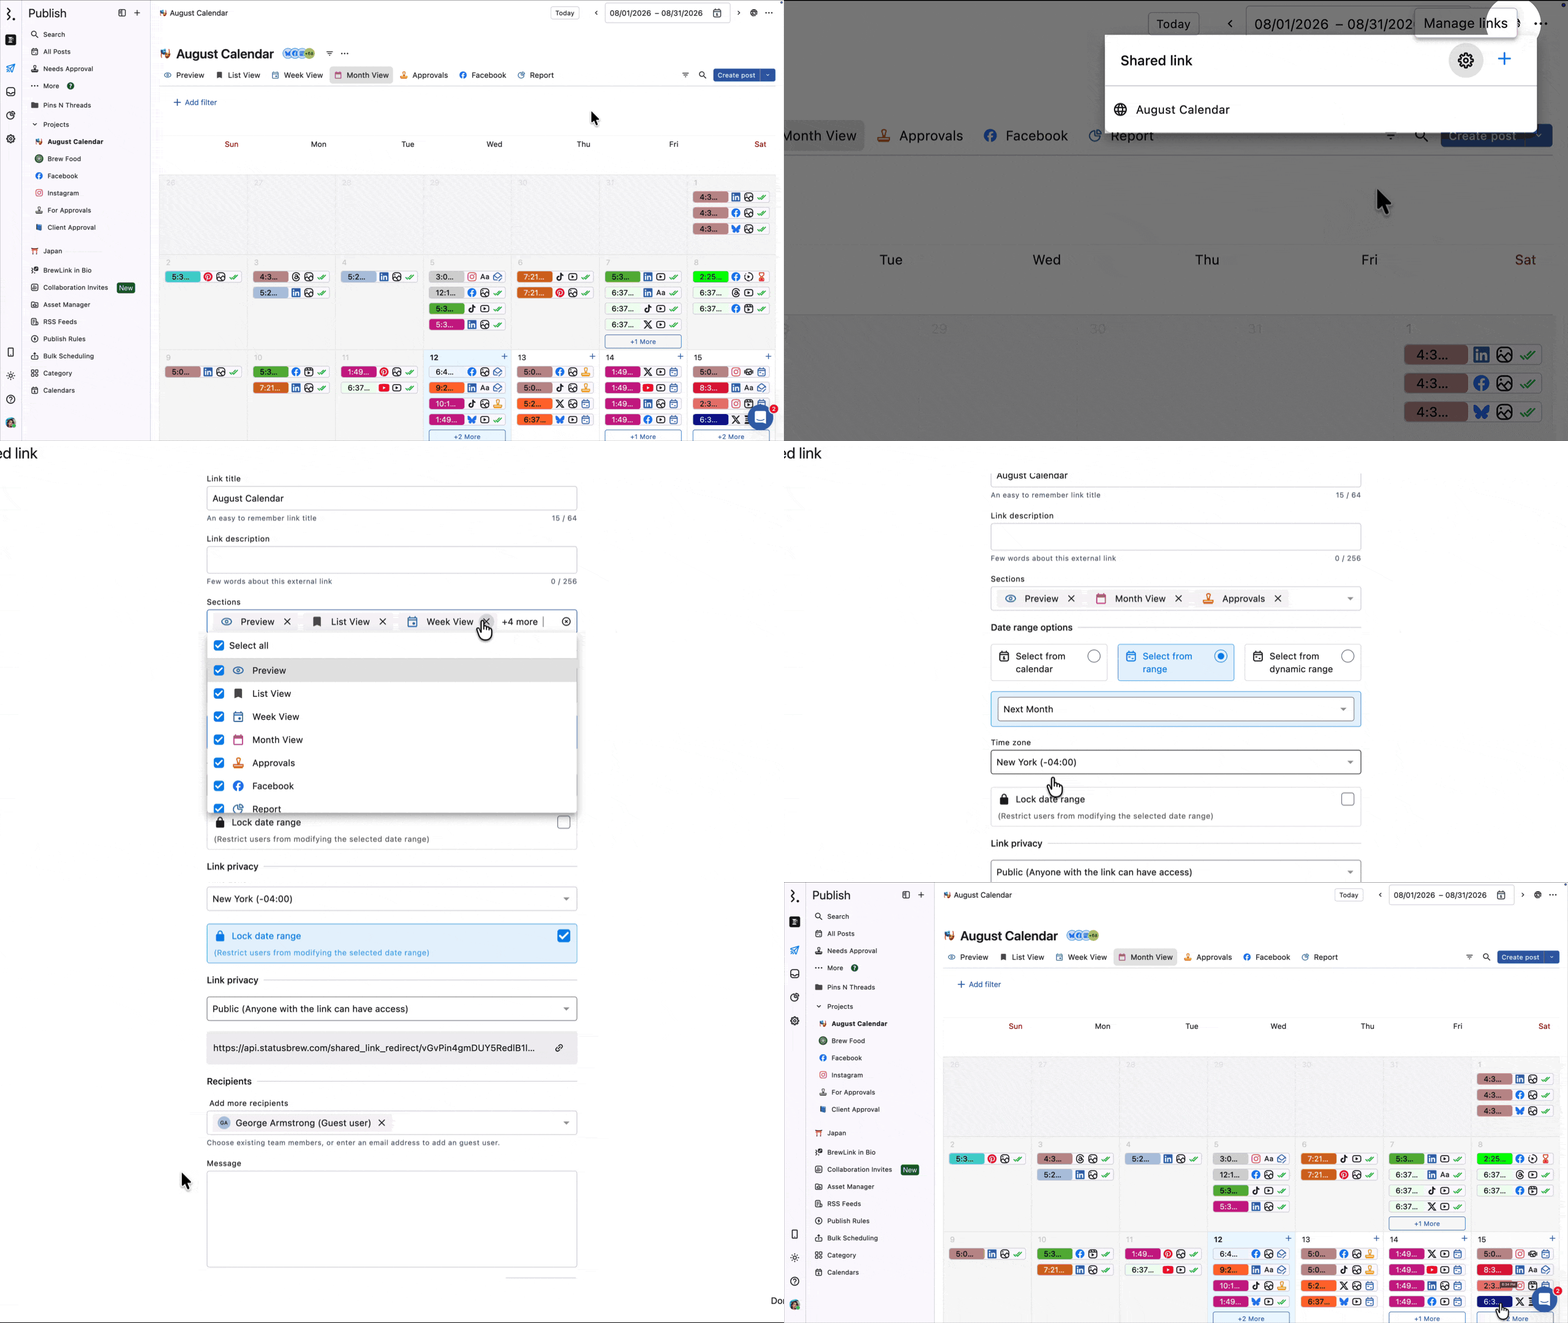
With shared links, you control which sections are visible, set custom date ranges, add recipients, and configure access permissions and expiry for added security.
Create a Shared Link
Go to Publish.
Find the project you want to share.
Click Share link.
Click Create new link. The link is created ("External link created successfully. Link is copied to clipboard and ready to share.") and appears in the Shared link dialog, named after the project by default.
Configure a Shared Link
Hover over the right side of the link in the Shared link dialog and click More options, then select Edit. The Edit shared link window opens.
Change the Link title if you want (up to 64 characters).
Add a Link description if you want (up to 256 characters).
Sections are copied from the project. Select which ones to share.
Date range is copied from the project. Change it using:
Select from calendar: click the icon and pick a range.
Select from range: predefined ranges such as Last 7 days, Last 30 days, Next 7 days, Next 30 days, Last week, Next week, Last month, Next month.
Select from dynamic range: a slider that sets a relative window around today. For example, -10 to +30 shows 10 days back and 30 days ahead; -90 to +90 shows 90 days each way.
Select a Time zone. It defaults to your Your Account preference, but you can set a client's time zone here.
To stop viewers from changing the range, select Lock date range. They can still pick dates within the range you set.
Set Link privacy:
Public: anyone with the link can view it. No sign-in or invite needed.
Invite Only: only invited people can view it. With this on, even you can't view it until you add yourself.
Add recipients (Invite Only): enter email addresses separated by commas, add an optional message, and click Send invites. Recipients appear under Recipients, where you can Resend or Revoke access.
Set link expiry: toggle it on, then pick a date in Link expires on. Leave the toggle off if you don't want it to expire (we recommend setting one). You can't pick a past date. After expiry, the link stops working, but the project stays available to you and your team.
Click Done.Project Best Practices
Project Best Practices
Some useful project setups, based on real use cases:
Network-based project
Create a separate project for each platform (Facebook, Instagram, LinkedIn, and so on). Within each, add sections to group content types like image posts, video posts, text posts, carousels, and stories.
Brand calendar project
Manage your whole workflow across planning, approval, and publishing in one project. Add sections like Ideas, Scheduled Posts, Waiting for Approval, Approved by Client, Rejected by Client, and Published Posts, so you can see what's in the pipeline, what's done, and what's pending approval. Especially useful for agencies and client-service teams that need a record of approvals and changes.
Content management project
Organize and track content across your publishing stages, with each section powered by a specific filter:
Scheduled Posts: State > In(=) > Scheduled. Shows every post scheduled to publish.
Need My Opinion: Shared With Me > Is(=) > True. Shows posts shared with you for feedback.
In Progress: State > In(=) > In Draft, Waiting for Approval.
FAQs
Can I Use A List View Instead Of A Calendar To Plan And Dump Content Ideas?
Yes. Create a dedicated project for idea dumping and set a section to List view. Go to Publish, create a new project, name it, select your data sources, and switch to the List section. To capture an idea without a publish date, save it as a draft or create a calendar event. Events are planning-only entries; they don't publish to social networks, so they're ideal for brainstorming, content themes, and campaign ideas.
Why Do Events Disappear After I Add Them To A Project?
Check the section type and its event calendar. A section can show Posts, Events, or Posts & Events. If it's set to Posts only, events won't show. Edit the section, switch it to Events or Posts & Events, select the correct event calendar, and save.
How Do I Share A Calendar Link For Events With A Specific Tag?
Create a shared calendar link from All Posts and filter it by tag before sharing. Go to Publish > All Posts, create or open the shared calendar link, add a Tag filter in its settings, save, and share. The link then shows only items matching that tag.
Why Can't I Play Or Hear Audio For Some Published Videos In The Calendar Preview?
While a video post is still a draft or scheduled, Statusbrew shows the uploaded media in the preview because it's still stored in Statusbrew. After publishing, the preview relies on the data the social network's API returns, which varies by platform. This doesn't mean the video was published without audio or that the media changed.
Why Do Facebook Reels Or Videos Show An Image Icon In The Calendar?
When you filter the calendar by Facebook Reels or Videos, some posts may still show an image icon on the post card. This happens because Meta's APIs sometimes return only a thumbnail for published content synced back into Statusbrew, even though the post type is identified correctly. To see the live post, click the external/open icon and view it on Facebook.
What Is The Updates Section In A Project?
It's where your team posts updates to each other within the project. Add a section, set its view type to Updates, and anyone in your organization with project access can post, comment, react, and pin. It holds no posts or events and has no calendar.
Can I Link A Post To A Team Update?
Yes. Copy the post's URL from Statusbrew and paste it into your update. It resolves into a link showing the post's internal title. Combine it with an @ mention to pull the right person into the discussion about that post.
Can I Add More Than One Updates Section To A Project?
No. A project can have only one Updates section. If you need separate update feeds, for example, one per client, set up a separate project for each and add an Updates section to each one.
Can External Viewers See Team Updates?
Yes, if the shared link includes the Updates section and they are added as a recipient. Recipients can do everything your own team can do there: post updates, comment, attach an image, react and pin. Viewers who are not recipients can read updates but not contribute. Uncheck the Updates section in Edit shared link if you do not want it shown at all.
Can I Filter An Updates Section Or Set A Date Range?
No. Updates aren't tied to dates or post states, so the filter bar and date range selector don't appear in an Updates section.
Can I Export An Updates Section To CSV Or PDF?
No. Export CSV and Export PDF are available for List, Week, Month, Preview, and Approvals sections, not for Updates or Grid.
How Do I Send Someone A Link To One Update?
Hover the update, click More (three dots) and select Share update. Statusbrew copies a link to that update to your clipboard. Opening it takes the person straight to that update in a focused view with its comments, not just to the Updates section.
Make sure they already have access to the project. Someone who is not a member of the space, or who has not been added to the project, lands on the space picker instead and sees You dont have sufficient permission to make this request.
Can I Attach An Image To A Comment?
Yes. Click the image icon in the comment box. Use it to suggest a visual or share a reference rather than describing it, and anyone reading the comment can download the image. Recipients on a shared link can attach images to their comments as well.
How Do I Highlight An Important Update?
Hover the update, click More (three dots), and select Pin update. It moves to the top of the feed under a Pinned label, so it's the first thing anyone opening the section sees.
What Is The Assets Section In A Project?
It's your Asset Manager library, shown inside the project. Add a section, set its view type to Assets, and choose which folder it opens on. Everyone with access to the project browses that folder and everything inside it, so the media and captions sit next to the calendar they're planned on.
Can External Viewers See The Assets Section?
Yes, if the shared link includes it and they are added as a recipient. Recipients can do everything your own team can do in that section: add assets, bulk upload, and comment. Viewers who are not recipients can browse but not contribute. Uncheck the Assets section in Edit shared link if you do not want it shown at all.
Can I Upload Assets From Inside A Project?
Yes. In an Assets section, click Add asset to add one, or the arrow beside it for Bulk upload. Anything you add lands in the folder you're currently browsing, the same as adding it from Asset Manager.
Can I Add More Than One Assets Section To A Project?
Yes. Each Assets section points at one folder with its own layout, so you can add several to surface different asset sets side by side in the same project.
What Is The Report Section In A Project?
The Report section lets you build a custom report within the same project as your content calendar. Add a Report section, name it, click Add widget, and build the report using the available metrics, the same way you create custom reports elsewhere in Statusbrew.
Do I Have To Build A Report Section From Scratch?
No. Build it from scratch, or reuse part of a report you've already built in Statusbrew Reports by bringing a section or a single widget from it into the project's Report section.
Why Do I See "No Widgets Added Yet" In The Report Section?
The Report section exists but has no widgets yet. Click Add widget and select the metrics you want to visualize.
What Kind Of Reports Can I Create In A Project?
You can build any custom report in a project using Statusbrew's 270+ metrics. After adding a Report section, choose your metrics and build reports for post performance, engagement, audience growth, team activity, campaign performance, network-specific performance, and more.