How to see data in a section for a particular time period?
A report can have multiple pages, called sections in Statusbrew, and each section can have filters applied.
There are many types of filters, but in this article, we'll show you how to set a date range for a section to display data for a specific period.
Set a time period for a section
Add a filter to a section
A section is a page within a report. A report often contains multiple sections, each containing widgets that display data visually.
Learn more about adding sections to your reports here .
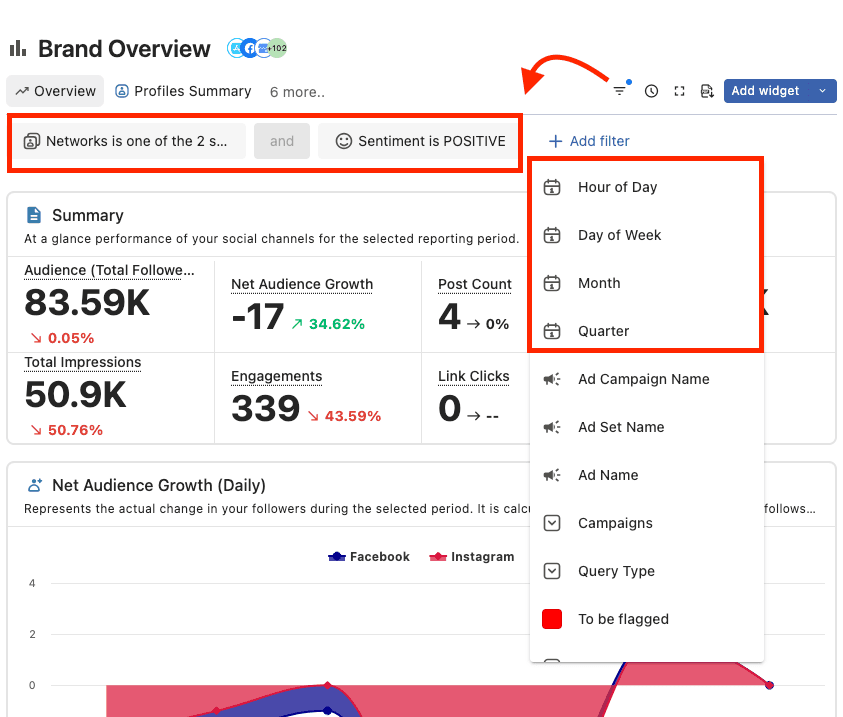
You can add filters to this section to further refine the data displayed in the widget.
To add a filter to a section:
Click the section where you want to add a filter (you can switch between sections by clicking the section tabs at the top).
Select Edit section.
Click Add filter .
A list of filters will be displayed. Select the filter you want, enter the required information, and click Done .
Click Save .
Once you set the filters, the content displayed in each widget will automatically update based on them.
Set a time period for a section
Now that you know how to add a filter to a section, let's set a time period for the section.
There are four time-related filters:
Time Period : Enter a time period between 1 and 24. Show/exclude data for the entered time period.
Day of the week : Select each day of the week from Monday to Sunday using the checkbox (multiple days can be selected). Data corresponding to the selected day of the week will be displayed.
Month : Enter a month from 1 to 12. Show/exclude data for the entered month.
Quarter : Enter the following rules. Data for the entered quarter will be displayed/excluded. (If you enter "1", data from January to March will be displayed.)
1: January to March
2: April to June
3: July to September
4: October to December
Each widget automatically reflects data based on the selected time period.
View and edit section filters
Clicking will display a list of filters applied to the section and allow you to take the following actions:
Click to delete
Click to combine the new filter with an existing filter (group filters)
Click Add Filter to add a new filter (independent of existing filters).
When you're done editing, click Apply.
Now you can access data for the selected period in the filters.
Note: Please keep in mind that the selected time period should be part of total time range selected in the main calendar.