Notification Rules
Notification Rules in Statusbrew let you automate alerts so the right people are informed at the right time, whether it's a new conversation assigned to them, a post being approved, or a channel getting disconnected.
With Notification Rules, you decide which triggers to get notified for, who should be notified, and how they should be notified: via Slack, Microsoft Teams, email, or in-app alerts.
You're not limited to notifying only your Statusbrew workspace users. You can also send notifications to external users who are not part of your workspace. This is useful when you want to keep clients or stakeholders in the loop without onboarding them to your Statusbrew account and paying for extra user seats.
Who Can Do This
Notification Rules are available on all Statusbrew plans. You need to be an Admin or above (Admin, Owner, or Primary Owner) to create or manage them. Once a rule is live, anyone you add as a recipient gets the alerts, even if they didn't build the rule themselves.
Creating Notification Rules

Go to Settings → Notification Rule → Add new rule.
Give a Name to the rule.
Select the relevant Data sources, i.e., the profile(s) or profile group(s) to run the rule on.
Select Trigger type(s), the conditions that will activate the rule.
(Optional) Add Filters to narrow when the rule fires. Click Add condition and set your criteria.
Select Action(s), what happens when a trigger is met.
Click Submit.
You can also schedule your rule to run only during specific time periods.
Under Add hours, choose the day and define the time range during which the rule should be active, for example, Monday from 09:00 to 17:00. You can add multiple days and time blocks by clicking Add times.
You can also specify the time zone so that the rule runs according to your local business hours or regional team workflows.
If no time is specified, the rule runs continuously by default, 24/7.
Adding Filters (Optional)
Filters narrow down when a rule fires. Without a filter, the rule runs on every event that matches your trigger. Add a filter to act only on events that meet extra conditions, for example, only conversations with negative sentiment, or only posts with a specific tag.
Under Filters, click Add condition and choose a condition.
To stack more conditions, click Add condition again. Statusbrew shows the logic between conditions as And or Or, which you can switch to suit your needs. And requires every condition to match; Or requires any one of them to match.
You can filter by: Conversation Type, Message Content, Message has attachments, Message Links Count, Message Mentions Count, Story Mention, Story Reply, Engage Inbox, Sentiment, Language, Post Text, Post Link, Post Tag, Contact Tag, Contact Name, Twitter Verified, Twitter followers, Star Rating, and UTM parameters (Campaign, Source, Medium, Content, and Term).
What Happens After
Once you click Submit, the rule becomes Active and starts watching for its triggers on the profiles you selected. When a trigger fires, Statusbrew sends the alerts through the actions you set. You can pause, edit, or delete the rule at any time from the Notification Rules window.
Actions
You can add one or more actions to a rule. Which actions are available depends on the trigger you select.
Notification Actions | Description |
|---|---|
Slack Alerts | Select the Slack channel where you want to receive notifications. |
Send notification | Select the user(s) or user group(s) who should receive in-app notifications. These also arrive as push notifications in the Statusbrew mobile app. |
Send email | Select the user(s) or user group(s) who should receive notifications on the email they use for their Statusbrew account. |
Send email to external users | Add the emails of external users (people who are not part of your Statusbrew Space) who should receive notifications. |
Microsoft Teams Alerts | Select the Microsoft Teams Connector you've added in Statusbrew to receive notifications. |
Post triggers (Post created, updated, deleted, approved, step approved, rejected, recalled, published, and failed) support all five actions. All other triggers, meaning conversation events, notes, and channel events, support Slack Alerts and Microsoft Teams Alerts only.
If you add an action that doesn't work with your selected trigger, Statusbrew flags it under Actions (for example, "Send email will not work with Conversation assigned trigger"). Remove the incompatible action or change the trigger before saving.
Available Notification Actions For Different Trigger Types
Trigger Type | Available Actions |
|---|---|
Message replied | Slack Alerts, Microsoft Teams Alerts |
Conversation snoozed | Slack Alerts, Microsoft Teams Alerts |
Conversation closed | Slack Alerts, Microsoft Teams Alerts |
Conversation re-opened | Slack Alerts, Microsoft Teams Alerts |
Conversation assigned | Slack Alerts, Microsoft Teams Alerts |
Conversation Added to Inbox | Slack Alerts, Microsoft Teams Alerts |
Post created | Slack Alerts, Send notification, Send email, Send email to external users, Microsoft Teams Alerts |
Post updated | Slack Alerts, Send notification, Send email, Send email to external users, Microsoft Teams Alerts |
Post deleted | Slack Alerts, Send notification, Send email, Send email to external users, Microsoft Teams Alerts |
Post approved | Slack Alerts, Send notification, Send email, Send email to external users, Microsoft Teams Alerts |
Post step approved | Slack Alerts, Send notification, Send email, Send email to external users, Microsoft Teams Alerts |
Post rejected | Slack Alerts, Send notification, Send email, Send email to external users, Microsoft Teams Alerts |
Post recalled | Slack Alerts, Send notification, Send email, Send email to external users, Microsoft Teams Alerts |
Post published | Slack Alerts, Send notification, Send email, Send email to external users, Microsoft Teams Alerts |
Post failed | Slack Alerts, Send notification, Send email, Send email to external users, Microsoft Teams Alerts |
Post Note | Slack Alerts, Microsoft Teams Alerts |
Conversation Note | Slack Alerts, Microsoft Teams Alerts |
Channel added | Slack Alerts, Microsoft Teams Alerts |
Channel removed | Slack Alerts, Microsoft Teams Alerts |
Channel re-authenticated | Slack Alerts, Microsoft Teams Alerts |
Channel disconnected | Slack Alerts, Microsoft Teams Alerts |
Channel disconnect warning | Slack Alerts, Microsoft Teams Alerts |
Managing Notification Rules
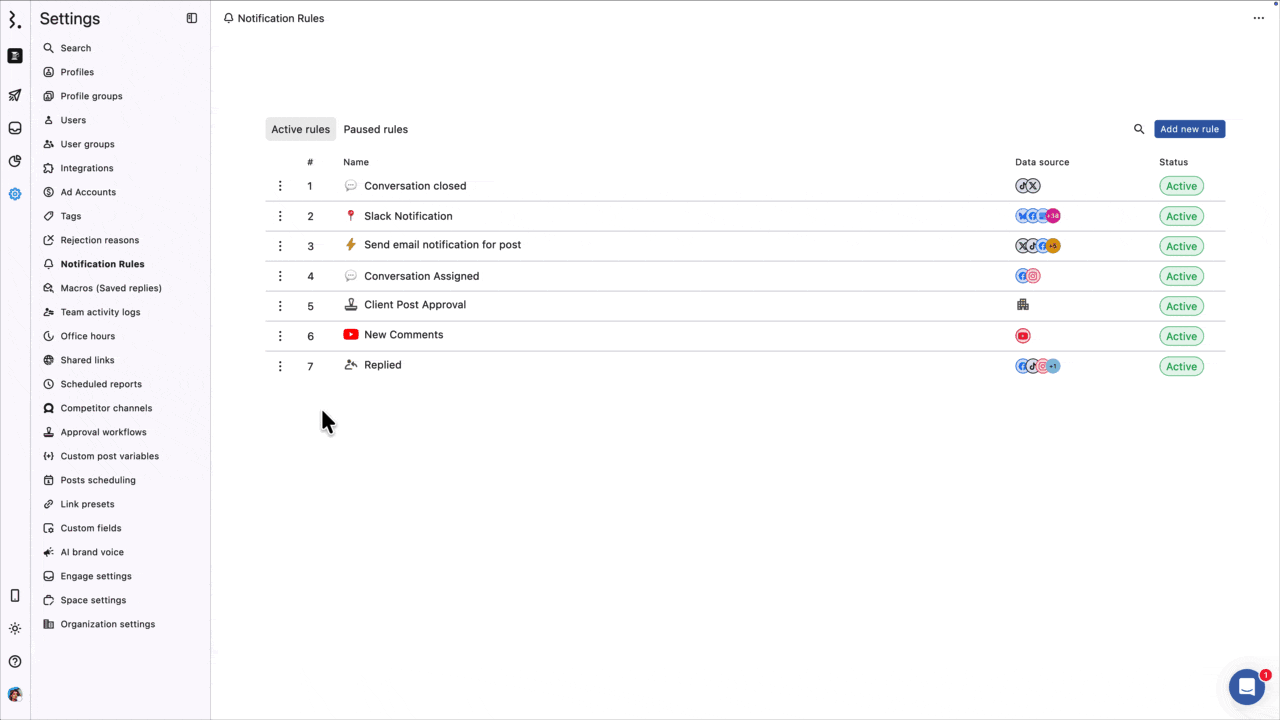
Going to Settings → Notification Rule opens the Notification Rules window, where you can see a list of all the notification rules set up by you and your team.
Rules are classified as:
Active rules: Rules currently running and sending notifications based on their configured triggers.
Paused rules: Rules that are temporarily disabled and are not sending notifications until reactivated.
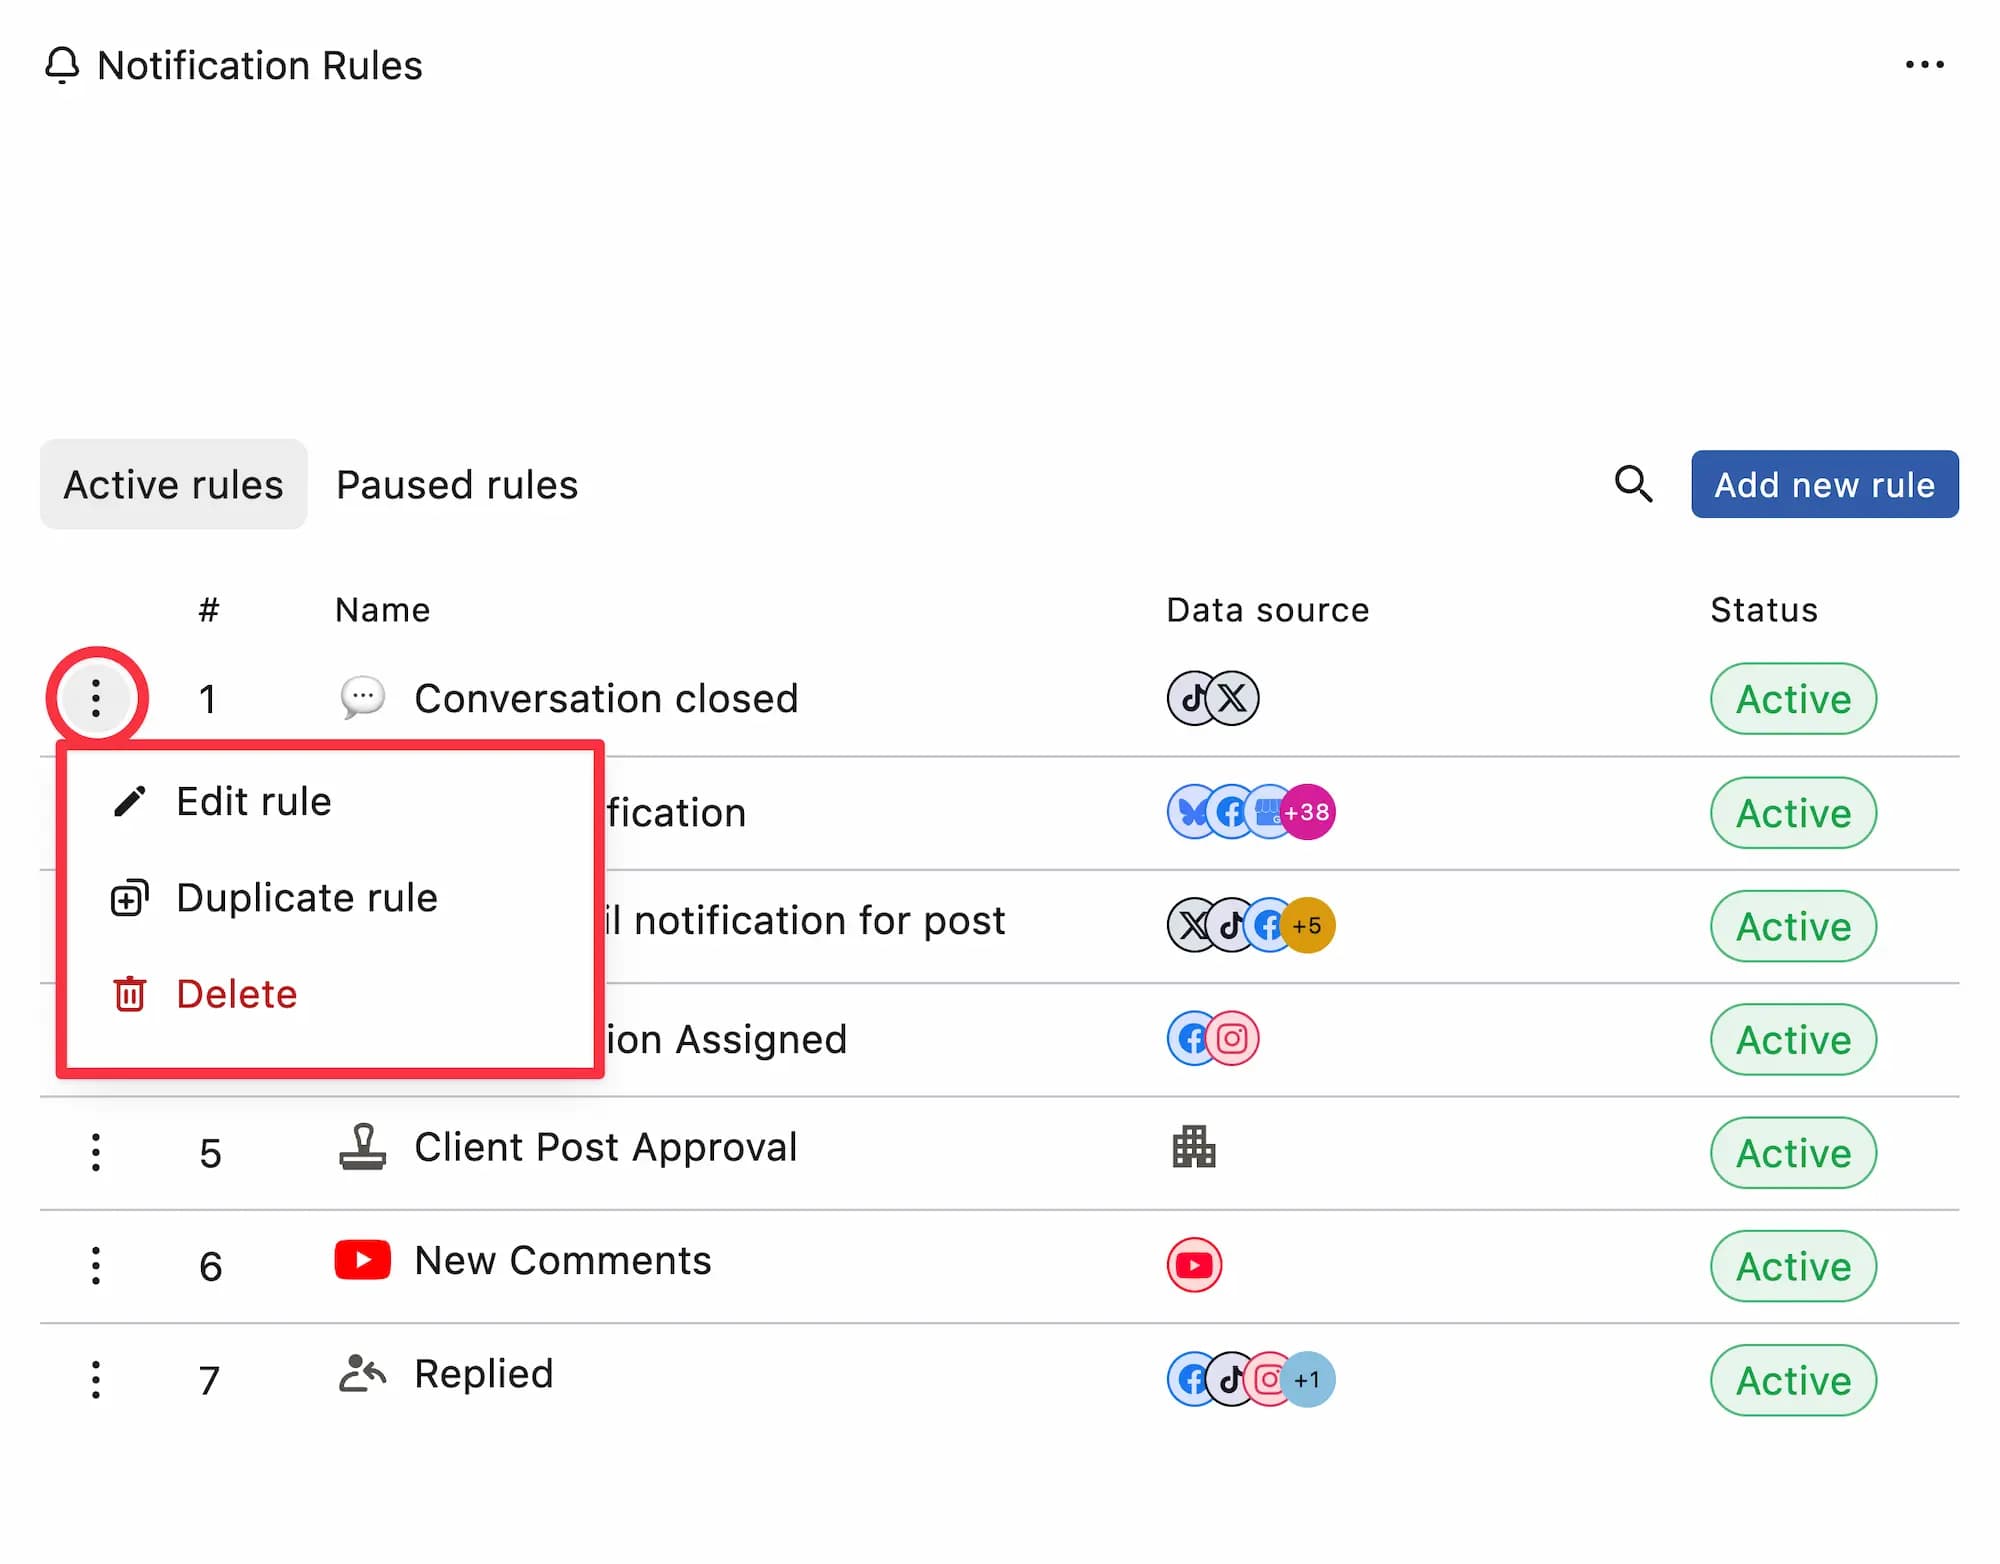
Click (3 dots) next to a rule to edit, duplicate, or delete it:
Clicking Edit rule opens the Edit rule window, where you can update the configuration. Once done, click Submit to save your changes.
Clicking Duplicate rule opens the Duplicate rule window with the same configuration. You can modify it before clicking Submit to save the new rule.
Clicking Delete permanently removes the rule from your list. This action cannot be undone.
If you want to stop a rule temporarily but may need to reactivate it later, use Pause rule. If you're sure you no longer plan to use the rule, use Delete rule.
Pausing A Rule
To pause a rule, go to Settings → Notification Rule. Click (More options) next to the rule you want to pause and select Edit. In the Edit rule window, click the Pause rule button and confirm. Pausing a rule temporarily stops the actions attached to it until you activate it again.
Notification Rules Example
Imagine your marketing head needs to stay informed about every post published on your brand profiles. This rule notifies them whenever a post goes live.
Go to Settings → Notification Rule → Add new rule.
Give the rule a Name (for example, "Notify Marketing Lead About Published Posts").
Select the Data sources (a profile group containing all your brand profiles).
Choose the Trigger type (Post published).
Under Actions, click Add a new action → Send notification → select the Marketing Head user or user group.
Click Submit.
FAQs
Can I Send Notifications To Someone Who Doesn't Have A Statusbrew Account?
Yes. Use the Send email to external users action and add their email address. This keeps clients or stakeholders informed without giving them a Statusbrew login. This action works with post triggers, so you can notify them when a post is published, fails, is approved, and so on.
Will Notifying External Users Cost Me Extra Seats?
No. External users are notified by email only. They don't get a Statusbrew login, so they don't count toward your paid user seats.
Who Receives The Notifications From A Rule?
Only the people and channels you add under Actions. That can be Statusbrew users, user groups, a Slack channel, a Microsoft Teams channel, or external email addresses. Someone doesn't need to have built the rule to receive its alerts.
What's The Difference Between Pausing And Deleting A Rule?
Pausing stops a rule from sending notifications but keeps its full configuration, so you can switch it back on later. Deleting removes the rule permanently and cannot be undone. Pause when you might need it again; delete when you're sure you won't.
Can I Limit A Rule To Business Hours?
Yes. Under Add hours, set the days and time ranges the rule should be active, and set the time zone. Outside those windows, the rule won't send notifications. If you don't set any hours, the rule runs 24/7.
Can I Edit A Rule Without Recreating It?
Yes. Click (More options) next to the rule and select Edit rule. Change the name, data sources, triggers, actions, or schedule, then click Submit. The rule keeps running with your updates.
Will I Get Notifications On My Phone?
Yes. The Send notification action delivers in-app alerts that also arrive as push notifications in the Statusbrew mobile app, so recipients stay notified whether or not they're at their desk.
Do Notification Rules Apply To All My Social Profiles?
A rule only runs on the Data sources you select, which can be individual profiles or profile groups. To cover every profile, add them all or select a profile group that contains them.
Why Am I Getting Slack Notifications From Statusbrew?
Slack notifications can come from different places in Statusbrew. First, check Settings → Notification Rule to see if a Notification Rule is sending Slack Alerts.
If the alert is related to post activity, such as a post created, approved, rejected, published, failed, or recalled, also check Publish Rules. Slack must also be connected to Statusbrew before Slack channels can be selected for alerts.
Why Is My Notification Rule Not Working?
Check that the rule is Active and not paused. Also, make sure the correct profile or profile group is selected under Data sources, the selected trigger matches the event you expect, and the rule is created in the right Space.
If you added filters, check that they are not too narrow. If multiple filters are joined with And, all conditions must match. If you added business hours, confirm that the rule is active for the current day, time, and time zone.
For Slack or Microsoft Teams alerts, make sure the connector is still connected, and the right channel is selected.
Why Did My Rule Not Trigger After I Added Filters?
Filters narrow down when a rule should run. If you add multiple conditions with And, every condition must match for the rule to trigger.
If the rule should trigger when any one condition matches, switch the logic to Or. For example, use Or if you want the rule to trigger for messages with either negative sentiment or a specific keyword.
Can I Send Email Notifications For Conversation Events?
No. Email actions work only with post triggers.
Conversation events, notes, and channel events currently support only Slack Alerts and Microsoft Teams Alerts. For example, if you want to be notified when a conversation is assigned, closed, snoozed, or reopened, choose Slack or Microsoft Teams as the action.
Why Can’t I Select Email As An Action For My Trigger?
Email is not available for every trigger. Post triggers support email and external email actions, but conversation, note, and channel triggers support only Slack Alerts and Microsoft Teams Alerts.
A simple rule is: Post triggers support all notification actions. Conversation, note, and channel triggers support Slack and Microsoft Teams only.
Why Are My Slack Or Microsoft Teams Channels Not Showing?
Make sure Slack or Microsoft Teams is connected to Statusbrew first. If the integration or connector is missing, disconnected, or removed, the channel may not appear while setting up the rule.
Reconnect the integration or ask an Admin to check the connector setup, then try creating or editing the rule again.
Can I Notify A Team When A Channel Gets Disconnected?
Yes. Use channel-related triggers such as Channel disconnected or Channel disconnect warning, then select Slack Alerts or Microsoft Teams Alerts as the action.
This is useful when you want admins or account owners to know that a social profile needs attention.
Can I Create A Rule For Only Negative Conversations?
Yes. Create a Notification Rule with the relevant conversation trigger, then add a filter for Sentiment = Negative.
Since conversation triggers only support Slack and Microsoft Teams, choose one of those channels to receive the alert.