Connecting Ad Accounts With Statusbrew
Manage your ad campaigns across Meta (Facebook & Instagram), LinkedIn & TikTok, and compare organic vs paid performance from one place.
Ad accounts don't count against your profile limit. You can boost posts for Instagram and Facebook only via Statusbrew.
Connecting your Ad account to Statusbrew helps you with:
Boosting posts
Managing Ad comments
Creating a paid performance report
Prerequistics
Before you can connect your ad accounts to Statusbrew, you need an ad account that is connected to your Facebook Page or LinkedIn Page. If you need to create an ad account, see the following:
Add an ad account to your business portfolio in Business Manager
Create an ad account in Campaign Manager as a new advertiser
Ensure that the Facebook Page or LinkedIn Page you want to promote is connected to Statusbrew. For a guide on how to connect them, see below:
Make sure you have Admin permissions for the Ad Account you want to connect. If you’re working at an agency, ensure that the client or brand you’re managing grants you Admin permissions for their Facebook Page or LinkedIn Page so you can successfully connect the Ad Account to Statusbrew.
To connect your TikTok Ads account to Statusbrew, you must be an Admin in the TikTok Business Center. Click here to view and request user permissions.
How To Add A Facebook/Instagram Ad Account To Statusbrew?
Once you have connected your social profiles to Statusbrew, you can add the ad account associated with it to Statusbrew and start promoting your posts.
To manage both Facebook and Instagram ads through Statusbrew, you simply need to connect your Meta ad account. There is no separate process for connecting Facebook or Instagram ad accounts individually. Once your Meta ad account is connected to Statusbrew, you can boost content across both Facebook and Instagram.
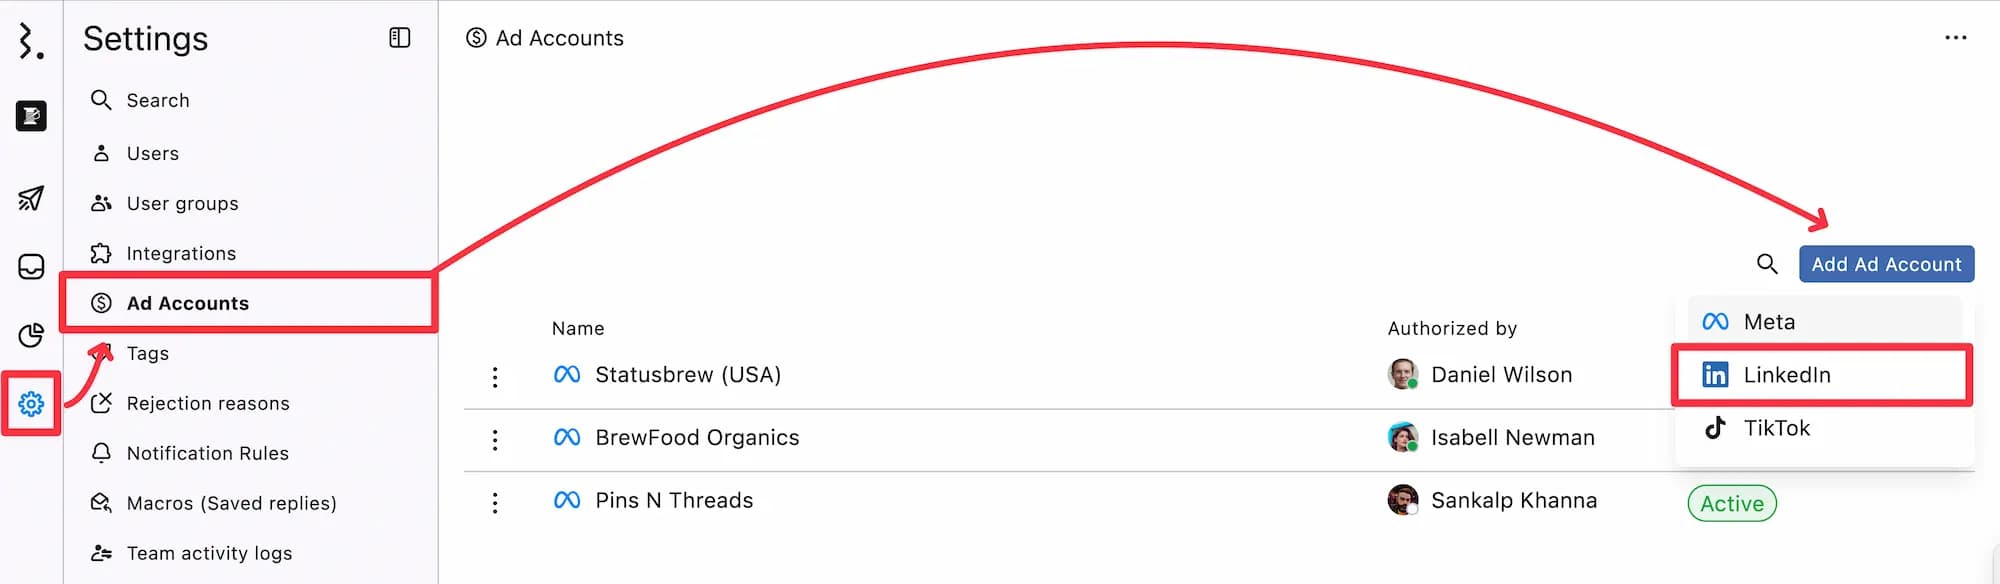
Go to Settings.
Select Ad Accounts.
Select Add Ad Account.
Select Meta. You'll now be redirected to Facebook.
You'll get a login window if you aren't logged in already. Enter your Facebook account credentials (email and password), then select Log In. Authorize Statusbrew to access your Facebook account.
Choose ad accounts that you want to connect and click Submit.
How To Add A LinkedIn Ad Account To Statusbrew?
Go to Settings.
Select Ad Accounts.
Select Add Ad Account.
Select LinkedIn.
You'll now be redirected to LinkedIn. If you aren't logged in already, you'll get a login window. Enter your LinkedIn account credentials (email and password), then select
Log In.
Review the permissions Statusbrew will receive and select Allow.
Check the box next to the ad account you'd like to connect to and click Submit.
Our system pulls up all the comments (including Ad comments) from the post, whether or not all the Ad accounts are connected to our platform.
If user has not connected their respective Ad account (from where the post has been boosted or ad has been set on it) we classify all the comments as regular FB Comment. Once the user connects their Ad Account, we will classify these comments as Ad Comment.
Comments received on the Dynamic Creative Ads are marked as regular FB Comment and not as Ad Comment, even if your Ad account is connected with our platform due to limited API support from Facebook.
How To Add A TikTok Ad Account To Statusbrew?
Connecting your TikTok Ad account to Statusbrew helps you moderate comments on TikTok ads & analyze the performance of your TikTok paid ads.
Go to Settings.
Select Ad Accounts.
Select Add Ad Account.
Select TikTok. You'll now be redirected to TikTok.
You'll get a login window. Authorize Statusbrew to access your TikTok account.
Choose TikTok ad account that you want to connect and click Submit.
How To Remove An Ad Account From Statusbrew?
Go to Settings.
Select Ad Accounts.
Click (More) beside the ad account you want to remove.
Select Remove from the drop-down menu.
Confirm your action.
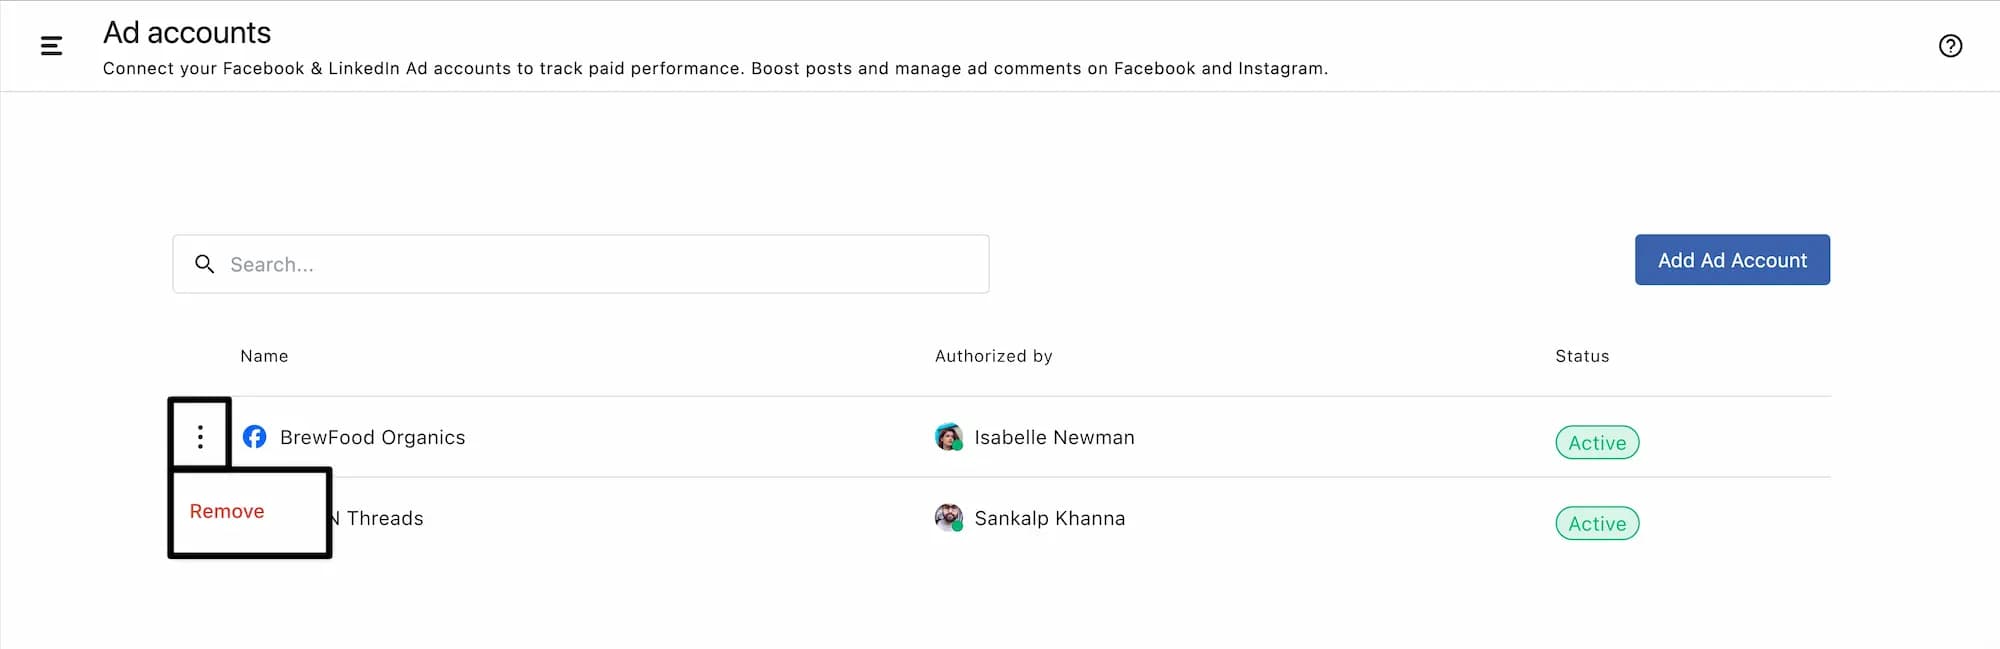
Removing an ad account from Statusbrew will delete all of its campaigns from Statusbrew. However, the campaigns will continue to run natively. This action is permanent and cannot be reversed.
Manage User Access For Ad Accounts
Primary Owners, Owners, and Admins can provide access to other user(s)/user group(s) to create ads and boost posts in Compose & Planner.
To provide users access:
Go to Settings.
Select Profiles.
Click (More) beside the profile you want to set permissions for.
Select Edit.
Click Add permissions.
Select the desired permission you would like to set.
Create Post (needs approval): Allows users to create ads but does not allow them to publish or boost without approval. Ads must be reviewed and approved by the approval.
Full Publishing: Grants users full access to create, schedule, and publish ads directly without requiring approval. This includes boosting posts and managing ad spend.
Engage Full Access: Grants users full access to view, respond to, moderate, and assign ad comments.
View Conversation: Allows users to view all ad comments without permission to reply, moderate, or take other actions.
In the field next to the selected permission, enter the user(s) and user group(s) to which you want to grant access. You can select from Frequently used options or search for specific user(s) or group(s) using the search bar.
Click Update to apply the changes.
Learn more about Access Permissions.
FAQs
Do I Need To Connect A Separate Instagram Ad Account?
No. Facebook and Instagram use the same Meta ad account. Connect your Meta ad account under Settings > Ad Accounts > Add Ad Account > Meta, and you can boost posts and manage ad comments on both Facebook and Instagram from Statusbrew.
Can I Boost Instagram Posts From Statusbrew?
Yes, but only for Facebook and Instagram. Boosting is not supported for LinkedIn or TikTok from Statusbrew. Connect your Meta ad account and use Compose or Publish to boost posts.
Why Are Ad Comments Showing Up As Regular Facebook Comments?
This happens when the ad account associated with the boosted post is not connected to Statusbrew. Once you connect the correct ad account, Statusbrew reclassifies those comments as Ad comments going forward.
Can I Connect Multiple Ad Accounts?
Yes. You can connect multiple ad accounts across Meta, LinkedIn, and TikTok. Ad accounts do not count against your profile limit.
What Happens To My Campaigns If I Remove An Ad Account From Statusbrew?
Removing an ad account from Statusbrew deletes all its campaign data from Statusbrew only. Your campaigns continue running natively on Facebook, LinkedIn, or TikTok without interruption.
Who Can Connect Or Remove Ad Accounts?
Only Primary Owners, Owners, and Admins can connect to or remove ad accounts. Regular Users cannot access Ad Account settings.
Can I Give A Team Member Access To Boost Posts Without Making Them An Admin?
Yes. Go to Settings > Profiles, find the relevant profile, and assign Full Publishing permission to the user or user group. This lets them create and boost posts directly without approval, without granting them Admin-level access to the whole Space.
Can Regular Users Manage Ad Comments In Engage?
Yes, if they have been granted Engage Full Access permission on the relevant profile. Users with View Conversation permission can view ad comments but cannot reply, hide, or take any other action.
Where Can I See Paid Performance Data For My Ads?
Paid performance data is available in Statusbrew Reports on Premium and Enterprise plans.
The easiest way to check ad stats is to start with the Paid Performance Report template. This report is built for paid reporting and can help you track ad performance, total spend, impressions, and other paid metrics without having to build everything from scratch.
Go to Reports → Create Report → Templates → Paid Performance Report.
After creating the report, you can select the right paid data source or ad account, adjust the date range, remove sections you do not need, and add paid metrics or custom widgets if required.
Statusbrew supports paid metrics for Facebook, Instagram, LinkedIn, and TikTok.
See List of Paid Metrics for the full list.
Why Can’t I See Old Ad Comments In Engage After Connecting My Ad Account?
Statusbrew does not backfill older ad comments after an ad account is connected.
Once the ad account and related social profiles are connected, new comments added to supported ads will automatically sync into Engage from that point forward.
Comments that were already present on the ad before the ad account was connected will not appear in Statusbrew.
The Resync comments option will not help in this case because it works only when an ad comment conversation already exists in Engage. For example, if comments were syncing earlier and newer comments stopped appearing, you can open the conversation and use Resync comments.
But if no ad comment conversation has synced into Engage yet, there is nothing to resync. New ad comments should start appearing only after the ad account connection is active.
Where Can I See Who Connected A Meta Ad Account?
Go to Settings → Ad Accounts.
On this page, check the Authorized by column. It shows the team member who connected or authorized each ad account in Statusbrew.
You can also check the Status column to see whether the ad account is active or needs reauthentication.
Why Are Some TikTok Ad Comments Not Showing In Statusbrew?
TikTok ad comments will appear in Statusbrew as ad comments only after your TikTok ad account is connected.
If the TikTok ad account is not connected, TikTok comments may still appear in Engage, but they will look like regular organic comments. The TikTok Ad Comment label will not be visible because Statusbrew cannot identify them as ad comments without the ad account connection.
Statusbrew also does not backfill older TikTok ad comments. Comments added before the TikTok ad account was connected will not sync as ad comments later.
Once the TikTok ad account is connected, new comments on TikTok ads will start syncing into Statusbrew automatically with the correct ad comment label.