How To Create & Manage Calendars & Events?
Place reminders on the Calendar on a single day or a range of days with Events.
Events are associated with your Space, so all users of a particular Space will be able to see the Events of that Space.
For each Space, a default calendar is created with the same name as the Space. Users can create Events on top of it.
Unlike scheduled posts that go live on social networks, Events help you map out campaigns, brainstorm content themes, and organize ideas before committing to publish schedules.
Think of Events as digital sticky notes or task labels that live directly in your content calendar.
Note: Calendars & Events can only be viewed and created in the Statusbrew web app. Calendars Events is are available in the Standard, Premium & Enterprise plan onwards.
You can create events from the Month, Week, and List views of the Planner. You can't create events from the Preview or Instagram Grid view, but the events already created will be shown in the Preview. Events won't be displayed in the Instagram Grid view.
How To Create An Event?
Go to Publish.
Click Create event.
In the Week & Month view, click (Create post icon) beside the date you want to create an event. Select Create event.
In the List View, hover over the date row to reveal the Create event option.
Add Event title (up to 126 characters).
Select a Start date and End date by clicking (Calendar icon). By default, the current date is selected in both the Start date and End date and All day event is checkmarked. You can choose a Start date and End date to create a multiple-day event. To create a timed event, uncheck the All day event and select the start time of the event. Statusbrew allows you to add start time up to minutes.
Click Create
You can also do the following:
Add Event description (up to 10000 characters).
Add Media. You can drag and drop the media or select a media file from your system by clicking anywhere in the media upload box.
Select networks for which you want to create an event.
Select Calendar. By default, the Calendar of the Space in which the Event is being created is selected.
Select Color.
Add Watchers.
If you are facing an issue with applying a tag to a calendar, make sure that the calendar is not a "Subscribed Calendar". This calendar can not be deleted, edited, or have tags applied. Even if you filter an event by tag, you will see all events, with or without tags, together. This is a known behavior in Statusbrew.
Viewing Events
Once an Event is created, it will be shown across List, Week, and Month views:
List View: The Event appears to be spanning the dates for which it was created. Each day within the event's duration will show the following Event details: Event icon, Icons of social networks for which the Event is created, Event title. All day events appear at the top of posts and timed events appear at their set time.
Week View: The Event is displayed across the days it spans with the following Event details: Event icon, Icons of social networks for which the Event is created, Event title, Event description, Event media.
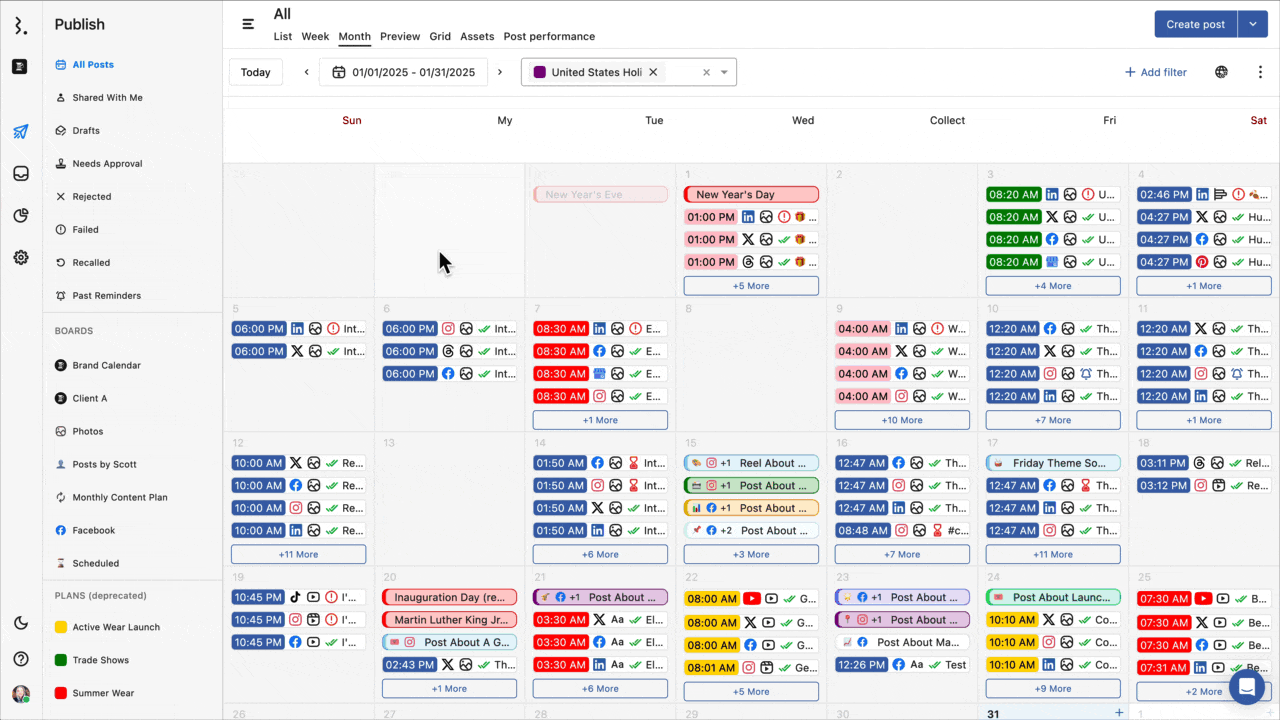
Month View: The Event appears as an individual cell on each day it spans with the following Event details: Event icon, Icons of social networks for which the Event is created, Event title.
Note: If the Event is created for more than one social network, the icon of the first selected social network will appear, followed by (Number of remaining social networks). Hovering over the number will show the icon of the remaining social networks.
Click on the Event to open it in the Event details sidebar.
Rescheduling Events
You can drag and drop events from the Week and Month View to reschedule. To do this:
Go to Publish and open the calendar of the Event.
Select and drag the Event to move it to a new date on the calendar. The Reschedule Event dialog box will open.
Make the required changes in the schedule and click Update.
Managing Events With Event Details Sidebar
Clicking on any Event in the List, Week, Month, or Preview view will open its details in the sidebar. The Event Details Sidebar consists of:
Copy to Compose button: Click on this button will open the event in the Compose window, adding the Event title to the Internal title, the Event description to the Post text, and the Event media to the Post Media.
(Watchers): Hover over the Watchers icon to see Watchers of the event.
(Edit event button): Opens the Edit Event dialog box. Make changes and click Update to save.
(More actions): Clicking on the More actions button will give you 2 options:
(Duplicate event): Selecting this option will open the Create event dialog box will all the Event details added. Make the required changes and/or select Create.
(Delete event): Selecting this option will open a confirmation dialog box. Confirm your action to delete the Event
(Close details (Esc) button): Closes the Event details sidebar.
Event title: Shows the Event title with Page Icon. Hover over the Event title to edit it.
Date: Displays the Event date and time. Clicking on the Event date and time will open the Reschedule event dialog box. Make the required changes and select Update.
Social Networks: Shows added social networks.
Calendar: Displays the calendar associated with the Event. Click on the calendar to change it.
Tags: Shows the added tags of the Event. Hovering over the added tag will display the user who added the tag, along with the time at which the tag was added. Click Add tags to include tags. Select (Remove tag) besides the tag you want to remove.
Event description: Displays the Event description. You can edit the description by clicking on it. The character count will be displayed in the bottom right corner. Click (Save) to save your changes and (Discard) to scrap them.
Event media: Shows the Event media, clicking on which will open the media in full-screen view. Click on the top right corner to close the full screen view.
All activity: Shows the Event's activity log with the date and time of the action.
Comments: Displays comments of the Event in chronological order.
Comment box: Allows team members to communicate and collaborate on the event. Supports mentions, basic formatting ( Bold, Italics, Add links to anchor text, and Add media). Click Add to post comments.
Post it as external: Clicking on the icon will enable it and allow external users to view comments on the event along with internal team members. Click on the icon again to disable it.
How To Import Events In A Calendar?
If you’re importing events from an external link, make sure the link is public and in iCal format. Syncing events from an external URL is a one-time import. If new events are added to your Calendar, you’ll need to import the same calendar URL again to sync the latest events.
You can import events from URLs or files in calendars created within Statusbrew. Here’s how:
Go to Publish.
Select Calendar.
Click beside Create calendar.
Select Add events from URL or Add events from file.
If you select Add events from URL, add the calendar's URL under From URL and select the calendar to which you want to add events. Click Add.
If you select Add events from file, click Select files and upload the file from your system. You can import event information in iCal or VCS (MS Outlook) format. Select the calendar to which you want to add events. Click Add.
What Is A Calendar?
Statusbrew’s Calendar enables you to visualize and manage your social campaigns. A Calendar within a Space displays all your posts, drafts, and Events in one organized view.
Each Space automatically includes a default calendar with the same name as the Space. You can also create additional calendars within the same Space to plan and manage content for different brands, clients, or campaigns separately.
Calendars and Events in Statusbrew are closely connected: each Event is linked to a specific Calendar.
When you create or edit an Event, you’ll have to select which Calendar it belongs to. This ensures your plans, reminders, and content ideas stay organized and easy to find within a Calendar.
How To Create A Calendar?
Go to Publish.
Select Calendar.
Click Create calendar.
Add Name (up to 126 characters).
Add Description (up to 10000 characters).
Click Create.
You can also do the following:
Select Color.
Select a Time zone.

How To Subscribe To A Calendar?
You can subscribe to the following National Holidays calendars to avoid missing a public holiday, stay on top of federal and state-specific celebrations, and plan your content.
Australian Holidays
United States Holidays
Belgium Holidays
German Holidays
Netherlands Holidays
Saudi Arabia Holidays
Malaysian Holidays
Here’s how to subscribe to them:
Go to Publish.
Select Calendar.
Click beside Create calendar.
Select Browse calendars.
Tick the checkbox beside the Holiday calendar you wish to subscribe to.

Viewing Calendars In Planner
Click Calendar in the Publish section from the Statusbrew dashboard. The List view of the Planner will open, showing posts, Events, and drafts from your default Space calendar. To view posts and Events from another calendar, click on the current calendar name and select the calendar you want to display in your Planner.
Managing Calendars
You can view all your created and shared calendars by going to Publish > Calendar. Use the search bar to search for any calendar.
The default calendar of your space and all your created calendars will appear under My calendars with the calendar color, name of the user who created the calendar, and time zone. Note that the Created by column of the default calendar of your space will be empty.
The subscribed National Holidays calendars will appear under Subscribed calendars with the calendar color, name of the user who added the calendar, and time zone.
You can edit calendars under My calendars. Here’s how:
Go to Publish.
Select Calendar.
Under My calendars, click (More) in front of the calendar you want to edit. If you can’t see your calendars under My calendars, select in front of My calendars.
Select Edit.
Make the required changes.
Click Create.

Here’s how you can delete a calendar:
Go to Publish.
Select Calendar.
Under My calendars, click (More) beside the calendar you want to edit.
Select Delete.
You cannot delete the default calendar of your space.
You can choose to unsubscribe from Subscribed calendars. Here’s how:
Go to Publish.
Select Calendar.
Under Subscribed calendars, click (More) beside the calendar you want to unsubscribe from. If you can’t see your subscribed calendars, select in front of Subscribed calendars.
Select Unsubscribe.
Shared Links for Calendars
Earlier, sharing content with your team involved multiple steps, such as adding user seats, sending invites, and setting permissions. Now, with shareable calendars, it’s all in one click. You can share your entire calendar with Events, specific posts, or even single posts without adding and paying for user seats.
Learn more about Shared Links For Calendars.
FAQs
Can I Create An Event For Multiple Days?
Yes, select a Start date and End date when creating the Event.
Where Can I View All My Events?
Events can be viewed and edited in List, Week, Month or Preview views.
Why Can't I Create An Event On A Specific Date?
Make sure you are in the correct view (Week, Month, or List) and the date is within the current calendar range.
How Do I Fix An Event That Appears On The Wrong Dates?
Edit the Event and verify the Start and End dates. Ensure the correct dates are selected and saved.