Onboarding Checklist For Agencies
If you use Statusbrew for multiple clients, we recommend creating a separate Space for each client. This keeps each client’s profiles, content, conversations, and reports separate.
This guide walks you through the setup we recommend for agencies.
Who Can Do This?
Primary Owners and Owners can create Spaces. Owners and Admins can connect social profiles and generate shared links for clients to connect their own profiles.
This setup works on all plans that support multiple profiles. Your plan determines how many profiles you can connect in total.
The Right Structure for a Multi-Client Agency
Statusbrew is built around Spaces (also called Workspaces). Each Space is a completely isolated environment with its own profiles, inboxes, tags, rules, and reports. No data from one Space is visible in another.
For an agency managing multiple clients, the recommended setup is: one Space per client.
This keeps their content, conversations, and data fully separate and lets you assign the right team members to each without giving them access to other clients.
A social profile can only be connected to one Space. If you accidentally connect a client's profile to the wrong Space, you will need to remove it and reconnect it to the correct one.
Step 1: Create a Space for Each Client
When you first sign up for Statusbrew, one Space is created automatically. This can serve as your agency's own holding space. From here, create a separate Space for each client.
Click your Space logo in the left sidebar to open the Space switcher.
Click the + icon in the top right corner of the switcher.
Give the Space a name (e.g., "Client A") and upload a logo if you want.
Click Create.
Repeat for each client. There is no limit to the number of Spaces an account can have.
Step 2: Connect Social Profiles to Each Client Space
Make sure you are switched into the correct client Space before connecting profiles. Each profile you connect will belong to that Space.
To switch Spaces: click your Space logo in the left sidebar, then select the client's Space from the list.

To connect a profile:
Go to Settings > Profiles.
Click Add profile.
Select the network (Facebook, Instagram, Google My Business, etc.).
Follow the on-screen prompts to authorize and connect the profile.
Repeat for each profile that belongs to that client. Then switch to the next client's Space and repeat.
Log out of your personal social media accounts before connecting client profiles to avoid accidentally connecting the wrong account.
If your client prefers to connect social accounts themselves, you can either add them to the Space with admin access or create a shared link and send it to them so they can connect the accounts themselves.
Step 3: Invite Your Team and Assign Roles
Once profiles are connected, invite the right team members to each Space and assign the appropriate role.
Owner: Owners who need full access across all Spaces and billing.
Admin: Account managers responsible for one client's Space: no billing access.
Regular User: Content creators or community managers with limited access.
You can create a user group and assign one or more permissions to multiple people at once. Next time, you just need to add a new user to that user group, and the new user will automatically inherit the permissions.
Owners can access all Spaces and billing by default. If you are inviting a client contact, give them Admin access (limited to their Space) rather than Owner access.
Step 4: Internal Collaboration
Agencies can manage internal collaboration in two ways, depending on how their team likes to work.
Using calendar events:
Teams can use them to plan content, assign work, and collaborate internally on upcoming campaigns and publishing schedules. This helps everyone stay aligned on responsibilities and deadlines in one shared place.

Using MCP-supported AI tools:
Statusbrew integrates with MCP-supported tools such as Claude, ChatGPT, Gemini, Grok, and Copilot Studio, so you can manage publishing, approvals, calendars, tags, and analytics through natural conversation. This is useful for teams that want to create, plan, and schedule content faster by integrating their AI workflow with Statusbrew.
Step 5: Set Up Client-Facing Workflows
Once profiles are connected and your team is in place, there are 4 ways to bring clients into the workflow without giving them full access to Statusbrew.

Content approval:
Use Approval Workflows to route posts through a review process before they go live. You can add clients as External Approvers at any step. They receive a secure email link to approve or reject content without needing a Statusbrew login or paid seat. Available on Agency, Premium, and Enterprise plans.
Calendar sharing:
Share a Planner board or calendar view with clients via a secure link. They can view scheduled content, leave comments on posts, and see published post insights without needing a login. You can set an expiry date and restrict access to the invited emails only.
Client’s own dashboard:
Your client gets a dedicated dashboard where they can review shared calendars, approve content, and suggest feedback. They just need to log in external.statusbrew.com to see everything shared with them, including posts waiting for approval, in one place.
Report sharing:
Generate a shareable link for any reporting dashboard and send it to your client. They get a live, view-only version of the report in their browser. Set an expiry date for added security.
Step 6: Organize Profiles into Profile Groups (Optional)
Within each client Space, you can group profiles together using Profile Groups. For a client managing Facebook, Instagram, and Google My Business, you might create a single group called "All Profiles" to run reports and schedule content across all three at once.
You can also use Profile Groups to control team member access: granting permissions at the group level instead of profile by profile.
FAQs
Can I manage all my clients from one screen without switching Spaces?
Not if you are using separate Spaces. Each Space is intentionally isolated, and you switch between them using the Space switcher in the left sidebar.
If you prefer a single-Space setup, you can connect all client profiles to one Space and use Profile Groups to organize them by client. Name each group after the client (e.g., "Client A") and use those groups to filter publishing, reporting, and engagement. This trades data isolation for convenience, so it works best for smaller agencies where strict data separation is not a requirement.
Can the same social profile be connected to two different client Spaces?
No. A social profile can only be connected to one Space at a time. If you need to move a profile to a different Space, remove it from the current Space first, then reconnect it to the new one.
What happens if the team member who connected a profile leaves?
The profile stays connected. It does not disconnect when the user who added it is removed. You may need to reauthenticate the profile eventually (tokens expire over time), but the connection itself remains intact.
Can I let a client connect their own social profiles?
Yes, two ways.
Option A: Give them Admin access to their Space. They log in to Statusbrew and connect profiles directly from Settings > Profiles. Keep in mind that Admins can also remove or reauthenticate any profile in that Space, so only use this for contacts you trust to manage their own profiles.
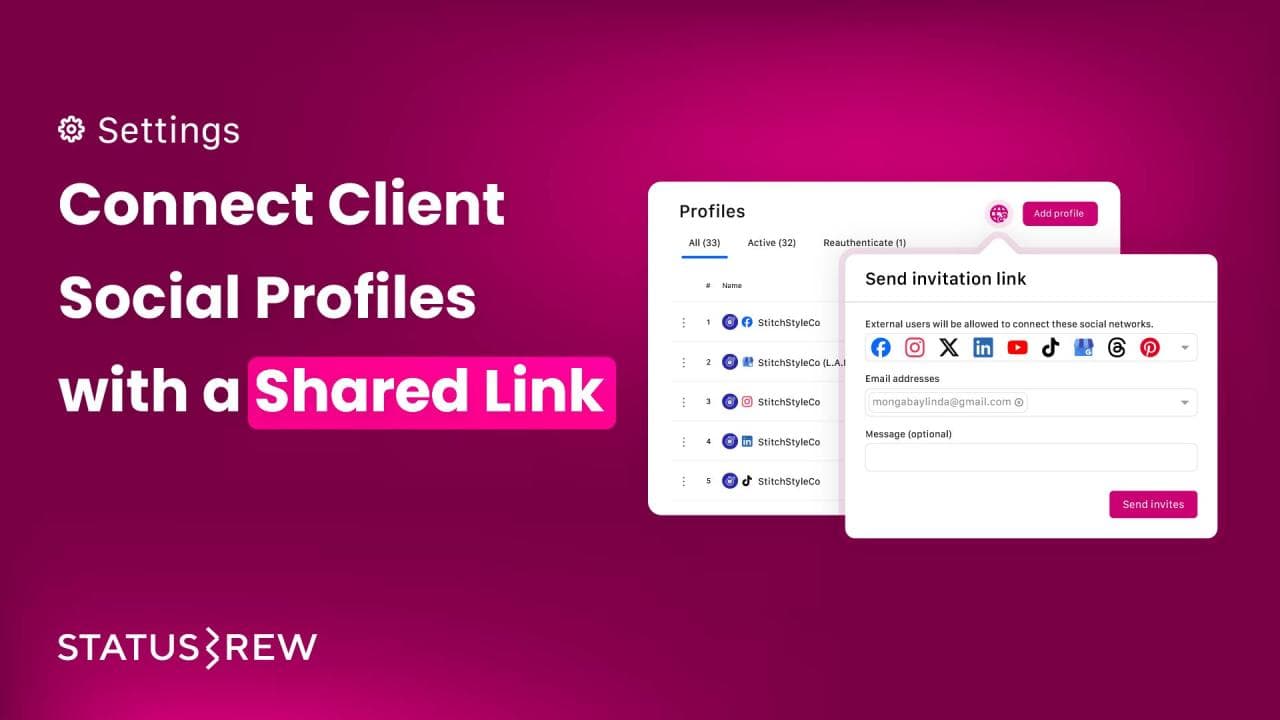
Option B: Generate a Shared Link. This lets a client authorize and connect their profiles without being added to your workspace or sharing their passwords.
Go to Settings > Profiles, click the Globe icon next to Add profile, and create a new link.
Choose which networks they can connect to, enter their email address, and send the invite. Once they authorize, the profiles appear in your Space immediately. You can also use the same link to ask a client to reauthenticate an expired profile.
Do I need a separate Statusbrew account for each client?
No. One Statusbrew account handles all clients through Spaces. You only need multiple organizations (separate accounts) if clients require completely separate billing entities.
How many profiles can I connect per client Space?
This depends on your plan. Your total profile limit is shared across all Spaces in your organization. If you hit the limit, you will need to upgrade your plan or remove an existing profile before adding a new one.
Can I use Profile Groups instead of separate Spaces for my clients?
You can, but it is not recommended for multi-client agencies. Profile Groups organize profiles within a Space, but they do not isolate data the way Spaces do. Clients sharing a Space can potentially see each other's conversations and content unless access is carefully restricted. Separate Spaces eliminates this risk entirely.
Is there any custom pricing plan for brands or agencies managing multiple clients or profiles?
If you are an agency or brand managing multiple social channels or profiles, Statusbrew offers custom pricing based on the number of profiles you plan to manage and the total number of users. To get exact pricing, share your profile count and team size with the Statusbrew team.
What is the best way to share a calendar with a client?
The best way is to add the client as an external user to your approval workflow, and then ensure that the same workflow is selected when scheduling the posts. This allows the client to properly review and approve content.
The client can then go to external.statusbrew.com, verify their email address, and access all posts pending their approval, along with any calendars and reports shared with them. This is the easiest option when the client needs to regularly review, comment on, or approve content.
Another way is to create a Shared Link for the calendar. This lets clients view scheduled content and leave comments without needing a Statusbrew account or an extra paid seat. You can create it from Publish → Calendar (board) → Share Link → Create new link and customize the title, date range, time zone, and recipients.
Learn more about approval workflows .